Welcome to DS210 B1 (Fall 2025)!
About this site
This site contains a complete set of resources and links for DS210 B1 for Fall 2025.
How the material works
Before lecture
- Ahead of each lecture, check the schedule for the reading associated with the next lecture and read it over (we will be moving quickly through the "lecture" part of each class so pre-reading is key).
- Complete the pre-lecture task on Gradescope - typically a quick question about the reading and/or a feedback question about the course.
During lecture
- In lecture, since we will be screens-closed for the first half each day, I will provide paper copies of key content for you to take notes on.
- In-class activities will be either paper/pencil, on gradescope, or on github classroom (URL TBD) depending on the day, and resources for those will be on this site as well.
After lecture
- A condensed version of the slides will be available on this site after the lecture under Lecture Notes.
- Homework assignments will be announced on Piazza and linked to the schedule when they are released. Due dates can be found in the schedule.
- Exam dates are on the schedule. We will have a review lecture before each exam.
Quick Links
On this site
External links
CDS 210 - Fall 2025 Syllabus
Overview
This course builds on DS110 (Python for Data Science) by expanding on programming language, systems, and algorithmic concepts introduced in the prior course. The course begins by exploring the different types of programming languages and introducing students to important systems level concepts such as computer architecture, compilers, file systems, and using the command line. It then moves to introducing a high performance language (Rust) and how to use it to implement a number of fundamental CS data structures and algorithms (lists, queues, trees, graphs etc). Then it covers how to use Rust in conjunction with external libraries to perform data manipulation and analysis.
Prerequisites: CDS 110 or equivalent
Teaching Staff
Section A1 Instructor: Thomas Gardos
Email: tgardos@bu.edu
Office hours: Tuesdays, 3:30-4:45pm @ CCDS 1623
Section B1 Instructor: Lauren Wheelock
Email: laurenbw@bu.edu
Office hours: Wed 2:30-4:00 @ CCDS 1506
Coffee slots: Fri 2:30-3:30 @ CCDS 1506
If you want to meet but cannot make office hours, send a private note on Piazza with at least 2 suggestions for times that you are available, and we will find a time to meet.
| Teaching Assistants | Course Assistants |
|---|---|
| TA: Zach Gentile Email: zgentile@bu.edu Office Hours: Mondays, 1:20-3:20pm | CA: Ting-Hung Jen Email: allen027@bu.edu Office Hours: Fridays 3:30-5:30 |
| TA: Joey Russoniello Email: jmrusso@bu.edu Office Hours: Thursdays, 10am-12 noon | CA: Matt Morris Email: mattmorr@bu.edu Office Hours: Mon/Wed 2:30-3:30 |
| TA: Emir Tali Email: etali@bu.edu Office Hours: Wednesdays, 11:30am - 1:30pm | CA: Pratik Tribhuwan Email: pratikrt@bu.edu Office Hours: Wednesdays 11:30-1:30 |
| CA: Ava Yip Email: avayip@bu.edu Office Hours: Tuesdays 3:45-5:45 |
Lectures and Discussions
A1 Lecture: Tuesdays, Thursdays 2:00pm-3:15pm (LAW AUD)
Section A Discussions (Wednesdays, 50 min):
- A2: 12:20pm – 1:10pm, SAR 300, (led by Zach)
- 3: 1:25pm – 2:15pm, IEC B10, (led by Zach)
- A4: 2:30pm – 3:20pm CGS 311, (led by Emir)
- A5: 3:35pm – 4:25pm CGS 315, (led by Emir)
B1 Lecture: Mondays, Wednesdays, Fridays 12:20pm-1:10pm (WED 130)
Section B Discussions (Fridays, 50 min):
- B2: Tue 11:00am – 11:50 (listed 12:15pm), 111 Cummington St MCS B37 (led by Joey)
- B3: Tue 12:30pm – 1:20 (listed 1:45pm), 3 Cummington Mall PRB 148 (led by Joey)
B4: Tue 2:00pm – 2:50pm (listed 3:15pm), 665 Comm Ave CDS 164B5: Tue 3:30pm – 4:20 (listed 4:45pm), 111 Cummington St MCS B31
Note: Discussion sections B4 and B5 are cancelled because of low enrollment. Please re-enroll in B2 or B3 if you were previously enrolled in B4 or B5.
Note: There are two sections of this course, they cover the same material and share a piazza and course staff but the discussion sections and grading portals are different. These are not interchangeable, you must attend the lecture and discussion sessions for your section!
Course Websites
-
Piazza
- Lecture Recordings
- Announcements and additional information
- Questions and discussions
-
Course Notes (https://ds210-fa25-private.github.io/):
- Syllabus (this document)
- Interactive lecture notes
-
Gradescope
- Homework, project, project proposal submissions
- Gradebook
-
GitHub Classroom: URL TBD
Course Content Overview
- Part 1: Foundations (command line, git) & Rust Basics (Weeks 1-3)
- Part 2: Core Rust Concepts & Data Structures (Weeks 4-5)
- Midterm 1 (~Week 5)
- Part 3: Advanced Rust & Algorithms (Weeks 6-10)
- Midterm 2 (~Week 10)
- Part 4: Data Structures and Algorithms (~Weeks 11-12)
- Part 5: Data Science & Rust in Practice (~Weeks 13-14)
- Final exam during exam week
For a complete list of modules and topics that will be kept up-to-date as we go through the term, see Lecture Schedule (MWF) and Lecture Schedule (TTH).
Course Format
Lectures will involve extensive hands-on practice. Each class includes:
- Interactive presentations of new concepts
- Small-group exercises and problem-solving activities
- Discussion and Q&A
Because of this active format, regular attendance and participation is important and counts for a significant portion of your grade (15%).
Discussions will review lecture material, provide homework support, and will adapt over the semester to the needs of the class. We will not take attendance but our TAs make this a great resource!
Pre-work will be assigned before most lectures to prepare you for in-class activities. These typically include readings plus a short ungraded quiz. We will also periodically ask for feedback and reflections on the course between lectures.
Homeworks will be assigned roughly weekly at first, and there will be longer two-week assignments later, reflecting the growing complexity of the material.
Exams Two midterms and a cumulative final exam covering theory and short hand-coding problems (which we will practice in class!)
The course emphasizes learning through practice, with opportunities for corrections and growth after receiving feedback on assignments and exams.
Course Policies
Grading Calculations
Your grade will be determined as:
- 15% homeworks (~9 assignments)
- 20% midterm 1
- 20% midterm 2
- 25% final exam
- 15% in-class activities
- 5% pre-work and surveys
I will use the standard map from numeric grades to letter grades (>=93 is A, >=90 is A-, etc). For the midterm and final, we may add a fixed number of "free" points to everyone uniformly to effectively curve the exam at our discretion - this will never result in a lower grade for anyone.
We will use gradescope to track grades over the course of the semester, which you can verify at any time and use to compute your current grade in the course for yourself.
Homeworks
Homework assignments will be submitted by uploading them to GitHub Classroom. Since it may be possible to rely on genAI tools to do these assignments, against the course policy, our grading emphasizes development process and coding best practices in addition to technical correctness.
Typically, 1/3 of the homework score will be for correctness (computed by automated tests for coding assignments), 1/3 for documenting of your process (sufficient commit history and comments), and 1/3 for communication and best practices, which can be attained by replying to and incorporating feedback given by the CAs and TAs on your work.
Exams
The final will be during exam week, date and location TBD. The two midterms will be in class during normal lecture time.
If you have a valid conflict with a test date, you must tell me as soon as you are aware, and with a minimum of one week notice (unless there are extenuating circumstances) so we can arrange a make-up test.
If you need accommodations for exams, schedule them with the Testing Center as soon as exam dates are firm. See below for more about accommodations.
Deadlines and late work
Homeworks will be due on the date specified in gradescope/github classroom.
If your work is up to 48-hours late, you can still qualify for up to 80% credit for the assignment. After 48 hours, late work will not be accepted unless you have made prior arrangements due to extraordinary circumstances.
Collaboration
You are free to discuss problems and approaches with other students but must do your own writeup. If a significant portion of your solution is derived from someone else's work (your classmate, a website, a book, etc), you must cite that source in your writeup. You will not be penalized for using outside sources as long as you cite them appropriately.
You must also understand your solution well enough to be able to explain it if asked.
Academic honesty
You must adhere to BU's Academic Conduct Code at all times. Please be sure to read it here. In particular: cheating on an exam, passing off another student's work as your own, or plagiarism of writing or code are grounds for a grade reduction in the course and referral to BU's Academic Conduct Committee. If you have any questions about the policy, please send me a private Piazza note immediately, before taking an action that might be a violation.
AI use policy
You are allowed to use GenAI (e.g., ChatGPT, GitHub Copilot, etc) to help you understand concepts, debug your code, or generate ideas. You should understand that this may may help or impede your learning depending on how you use it.
If you use GenAI for an assignment, you must cite what you used and how you used it (for brainstorming, autocomplete, generating comments, fixing specific bugs, etc.). You must understand the solution well enough to explain it during a small group or discussion in class.
Your professor and TAs/CAs are happy to help you write and debug your own code during office hours, but we will not help you understand or debug code that generated by AI.
For more information see the CDS policy on GenAI.
Attendance and participation
Since a large component of your learning will come from in-class activities and discussions, attendance and participation are essential and account for 15% of your grade.
Attendance will be taken in lecture through Piazza polls which will open at various points during the lecture. Understanding that illness and conflicts arise, up to 4 absences are considered excused and will not affect your attendance grade.
In most lectures, there will be time for small-group exercises, either on paper or using github. To receive participation credit on these occasions, you must identify yourself on paper or in the repo along with a submission. These submissions will not be graded for accuracy, just for good-faith effort.
Occasionally, I may ask for volunteers, or I may call randomly upon students or groups to answer questions or present problems during class. You will be credited for participation.
Absences
This course follows BU's policy on religious observance. Otherwise, it is generally expected that students attend lectures and discussion sections. If you cannot attend classes for a while, please let me know as soon as possible. If you miss a lecture, please review the lecture notes and lecture recording. If I cannot teach in person, I will send a Piazza announcement with instructions.
Accommodations
If you need accommodations, let me know as soon as possible. You have the right to have your needs met, and the sooner you let me know, the sooner I can make arrangements to support you.
This course follows all BU policies regarding accommodations for students with documented disabilities. If you are a student with a disability or believe you might have a disability that requires accommodations, please contact the Office for Disability Services (ODS) at (617) 353-3658 or access@bu.edu to coordinate accommodation requests.
If you require accommodations for exams, please schedule that at the BU testing center as soon as the exam date is set.
Re-grading
You have the right to request a re-grade of any homework or test. All regrade requests must be submitted using the Gradescope interface. If you request a re-grade for a portion of an assignment, then we may review the entire assignment, not just the part in question. This may potentially result in a lower grade.
Corrections
You are welcome to submit corrections on homework assignments or the midterms. This is an opportunity to take the feedback you have received, reflect on it, and then demonstrate growth. Corrections involve submitting an updated version of the assignment or test alongside the following reflections:
- A clear explanation of the mistake
- What misconception(s) led to it
- An explanation of the correction
- What you now understand that you didn't before
After receiving grades back, you will have one week to submit corrections. You can only submit corrections on a good faith attempt at the initial submission (not to make up for a missed assignment).
Satisfying this criteria completely for any particular problem will earn you back 50% of the points you originally lost (no partial credit).
Oral re-exams (Section B only)
In Section B, we will provide you with a topic breakdown of your midterm exams into a few major topics. After receiving your midterm grade, you may choose to do an oral re-exam on one of the topics you struggled with by scheduling an appointment with Prof. Wheelock. This will involve a short (~10 minute) oral exam where you will be asked to explain concepts and write code on a whiteboard. This score will replace your original score on the topic, with a cap of 90% on that topic.
MWF Lecture, HW, and Exam Schedule
Everything in this table that occurs in the future is subject to change. Please check the readings before each lecture. Homework and exam dates should be stable - we will make a clear announcement if they need to be changed.
This table is wide so you might need to scroll to the right to see all columns.
| Date | Lecture | HW and Exams | Topic | Pre-lecture Reading | In-class Activity |
|---|---|---|---|---|---|
| Week 1: Sep 1-5 | --- | --- | --- | --- | --- |
| Sep 4 (Wed) | Lecture 1 | Course overview, Why Rust | Activity 1 | ||
| Sep 6 (Fri) | Lecture 2 | Hello Shell | Activity 2 | ||
| Week 2: Sep 8-12 | --- | --- | --- | --- | --- |
| Sep 8 (Mon) | Lecture 3 | HW1 Out (shell, git) | Hello Git | Activity 3 | |
| Sep 10 (Wed) | Lecture 4 | Hello Rust | Ch 1: Getting Started | Activity 4 | |
| Sep 12 (Fri) | Lecture 5 | Guessing game | Ch 2 - STOP AT "Generating a Secret Number" | Activity 5 | |
| Week 3: Sep 15-19 | --- | --- | --- | --- | --- |
| Sep 15 (Mon) | Lecture 6 | HW1 Due HW2 Out (rust basics) | Hello VSCode and GH Classroom | Ch 2 - the rest | Activity 6 |
| Sep 17 (Wed) | Lecture 7 | Variables and types | Ch 3.1: Variables and Mutability, Ch 3.2: Data Types | Activity 7 | |
| Sep 19 (Fri) | Lecture 8 | Functions | Ch 3.3: Functions | Activity 8 | |
| Week 4: Sep 22-26 | --- | --- | --- | --- | --- |
| Sep 22 (Mon) | Lecture 9 | Control Flow | Ch 3.5: Control Flow | Activity 9 | |
| Sep 24 (Wed) | Lecture 10 | HW2 Due HW3 Out (enums, match) | Enums, match | 3 short readngs - Rust by example: Enums Ch 6.1 STARTING FROM "The Option Enum" Ch 6.2 STOP AT "How Matches Interact..." | Activity 10 |
| Sep 26 (Fri) | Lecture 11 | Error handling | Ch 9: Error Handling (through about half of 9.2) | Activity 11 | |
| Week 5: Sep 29-Oct 3 | --- | --- | --- | --- | --- |
| Sep 29 (Mon) | Lecture 12 | Review Part 1 | Rust by Example | Activity 12 | |
| Oct 1 (Wed) | Lecture 13 | Review Part 2 | (Review Lecture Notes) | Activity 13 | |
| Oct 2 (Thu) | HW3 Due | ||||
| Oct 3 (Fri) | Midterm 1 | 📚 Midterm 1 📚 | |||
| Week 6: Oct 6-10 | --- | --- | --- | --- | --- |
| Oct 6 (Mon) | Lecture 14 | Stack & Heap | |||
| Oct 8 (Wed) | Lecture 15 | Ownership & Vectors | Youtube video on ownership | ||
| Oct 10 (Fri) | Lecture 16 | HW4 Out | Borrowing & References | Ch 4.1: Intro to Ownership | |
| Week 7: Oct 13-17 | --- | --- | --- | --- | --- |
| Oct 13 (Mon) | No Class (holiday) | ||||
| Oct 14 (Tue) | Lecture 17 Monday Schedule | &mut and the Borrow Checker | Ch 4.2: References and Borrowing | ||
| Oct 15 (Wed) | Lecture 18 | Strings & Slices | Ch 8.2: Storing UTF-8 Encoded Text with Strings | ||
| Oct 17 (Fri) | Lecture 19 | Collections & Heap Data | |||
| Week 8: Oct 20-24 | --- | --- | --- | --- | --- |
| Oct 20 (Mon) | Lecture 20 | Structs & Methods | Ch 5.1: Defining and Instantiating Structs, Ch 5.3: Method Syntax | ||
| Oct 22 (Wed) | Lecture 21 | Matching structs & Review | |||
| Oct 24 (Fri) | Lecture 22 | HW4 Due HW5 Out | Generics & Type Systems | Ch 10.1: Generic Data Types | |
| Week 9: Oct 27-31 | --- | --- | --- | --- | --- |
| Oct 27 (Mon) | Lecture 23 | Traits | Ch 10.2: Traits | ||
| Oct 29 (Wed) | Lecture 24 | Lifetimes | Ch 10.3: Validating References with Lifetimes (intro) | ||
| Oct 31 (Fri) | Lecture 25 | Systems Programming | None | ||
| Week 10: Nov 3-7 | --- | --- | --- | --- | --- |
| Nov 3 (Mon) | Lecture 26 | Midterm Review | (Review Lecture Notes) | ||
| Nov 5 (Wed) | Midterm 2 | 📚 Midterm 2 📚 | |||
| Nov 7 (Fri) | Lecture 27 | HW5 Due HW6 Out | Packages, Crates, and Modules | Ch 7.1: Packages and Crates | |
| Week 11: Nov 10-14 | --- | --- | --- | --- | --- |
| Nov 10 (Mon) | Lecture 28 | Tests and Python Integration | Ch 11.1: Writing Tests | ||
| Nov 12 (Wed) | Lecture 29 | Iterators & Closures | Ch 13.1: Closures, Ch 13.2: Processing a Series of Items with Iterators | ||
| Nov 14 (Fri) | Lecture 30 | File I/O, Concurrency Overview, Scientific Computing | Ch 12.2: Reading a File, Ch 16: Fearless Concurrency (intro) | ||
| Week 12: Nov 17-21 | --- | --- | --- | --- | --- |
| Nov 17 (Mon) | Lecture 31 | Big O Notation & Algorithmic Complexity | Algorithms Complexity (MIT OpenCourseWare), Big-O Notation (Python DS Ch 2) | ||
| Nov 19 (Wed) | Lecture 32 | Algorithm Design: Comparing Sorting Algorithms | Sorting and Searching (Python DS Ch 5: Merge Sort, Quick Sort), Sorting Algorithms | ||
| Nov 21 (Fri) | Lecture 33 | HW6 Due HW7 Out | Linear Data Structures | Basic Data Structures (Python DS Ch 3: Stacks, Queues, Deques), Stack & Queue in Rust | |
| Week 13: Nov 24-28 | --- | --- | --- | --- | --- |
| Nov 24 (Mon) | Lecture 34 | Priority Queues & Heaps | Binary Heaps (Python DS Ch 6: Binary Heaps), Heap Data Structure (HackerRank) | ||
| Nov 26 (Wed) | No Class (Thanksgiving) | ||||
| Week 14: Dec 1-5 | --- | --- | --- | --- | --- |
| Dec 1 (Mon) | Lecture 35 | Trees & Binary Search Trees | Trees and Tree Algorithms (Python DS Ch 6: Trees, BST), Tree Traversals Visualized | ||
| Dec 3 (Wed) | Lecture 36 | Graph Representation & Traversals | Graphs Introduction (Python DS Ch 7: Graph Intro, BFS, DFS), Graph Theory Intro, BFS & DFS Algorithms (William Fiset) | ||
| Dec 5 (Fri) | Lecture 37 | HW7 Due | Advanced Graph Algorithms (Topological Sort and MST) | Graph Algorithms (Python DS Ch 7: Advanced topics) | |
| Week 15: Dec 8-12 | --- | --- | --- | --- | --- |
| Dec 8 (Mon) | Lecture 38 | Shortest Paths & Dijkstra's Algorithm | Shortest Path Problems (Python DS Ch 7: Dijkstra), Dijkstra's Algorithm (Computerphile) | ||
| Dec 10 (Wed) | Final Review | Last Day of Classes | |||
| Finals Week | --- | --- | --- | --- | --- |
| TBD | 📚 Final Exam 📚 |
Lecture 1 - Welcome to DS210! (Section B)
What today will look like
- Screen-free space
Agenda
- What is this course?
- Quick introductions and logistics
- Syllabus review activity
- AI use discussion
All the material in the course will be in the service of at least one of:
- Code development skills - tools, collaboration, best practices
- Programming in Rust
- Systems programming (memory, performance, types)
- Data structures and algorithms (to be continued in DS 320)
But why are YOU taking it?

I just want to say - I hear you. Here's my job...
Why coding development skills matter
- Often never taught explicitly, can be tricky to self-teach
- Vitally important in "the real world", when you'll need to:
- Get out of a "detached head" state without losing your head
- Collaborate with others on code across space and time
- Work on massive codebases and data warehouses
Why Systems Programming Matters
Knowing enough to answer
- Why is my code slow?
- Why is my app crashing?
- Why did we get hacked?
Or better yet... not having to answer those questions as often!
Why data structures and algorithms?
Knowing enough to answer
- Why is my model producing weird results?
- Is there a smarter way to do this than brute-force?
- How is this ever going to scale?
And inventing whole net new ways of working with data.
Also -
- Technical interviews
- Intellectual joy
Why are we doing this in Rust?
- A second language
- A compiled language
- A systems programming language
- A modern language
- An increasingly popular language
Logistics
What have you heard about the course?
New This Semester
- Local dev and focus on development skills
- Mastery vs coverage
- In-class activities in every lecture
- Better alignment between lectures, homeworks, and exams
- Three exams, no final project
Why the shift to "active learning"?
- A meta-analysis of 225 studies found students in traditional lecture courses are 1.5 times more likely to fail compared to active learning environments.
- Active learning produces consistent effect sizes of 0.47-0.49 standard deviations, or half a letter grade improvement.
- Active learning reduces achievement gaps between underrepresented and majority students by 33-45%.
Our Teaching Staff

Two things to know about me...
- I am your advocate.
- It's us against the material
- No gotchas
- Lots of practice and review in class
- Please share feedback
- I want to know who you are (coffee slots!)
- If you are struggling, please reach out early so we can help
- I have high expectations for you.
- Grading on an absolute scale
- Less weight on homeworks, more on exams
- When you're here, you're HERE
- You CAN learn this stuff!
What this means for grading
35% course grade based on EFFORT:
- 15% homeworks
- 15% in-class activities
- 5% pre-work and surveys
65% based on MASTERY:
- 20% midterm 1
- 20% midterm 2
- 25% final exam
Lectures and Discussions
Lecture: Mondays, Wednesdays, Fridays 12:20pm-1:10pm (WED 130)
Discussion B2 - led by Joey
- Tue 11:00am – 11:50 (listed 12:15pm)
- 111 Cummington St MCS B37
Discussion B3 - led by Joey
- Tue 12:30pm – 1:20 (listed 1:45pm)
- 3 Cummington Mall PRB 148
B4 and B5 are cancelled this semester
About Section A
Section A Instructor: Thomas Gardos
- Email: tgardos@bu.edu
- Office hours: Tuesdays, 3:30-4:45pm @ CCDS 1623
Their schedule:
- Lectures are Tue / Thu 2-3:15
- Discussions are Wednesday afternoons
- Pacing may be different, so please attend B lectures and discussions!
What we share:
- Homework assignments and due dates
- Exams topics (different questions) and rough dates
- TAs and CAs
Thanks for hanging tight as we get set up!
Syllabus Review Activity (20 min)
Instructions
In groups of 2-3, spend 15 minutes answering the worksheet questions on paper.
Recap
AI use discussion (20 min)
Instructions
Think-pair-share style, each ~6-7 minutes, with wrap-up.
Form groups of 2-3 (different groups if possible!).
We're not putting this on gradescope (sorry if you filled this out on gradescope yesterday! 😅)
Round 1: Learning Impact
How might GenAI tools help your learning in this course?
How might they get in the way?
Round 2: Values & Fairness
What expectations do you have for how other students in this course will or won't use GenAI?
What expectations do you have for the teaching team so we can assess your learning fairly given easy access to these tools?
Round 3: Real Decisions
Picture yourself stuck on a challenging Rust problem at midnight with a deadline looming.
What options do you have?
What would help you make decisions you'd feel good about?
Wrap-up
By Friday
Please fill out the intro survey linked in the email and mark it complete on Gradescope.
Quick show of hands - mac/linux vs windows?
Bring your laptop and come prepared to work with the shell next class!
Lecture 2 - Hello Shell!
Intro
And the survey says...
- Cold calling
- High weight on exams, no curve
- Rust :-P
- Office hour availability
- Cancelling the project
- Regrading and corrections
- 4 "free" absenses
- AI / collaboration policy
- Late policy
- Course content changes
- Coffee slots :-)
- Oral re-exams
- No curve / grade quotas
- Homework grading approach
- Participation credit
Some FAQs
Common questions
- Exam format and content
- How I learned your names
- Where are recordings / lecture notes
- Partial credit / extra credit
- How bad til exams get a curve?
Some more points to note
- Gradescope vs GitHub Classroom
- Lecture notes for A vs B
I promise to revisit these Monday:
- Prework
- Homework and exam schedule
Motivation
What is the terminal?

What is the terminal?
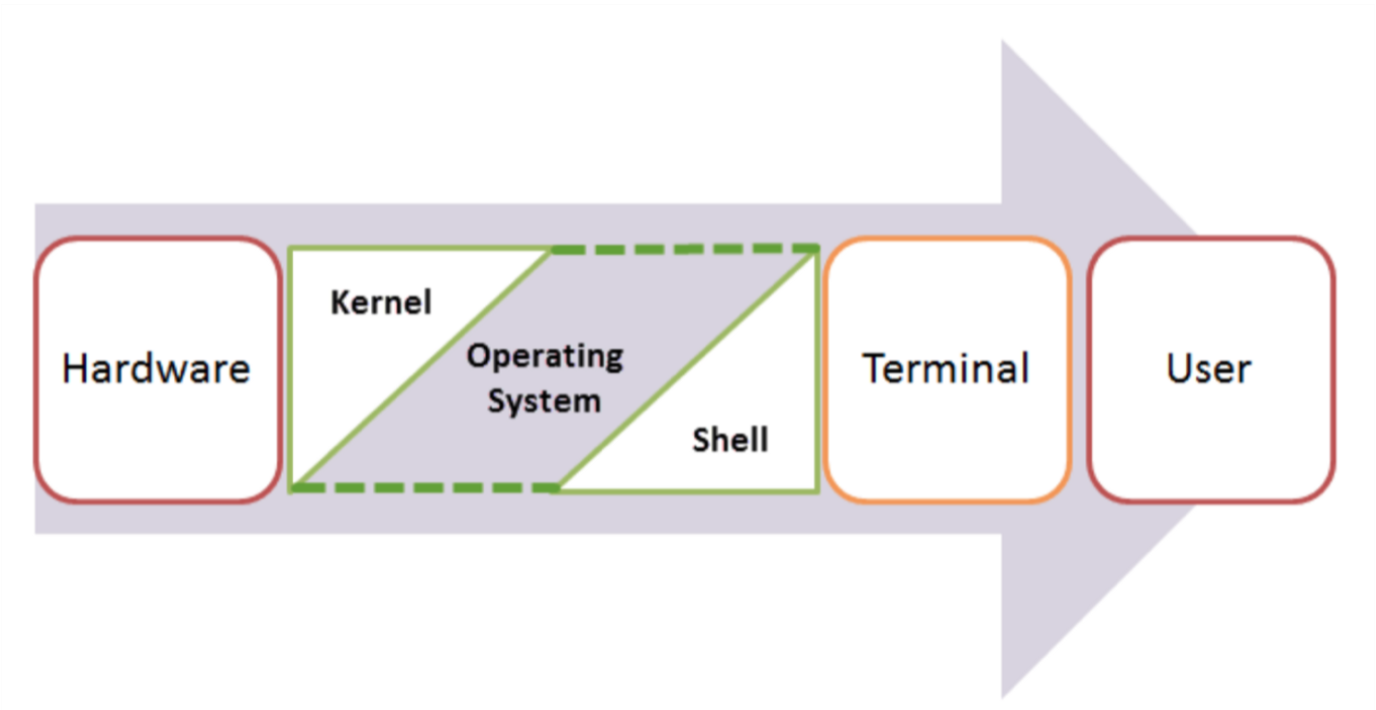
... the kitchem metaphor
Shell, Terminal, Console, Command line... and what's Bash?
- The command line is the interface where you type commands to interact with your computer.
- The command prompt is the character(s) before your cursor that signals you can type and can be configured with other reminders.
- The terminal or console is the program that opens a window and lets you interact with the shell.
- The shell is the command line interpreter that processes your commands. (You might also encounter "a command line" in text-based games)
Terminals are more like applications and shells are more like languages.
Shell, Terminal, Console, Command line... and what's Bash?
Terminals come in proper nouns:
- Terminal (macOS)
- iTerm2 (macOS)
- GNOME Terminal (Linux)
- Konsole (Linux)
- Command Prompt (Windows)
- PowerShell (Windows)
- Git Bash (Windows)
Shells also come in proper nouns:
- Bash (Bourne Again SHell) - most common on Linux and macOS
- Zsh (Z Shell) - default on modern macOS
- Fish (Friendly Interactive SHell) - user-friendly alternative
- Tcsh (TENEX C Shell) - popular on some Unix systems
- PowerShell - advanced shell for Windows
Shell, Terminal, Console, Command line... and what's Bash?
BUT they are often used interchangeably in speech:
- "Open your terminal"
- "Type this command in the shell"
- "Run this in the command line"
- "Execute this in your console"
What is this all good for?
Lightning fast navigation and action
# Quick file operations
ls *.rs                    # Find all Rust files
grep "TODO" src/*.rs       # Search for TODO comments across files
wc -l data/*.csv          # Count lines in all CSV files
- How would you to this "manually"?
It's how we're going to build and manage our rust projects
# Start your day
git pull                          # Get latest team changes
cargo test                        # Make sure everything still works
# ... code some features ...
cargo run                         # Test your new feature
git add src/main.rs               # Stage your changes
git commit -m "Add awesome feature"  # Save your work
git push                          # Share with the team
For when your UI just won't cut it
- Confused by "invisible files" and folders?
ls -la
For when your UI just won't cut it
- Need to find a file where you wrote something a while ago
grep -r "that thing I wrote 6 months ago"
- Modify lots of files at once
# Rename 500 photos at once
for file in *.jpg; do mv "$file" "vacation_$file"; done

# Delete all files older than 30 days
find . -type f -mtime +30 -delete
- "Why is my computer fan running like it's about to take off?"
df -h              # See disk space usage immediately
ps aux | grep app  # Find that app that's hogging memory
top                # Live system monitor
In other words, the command line provides:
- Speed: Much faster for repetitive tasks
- Precision: Exact control over file operations
- Automation: Commands can be scripted and repeated
- Remote work: Essential for server management
- Development workflow: Many programming tools use command-line interfaces
Learning objectives for today (TC 12:30)
By the end of this lecture, you should be able to:
- Navigate your file system on the command line
- Create, copy, move, and delete files and directories at the command line
- Interpret file permissions
- Use pipes and redirection for basic text processing
We will also discuss, but you are not responsible for:
- Customizing your shell profile with aliases and functions
- Writing simple shell scripts
![]() We'll have one of these slides every lecture and it's a great way to check in on what material you're responsible for for exams!
We'll have one of these slides every lecture and it's a great way to check in on what material you're responsible for for exams!
The file system and navigation
Everything starts at the root
Root Directory (/):
In Linux, the slash character represents the root of the entire file system.
(On a Windows machine you might see "C:" but on Linux and MacOS it is just "/".)
(We'll talk more about Windows in a minute)
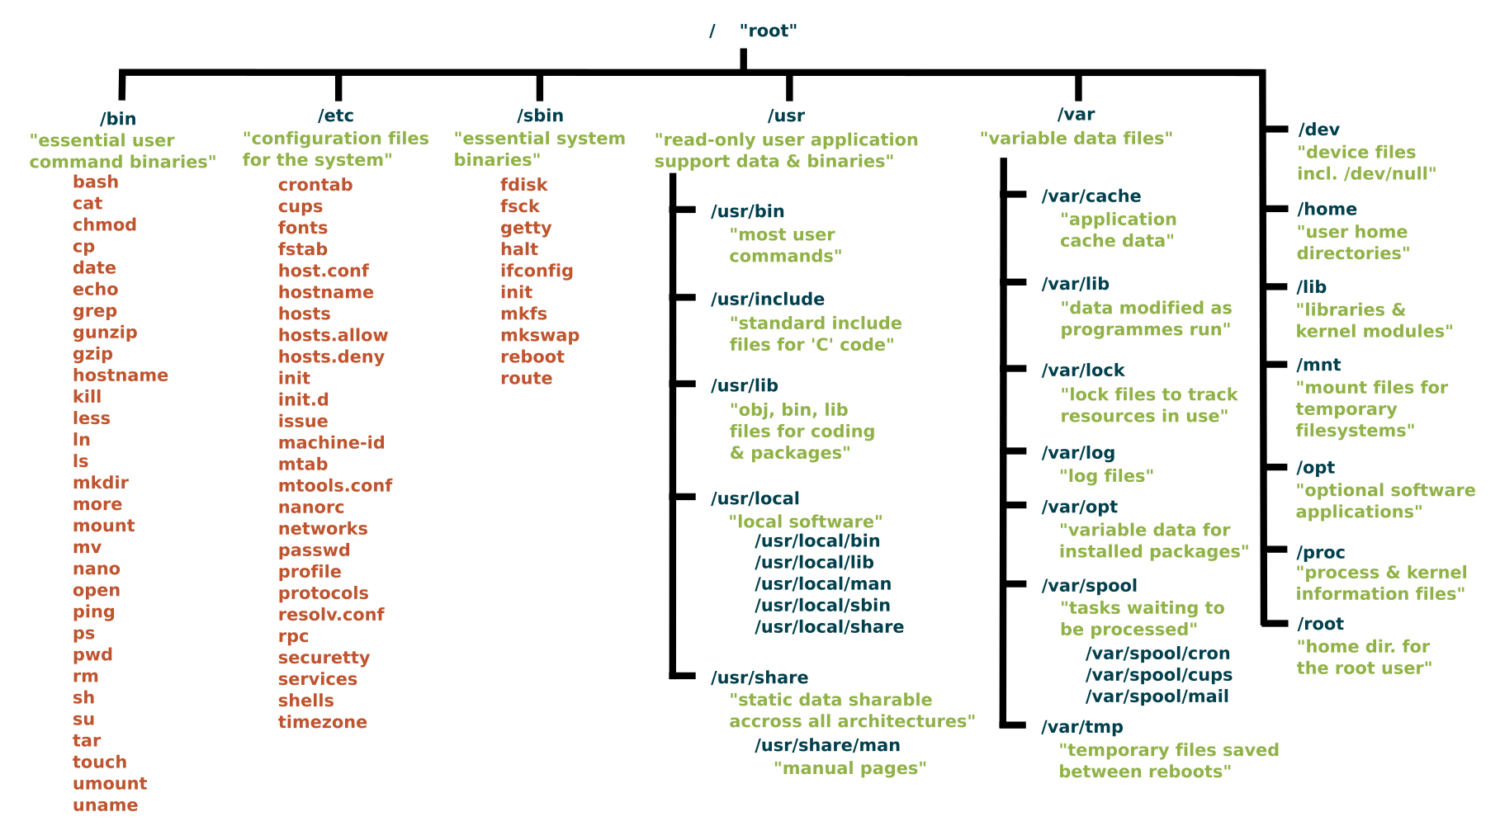
Key Directories You'll Use:
/                          # Root of entire system
├── home/                  # User home directories
│   └── username/          # Your personal space
├── usr/                   # User programs and libraries
│   ├── bin/              # User programs (like cargo, rustc)
│   └── local/            # Locally installed software
└── tmp/                  # Temporary files
Navigation Shortcuts:
~= Your home directory.= Current directory..= Parent directory/= Root directory
Let's take a look / basic navigation demo
Demo time! First let's look at the command prompt...
Maybe half of your interactions with the shell will look like:
pwd                   # Print working directory
ls                    # List files in current directory
ls -a                 # List files including hidden files
ls -al                # List files with details and hidden files
cd directory_name     # Change to directory
cd ..                 # Go up one directory
cd ~                  # Go to home directory
Tips:
- Use
Tabfor auto-completion (great for paths!) - Use
Up Arrowto access command history - Try
control-cto abort something running or clear a line - You can't click into a line to edit it, use left/right arrows (or vim, or copy-paste)
What's going on here?
The command line takes commands and arguments.
ls -la ~
The grammer is like a command in English: VERB (NOUN) ("eat", "drink water", "open door")
ls is the command, -la and ~ are arguments.
Flags / Options
Special arguemnts called "options" or "flags" usually start with a dash - and can be separate or combined. These are equivalent:
ls -la
ls -al
ls -a -l
ls -l -a
BUT they typically need to come before other arguemnts:
ls -l -a ~   # works!
ls -l ~ -a   # does not work
Let's pause for the elephant in the room
- macOS is built on Unix
- Windows is entirely different
dirinstead oflscopyandmoveinstead ofcpandmv
- We strongly recommend Windows users install a terminal with
bash(we'll do it today!) so we can speak the same language.
One thing is unavoidable: different paths
/vsC:\Users\(vote for which is a back slash!)- This incompatibility has caused more suffering than metric vs imperial units.
Essential Commands for Daily Use (TC 12:35)
Quiz time!
What do these stand for and what do they do:
pwdcdls
And
- How can you "get home quickly"?
![]() These slides make a great starting point for Anki questions!
These slides make a great starting point for Anki questions!
Reverse, reverse!
- How can you see what directory you're in?
- How can you look around to see what's in the folder?
- How can you go into one of those folders?
- How can you back out?
- How can you see hidden files?
The rest of the 80% of bash commands you will mostly ever use
Demo time!
mkdir project_name        # Create directory
mkdir -p path/to/dir      # Create nested directories
touch notes.txt        # Create empty file
echo "Hello World" > notes.txt  # Overwrite file contents
echo "It is me" >> notes.text   # Append to file content

cat filename.txt          # Display entire file
head filename.txt         # Show first 10 lines
tail filename.txt         # Show last 10 lines
less filename.txt         # View file page by page (press q to quit)
nano filename.txt          # Edit a file

cp file.txt backup.txt    # Copy file
mv old_name new_name      # Rename/move file
rm filename               # Delete file
rm -r directory_name      # Delete directory and contents
rm -rf directory_name     # Delete dir and contents without confirmation
Understanding ls -la Output
-rw-r--r-- 1 user group 1024 Jan 15 10:30 filename.txt
drwxr-xr-x 2 user group 4096 Jan 15 10:25 dirname
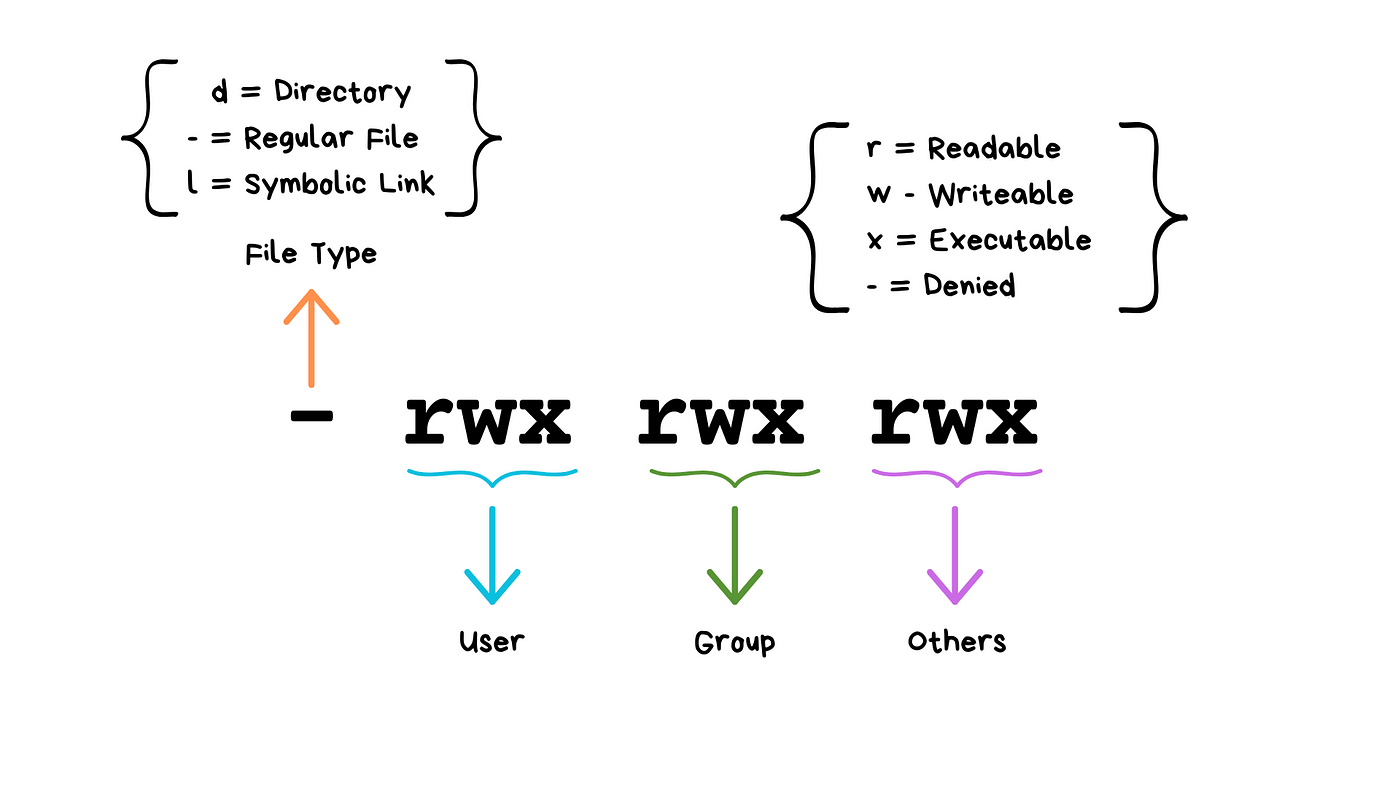
(Don't worry about "groups"!)
We will see these kinds of permissions again in Rust programming!
Common Permission Patterns
644orrw-r--r--: Files you can edit, others can read755orrwxr-xr-x: Programs you can run, others can read/run600orrw-------: Private files only you can access
(Any guesses about the numeric codes?)
Don't have permission? Don't tell anyone I told you this but...
Don't have permission? Don't tell anyone I told you this but...

- What do you think
sudostands for?
One list thing... Combining Commands with Pipes
ls | grep ".txt"          # List only .txt files
cat file.txt | head -5    # Show first 5 lines of file
ls -l | wc -l            # Count number of files in directory
Combining Commands with Pipes
More Examples:
# Find large files
ls -la | sort -k5 -nr | head -10

# Count total lines in all text files
cat *.txt | wc -l
So tell me, what's the difference...
ls -la | wc -l
ls -la > results.txt
FYI (TC 12:45 or skip)
For your awareness - Your Shell Profile
Understanding Shell Configuration Files:
Your shell reads a configuration file when it starts up. This is where you can add aliases, modify your PATH, and customize your environment.
Common Configuration Files:
- macOS (zsh):
~/.zshrc - macOS (bash):
~/.bash_profileor~/.bashrc - Linux (bash):
~/.bashrc - Windows Git Bash:
~/.bash_profile
Finding Your Configuration File:
It's in your Home directory.
# Check which shell you're using (MacOS/Linus)
echo $SHELL

# macOS with zsh
echo $HOME/.zshrc

# macOS/Linux with bash
echo $HOME/.bash_profile
echo $HOME/.bashrc
Adding aliases to you shell profile
# Edit your shell configuration file (choose the right one for your system)
nano ~/.zshrc        # macOS zsh
nano ~/.bash_profile # macOS bash or Git Bash
nano ~/.bashrc       # Linux bash

# Add these helpful aliases:
alias ll='ls -la'
alias ..='cd ..'
alias ...='cd ../..'
alias projects='cd ~/development'
alias rust-projects='cd ~/development/rust_projects'
alias grep='grep --color=auto'
alias tree='tree -C'

# Custom functions
# This will make a directory specified as the argument and change into it
mkcd() {
    mkdir -p "$1" && cd "$1"
}
Modifying your PATH
You may need to do this occasionally to make tools you install available on the command line.
# Add to your shell configuration file
export PATH="$HOME/bin:$PATH"
export PATH="$HOME/.cargo/bin:$PATH"    # For Rust tools (we'll add this later)

# For development tools
export PATH="/usr/local/bin:$PATH"
Applying Changes:
# Method 1: Reload your shell configuration
source ~/.zshrc        # For zsh
source ~/.bash_profile # For bash

# Method 2: Start a new terminal session
# Method 3: Run the command directly
exec $SHELL
Shell scripts
Shell script files typically use the extension *.sh, e.g. script.sh.
Shell script files start with a shebang line, #!/bin/bash.
#!/bin/bash

echo "Hello world!"
To execute shell script you can use the command:
source script.sh
Before it gets noisy in here... (TC 12:50)
- What does
drwxr-xr-xmean? - How can I quickly write "I'm awesome" to my
affirmations.txtfile? - How can I delete my
file_of_secrets.txtbefore the cops get here? - How can I rename my
file_of_secrets.txtso it "disappears"? - How can I find it again?
In-Class Activity: Shell Challenge
In groups of 2-3, go to https://github.com/lauren897/ds210-fa25-b and complete the challenge.
Remember to submit on gradescope (once per group)! (There's a grace period til 1:30)
Coming up -
- Monday: git and GitHub
- Releasing HW1 (exact dates TBD but we'll give at least a full week)
- We start Rust on Wednesday!
- Wednesday also starts pre-work, we'll explain more on Monday
- I'll post a coffee slot sign-up sheet tonight
- I'll have lecture notes / a site set up by Monday
Lecture 3 - Hello Git!
The problem with "manual" version control
- Storage space (due to redundancy)
- Hard to see what changes were made when
- Hard to collaborate (merge, review)
The collaboration problem
Learning Objectives
By the end of this lecture, you should be able to:
- Understand why version control is critical for programming
- Configure Git for first-time use
- Create repositories and make meaningful commits
- Connect local repositories to GitHub
- Use the basic Git workflow for individual projects
- Use the
gitcommandsclone,checkout,add,commit,push,pull,merge
Warning - this is a lot to take in at once, but we will be practicing and developing this ALL semester
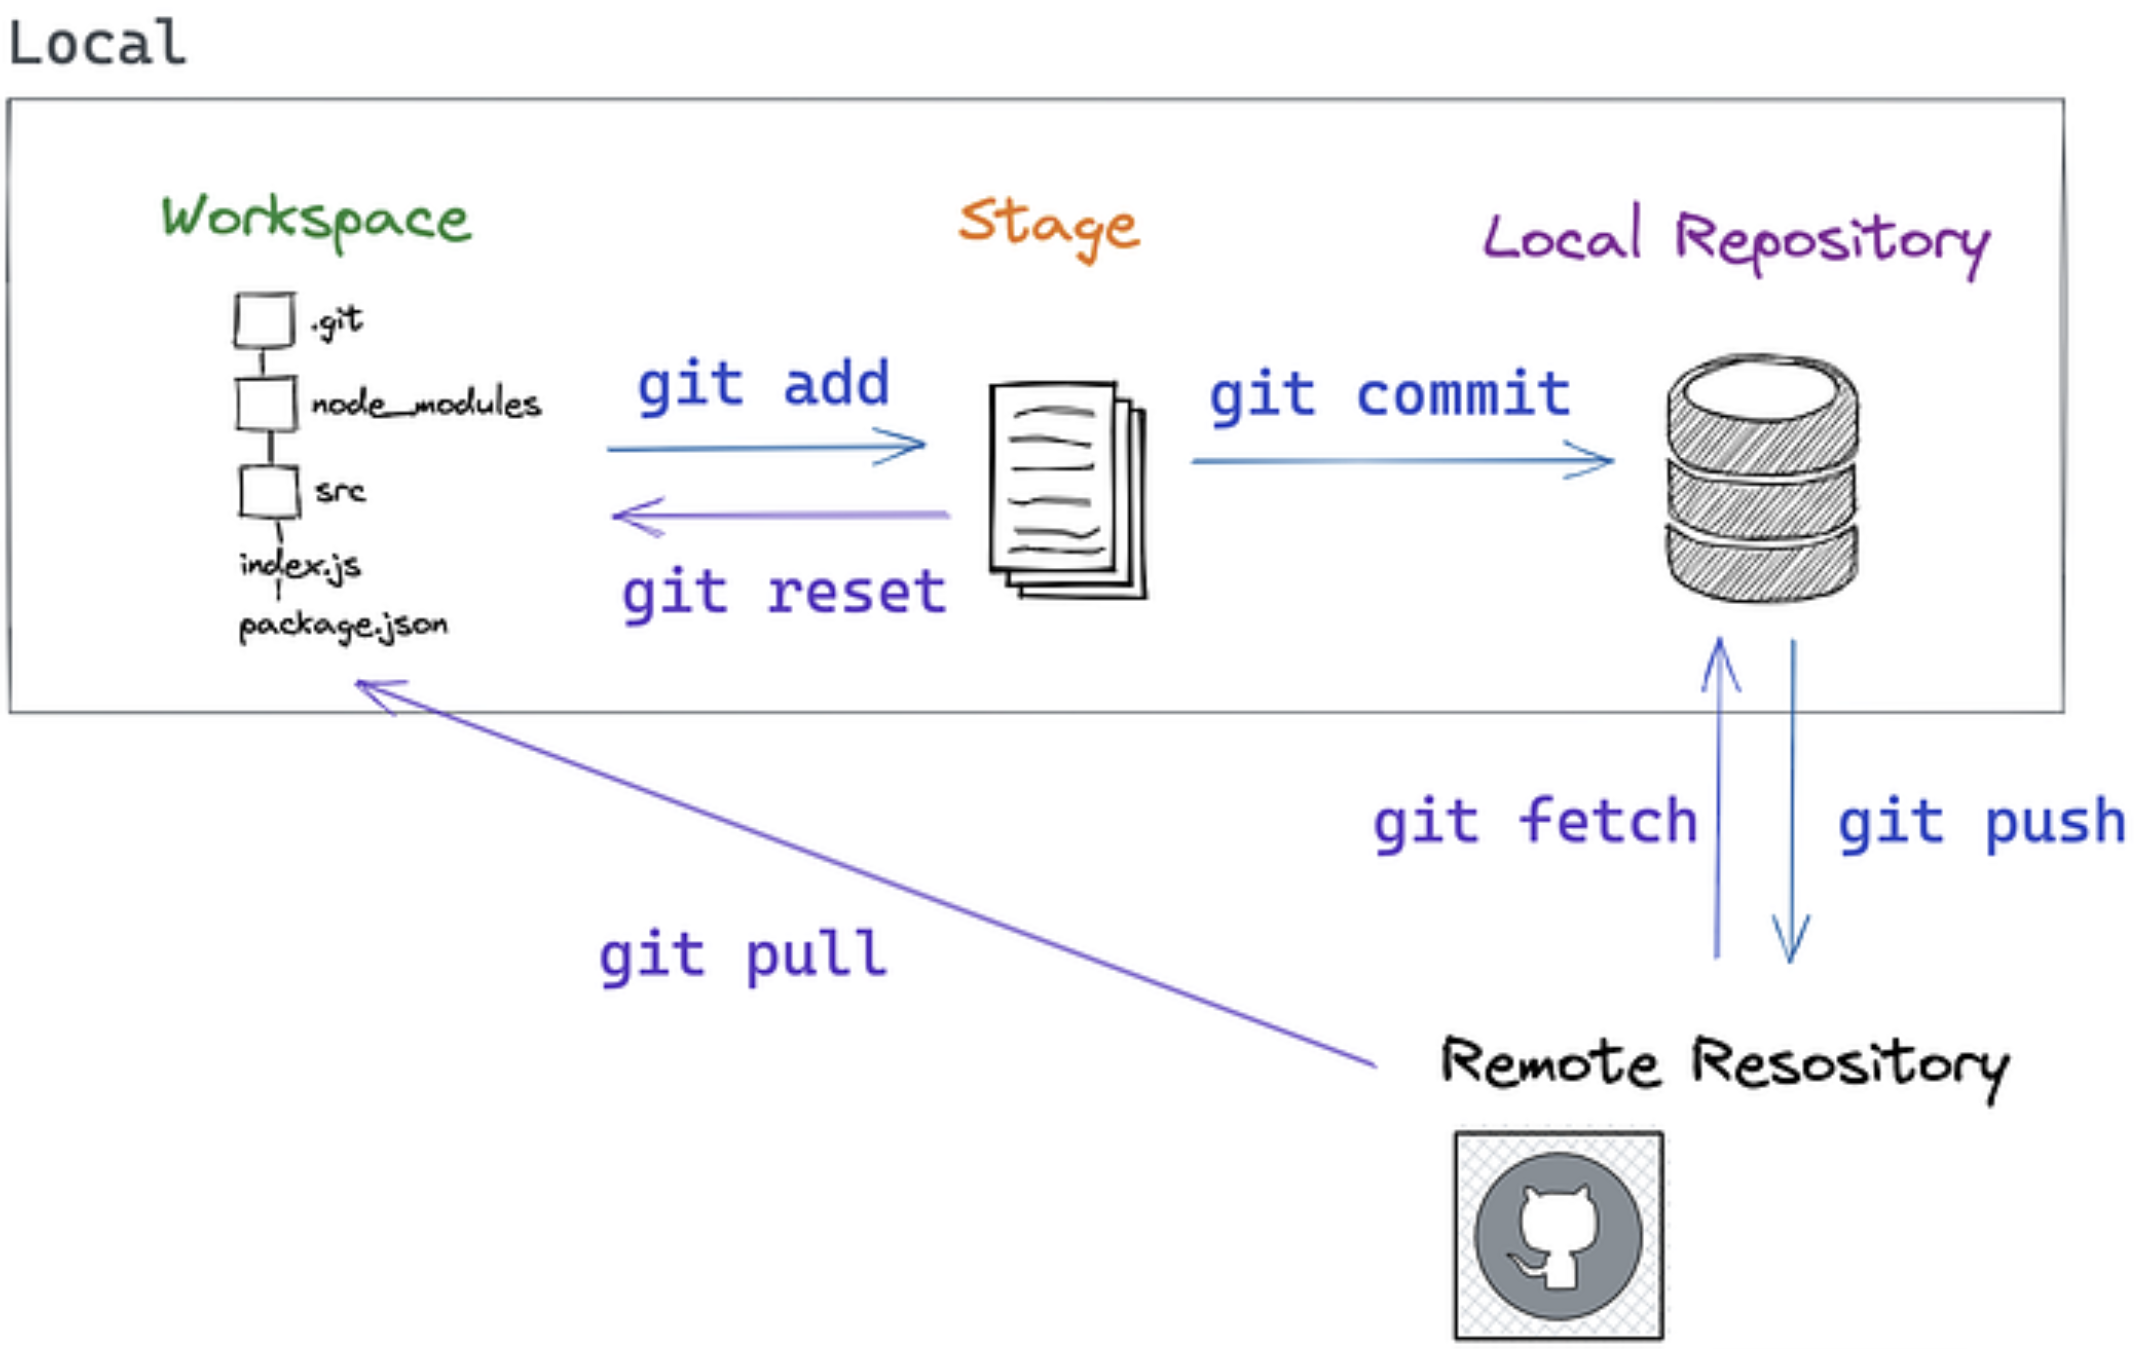
The Four (and a half) Locations
Repository (Repo): A folder tracked by Git, containing your project and its complete history.
Workspace The files on your machine right now, where we edit them
Staging Area Temporary holding spot for changes before committing
Local repository Where we store committed changes locally
Remote repository A server (like GitHub) for storing and collaborating on code
Git workflow concepts
Commit: A snapshot of your project at a specific moment, with a message explaining what changed.
Diff: The collection of specific edits in a commit. (Or generally, the differences between any two versions of a file.)
Branch: One "timeline" of commits that may diverge from other timelines
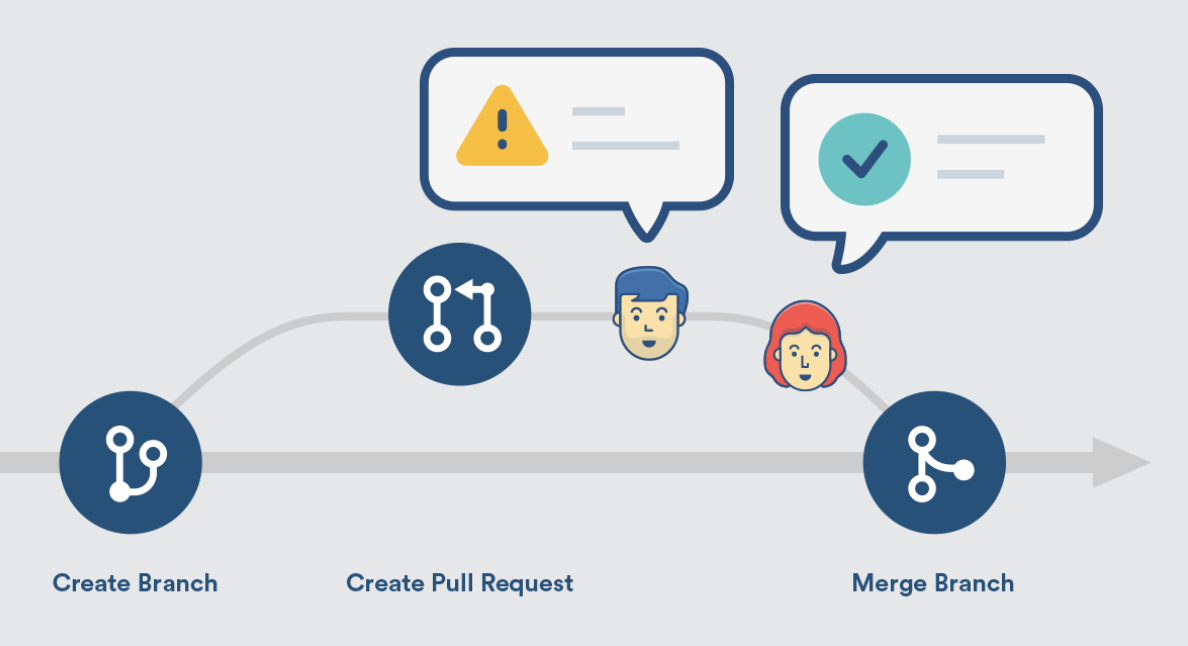
Git Workflows
Merging and Pull Requests
Merge: Combines changes from different branches. Takes commits from one branch and integrates them into another branch.
Merge Conflict: Merging may fail if both branches change the same lines. Git will point to the conflict and ask you to resolve it before finishing the merge.
Pull Request (PR): A request to merge your changes into another branch, typically used for code review. You "request" that someone "pull" your changes into the main codebase.
Git Branching
- Main branch: Usually called
main(ormasterin older repos) - Feature branches: Created for new features or bug fixes
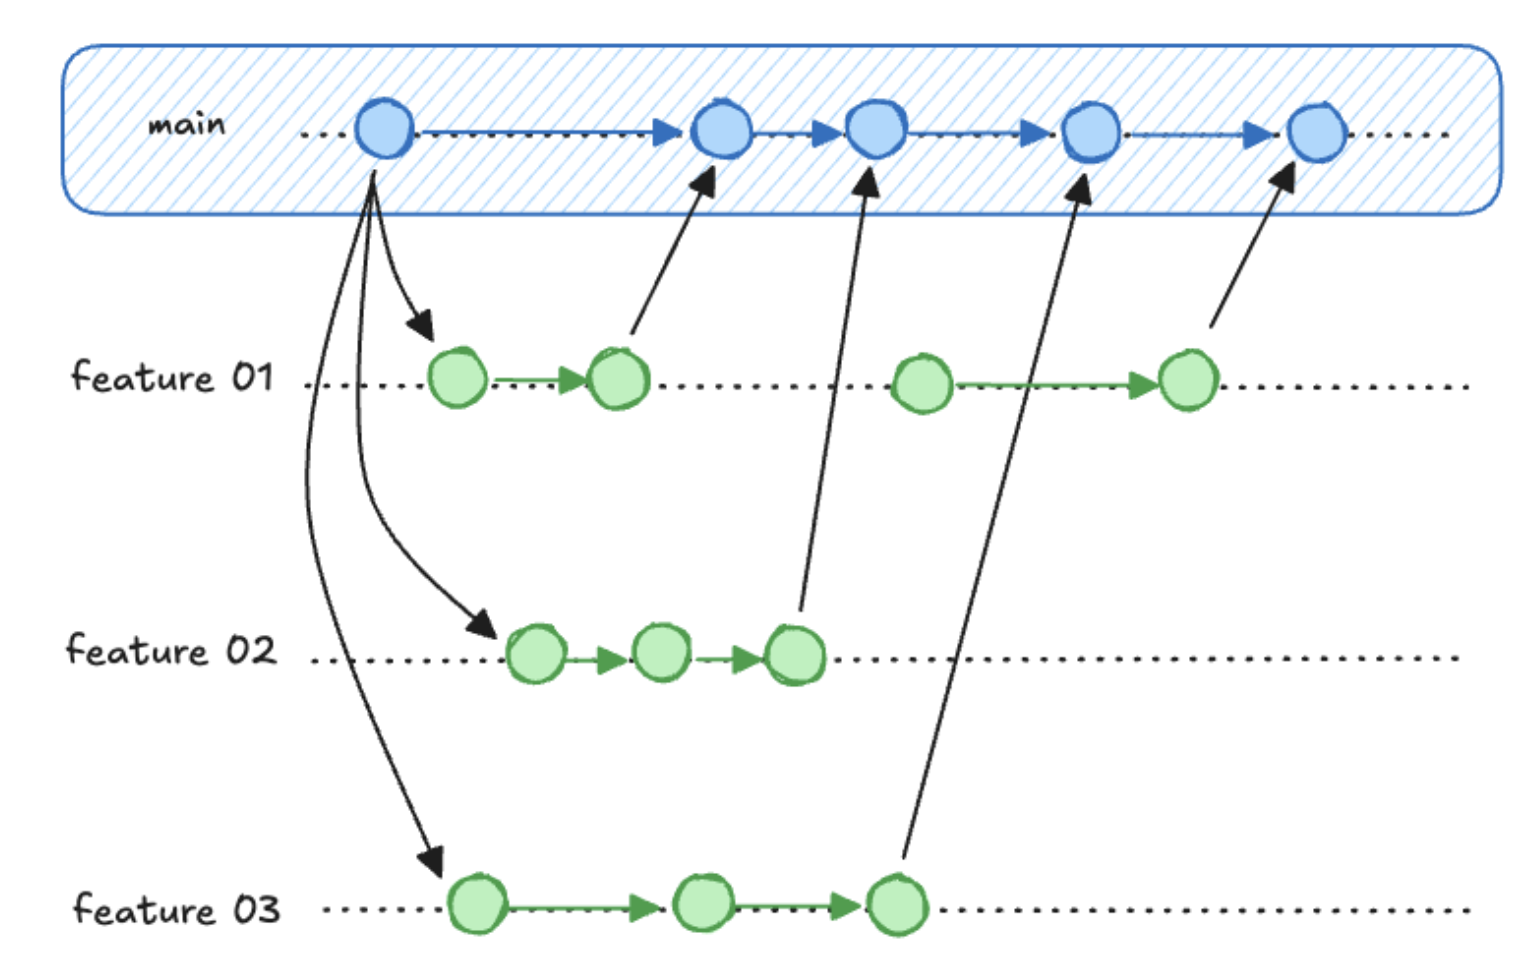
- Isolates experimental work
- Enables parallel development
- Facilitates code review
Essential Git Commands
Let's take this to the command line.
One-Time Setup
# Configure your identity (use your real name and email)
git config --global user.name "Your Full Name"
git config --global user.email "your.email@example.com"

# Set default branch name
git config --global init.defaultBranch main
Note: The community has moved away from
masteras the default branch name, but it may still be default in some installations.
Starting a New Project - Demo/Practice (shout it out)
- Where am I?
- How can I move to my projects directory?
- How can I create a new project?
- How can I move into the project?
git init- What did that do?
A note about .gitignore
Anything in your repo you DON'T want tracked in git as part of you repo can go in the .gitignore file.
latexfile.aux
.ipynb_checkpoints/
.vscode
.DS_Store
/tmp
If you ever run git add and notice it added a bunch of files you don't recognize - it's time to update your .gitignore
Daily Git Workflow
# Create a descriptive branch name for the change you want to make
git checkout -b feature_branch

# Check what's changed
git status                    # See current state

# Stage changes for commit
git add filename.rs          # Add specific file to staging
git add .                    # Add all changes in current directory

git commit -m "Add calculator function" # Commit with a comment

git checkout main # Switch back to main
git merge feature_branch # Merge branch back into main
# merge merges the branch you NAME *into* the branch you're currently ON
Writing Good Commit Messages
- Start with a present / imperative verb
- Be brief and specific
- If you find yourself using "and" a lot your commits are too big
The Golden Rule: Your commit message should complete this sentence: "If applied, this commit will [your message here]"
Good Examples:
git commit -m "Add input validation for calculator"
git commit -m "Fix division by zero error"
git commit -m "Refactor string parsing for clarity"
git commit -m "Add tests for edge cases"
Bad Examples:
git commit -m "fix a bug"        # What bug
git commit -m "fix date range bug and added multi-user feature"  # Too much at once
git commit -m "trying again"    # what are you doing differently?
Working with GitHub
Why GitHub?
- Remote backup for solo work
- Easy sharing and collaboration
- Many tools and integrations
Connecting to GitHub
You CAN create a repo locally then push it to GitHub:
git init
git remote add origin https://github.com/yourusername/repository-name.git
git push -u origin main
But you can also create it from GitHub and clone it locally - what we'll usually do
# Clone existing repository
git clone https://github.com/username/repository.git
To keep things in sync your main actions are
# Get to the repository
cd repository

# Pull any changes from GitHub
git pull

# Push your commits to GitHub
git push # you'll be prompted at this point to log into github in your terminal
Git, GitHub, and shell together - Demo
# Creating a new repo
cd ~/ds210/assignments
mkdir assignment_01
cd assignment_01
git init

# Make a branch
git checkout -b problem1

# Make initial commit
touch README.md
echo "# Assignment 1" > README.md
git add README.md
git commit -m "Initial project setup for Assignment 1"

# Work and commit frequently
# ... write some code ...
mkdir src
touch src/main.rs
echo "some rust code" > src/main.rs
git add src/main.rs
git commit -m "Implement basic data structure"

# Merge back to the main branch
git checkout main
git merge problem1

# Push changes to GitHub
git remote add origin https://github.com/yourusername/repository-name.git
git push -u origin main
git push
Common Git Scenarios
"I made a mistake in my last commit message"
git commit --amend -m "Corrected commit message"
I want to undo a git add
git reset
"I want to undo changes I haven't committed yet"
git checkout -- filename.rs    # Undo changes to specific file
git reset --hard               # Undo ALL uncommitted changes (CAREFUL!)
I want to do something else
git log    # shows commit history
git branch # shows available branches
git rebase # is an alternative to merge
git fetch  # is like git pull but doesn't include a merge
Search and stack overflow are you friends here!
Resources for learning more and practicing
- Interactive online Git tutorial that goes a bit deeper: https://learngitbranching.js.org/
- A downloadable app with tutorials and challenges: https://github.com/jlord/git-it-electron
- Another good tutorial (examples in ruby): https://gitimmersion.com/
- Pro Git book (free online): https://git-scm.com/book/en/v2
Lecture 4 - Hello Rust!
Quick pulse check
- Who got Rust installed?
- Is anyone STILL having github authentication issues?
- How were the discussions yesterday?
- On gradescope / grade tracking and updates
How this feels is both normal and not normal
- What's a SNAFU?
So what's going well?
Think-Pair-Share
- Something you figured out after being frustrated
- A time you were able to help someone else
- An aha moment
- That you keep showing up
Rust

Learning objectives
By the end of class today you should be able to:
- Explain what a compiler and a compiled language is
- Write a simple "hello world" Rust program wiht proper syntax (
fn, brackets) - Use
rustcandcargoto compile and run Rust programs - Decide when to use mutable or immutable variables in Rust
Rust in three concepts
- Compiled
- Type-safe
- Memory-safe
What is a compiler?
What is a compiled langauge vs an interpreted one?
What is type-safety?
What is memory-safety?
Comparing to Python
R v P - Basic function writing
fn main() {
    println!("Hello, world!");
}
Key differences from Python:
fnkeyword for functions (what was it for python?)- Braces
{}for code blocks (...?) - Semicolons
;end statements (...?) println!is a macro (the!means macro) - more on this later
R v P - Variables, types, and mutability
fn main() {
    let x = 5;          // immutable by default
    let mut y = 10;     // mut makes it mutable
    y = 15;             // this works
    // x = 6;           // this would error!
    // y = "today"     // this would also error!

    println!("x is {}, y is {}", x, y);
}
Key differences from Python:
- Python: everything mutable by default
- Rust: immutable by default with unchangable types
R vs P Ownership and memory safety
import pandas as pd

def clean_data(df):
    df['score'] = df['score'] * 2  # Double all scores
    return df

# Original data
grades = pd.DataFrame({'name': ['Alice', 'Bob'], 'score': [85, 92]})
print("Original:", grades['score'].tolist())  # [85, 92]

# Clean the data
cleaned = clean_data(grades)
print("Cleaned:", cleaned['score'].tolist())   # [170, 184]

# Wait... what happened to our original data?
print("Original:", grades['score'].tolist())   # [170, 184] - Changed!
In Rust
#![allow(unused)]
fn main() {
// Option 1: Take ownership (original data moves, can't use it anymore)
fn clean_data_move(mut scores: Vec<i32>) -> Vec<i32> {
    for score in &mut scores {
        *score *= 2;
    }
    scores  // Returns modified data, original is gone
}

// Option 2: Borrow mutably (explicitly allows changes)
fn clean_data_borrow(scores: &mut Vec<i32>) {
    for score in scores {
        *score *= 2;
    }
    // Original data is modified, but you were explicit about it
}
}
Key differences from Python:
- Python: unclear when a variable might be changed -> unexpected behavior
- Rust: data moves are alwyas explicit
Compiling and running
Python: One Step (Interpreted)
python hello.py
- Python reads your code line by line and executes it immediately
- No separate compilation step needed
Rust: Two Steps (Compiled)
# Step 1: Compile (translate to machine code)
rustc hello.rs

# Step 2: Run the executable
./hello
rustcis your compilerrustctranslates your entire program to machine code- Then you run the executable (why
./?)
Rust with Cargo (two-in-one)
# Set-up steps (one time)
cargo new my_project
cd my_project

# Build and run (compiles automatically)
cargo run
- Cargo uses
rustcunder the hood
Activity
Some reminders before we look at solutions together
- Pre-work for Friday
- I have office hours today
- Homework due Monday
- Citing solutions vs breadcrumbs
Let's look at some solutions
Lecture 5 - Guessing Game Part 1
Overview of today and Monday
- Today: Part 1, in the terminal
- Monday: Part 2, in VSCode
Learning objectives
By the end of class today you should be able to:
- Use basic
cargocommands to create projects and compile rust code - Add external dependencies to a project
- Handle Rust's
Resulttype with.expect() - Recognize common Rust compilation errors
Live guessing game demo
![]() I might suggest drawing a diagram of the folder structure as we explore
I might suggest drawing a diagram of the folder structure as we explore
Key/new(ish) commands from the demo
cargo new guessing_game


nano Cargo.toml


open . # explorer . on Windows


cargo run


cargo build


cargo check


cargo run --release


./target/debug/guessing_game
Key files from the demo
Cargo.toml


Cargo.lock


.gitignore


src/main.rs


target/debug/guessing_game


target/release/guessing_game
Compiling review and reference
Option 1: Compile directly
- put the content in file
hello.rs - command line:
- navigate to this folder
rustc hello.rs- run
./helloorhello.exe
Option 2: Use Cargo
- create a project:
cargo new PROJECT-NAME - main file will be
PROJECT-NAME/src/main.rs - to build and run:
cargo run - the machine code will be in :
./target/debug/PROJECT-NAME
Different ways to run Cargo
cargo runcompiles, runs, and saves the binary/executable in/target/debugcargo buildcompiles but does not runcargo checkchecks if it compiles (fastest)cargo run --releasecreates (slowly) "fully optimized" binary in/target/release
Back to the guessing game
We're going to add this to main.rs:
use std::io;

fn main() {
    println!("Guess the number!");
    println!("Please input your guess.");

    let mut guess = String::new();

    io::stdin()
        .read_line(&mut guess)
        .expect("Failed to read line");

    println!("You guessed: {}", guess);
}
cargo run
.expect() - a tricky concept
-
read_line()returns aResultwhich has two variants -OkandErr -
Okmeans the operation succeeded, and returns the successful value -
Errmeans something went wrong, and it returns a comment on what happened -
If you use
read_line()WITHOUTexpectit will compile but warn you not to do that -
If you use
read_line()WITHexpectand it saysOkthe output will be the same (user input saved toguess) -
If you use
read_line()WITHexpectand it saysErrthe program will crash and print what you wrote in.expect()
There are better ways of handling errors that we'll cover later
More on macros!
- A macro is code that writes other code for you / expands BEFORE it compiles.
- They end with ! like println!, vec!, or panic!
For example, println!("Hello"); roughly expands into
#![allow(unused)]
fn main() {
use std::io::{self, Write};
io::stdout().write_all(b"Hello\n").unwrap();
}
while println!("Name: {}, Age: {}", name, age); expands into
#![allow(unused)]
fn main() {
use std::io::{self, Write};
io::stdout().write_fmt(format_args!("Name: {}, Age: {}\n", name, age)).unwrap();
}
(which you can see will further expand!)
Adding a secret number
Adding to the toml:
[dependencies]
rand = "0.8.5"
Adding to main.rs
#![allow(unused)]
fn main() {
use rand::Rng;

let secret_number = rand::thread_rng().gen_range(1..=100);
println!("The secret number is: {secret_number}");
}
What did all that do
cat Cargo.toml
cat Cargo.lock

cargo run
cargo run
Activity preview - let's break things!
Activity time
Debrief:
- Let's make a list together - how many did we find?
- Which error was the most confusing?
- Which error message was the most helpful?
- Did any errors surprise you?
- What patterns did you notice in how Rust reports errors?
Wrapping up
- Coffee slots this afternoon - stop by for 5 min if you want
- Homework due Monday at 11:59pm
- REMEMBER TO COMMENT what your commands do in Problem 1
- Oh My Git - check you have "gold" borders (you did at least five at the command line)
- There will ALSO be pre-work for Monday
Lecture 6 - Guessing Game Part 2: VSCode & Completing the Game
Learning objectives
By the end of class today you should be able to:
- Use VSCode with rust-analyzer and the integrated terminal for Rust development
- Start using loops and conditional logic in Rust
- Use
matchexpressions andOrderingfor comparisons - Keep your code tidy and readable with
clippy, comments, and doc strings
Why VSCode for Rust?
- Rust Analyzer: Real-time error checking, autocomplete, type hints
- Integrated terminal: No more switching windows
- Git integration: Visual diffs, staging, commits
Setting up VSCode for Rust
You'll need to have
- Installed VSCode
- Installed Rust
- Installed the rust-analyzer extension
Joey covered this in discussions - if you need help with these come talk to us
Opening our project
From the terminal:
cd guessing_game
code .
or use File -> Open Folder from VSCode
VSCode Features Demo
File Explorer & Navigation
- Side panel for project files
- Quick switching with
Cmd+P(Mac) /Ctrl+P(Windows) - Split editor views
Integrated Terminal
View → TerminalorCtrl+`- Multiple terminals
- Same commands as before:
cargo run,cargo check
Rust Analyzer in Action
- Red squiggles - Compiler errors
- Yellow squiggles - Warnings
- Hover tooltips - Type information
- Autocomplete - As you type suggestions
- Format on save - Automatic code formatting
Let's see it in action!
Cargo Clippy
- Run with
cargo clippyin terminal to see suggestions - Suggests stylistic changes that won't change the function of your code (ie refactoring suggestions)
cargo clippy --fixwill automatically accept suggestions
Completing The Guessing Game
Highlights from the compiler errors activity
Let's chat about these together
- Lots of folks hit on something like this - what happened?
"1. error ""error[E0433]: failed to resolve: use of unresolved module or unlinked crate `rand`
 --> main.rs:8:25"""
- Then playing around, people found:
-  expected `;`, found keyword `let` (deleted a semicolon)
-  invalid basic string b/c removed ""
-  linking with `link.exe` failed: exit code: 1
-  expected function, found macro `println`   (got rid of ! in println!)
-  cannot borrow `guess` as mutable, as it is not declared as mutable   (got rid of mut in declaration)
-  this file contains an unclosed delimiter (deleted a curly bracket)
-  unresolved import `std::higang`
-  failed to resolve: use of unresolved module or unlinked crate `io`
-  unreachable expression (placed code after break)
Let's walk through an interesting one
One student used cargo add rand rather than manually adding rand to the dependencies (which is totally valid!), and go this. What's going on?
warning: use of deprecated function `rand::thread_rng`: Renamed to `rng`
 --> src\main.rs:8:31
  |
8 |     let secret_number = rand::thread_rng().gen_range(1..=100);
  |                               ^^^^^^^^^^
  |
  = note: `#[warn(deprecated)]` on by default
warning: use of deprecated method `rand::Rng::gen_range`: Renamed to `random_range`
 --> src\main.rs:8:44
  |
8 |     let secret_number = rand::thread_rng().gen_range(1..=100);
  |                                            ^^^^^^^^^

warning: `scavenger_hunt` (bin ""scavenger_hunt"") generated 2 warnings
Current state (from last class):
use std::io;
use rand::Rng;

fn main() {
    println!("Guess the number!");

    let secret_number = rand::thread_rng().gen_range(1..=100);
    println!("The secret number is: {secret_number}");

    println!("Please input your guess.");

    let mut guess = String::new();

    io::stdin()
        .read_line(&mut guess)
        .expect("Failed to read line");

    println!("You guessed: {}", guess);
}
Making it a real game:
- Remove the secret reveal - no cheating!
- Compare numbers - too high? too low?
- Add a loop - keep playing until correct
- Handle invalid input - what if they type "banana"?
Steps 0+1
Step 0: No cheating
We just need to delete:
#![allow(unused)]
fn main() {
println!("The secret number is: {secret_number}");
}
Step 1: Comparing Numbers
First, we need to convert the guess to a number and compare:
#![allow(unused)]
fn main() {
use std::cmp::Ordering; // typically crate :: module :: type or crate :: module :: function

// Add this after reading input:
let guess: u32 = guess.trim().parse().expect("Please enter a number!");

match guess.cmp(&secret_number) {
    Ordering::Less => println!("Too small!"),
    Ordering::Greater => println!("Too big!"),
    Ordering::Equal => println!("You win!"),
}
}
Step 2: Adding the Loop
Wrap the input/comparison in a loop:
#![allow(unused)]
fn main() {
loop {
    println!("Please input your guess.");

    // ... input code ...

    match guess.cmp(&secret_number) {
        Ordering::Less => println!("Too small!"),
        Ordering::Greater => println!("Too big!"),
        Ordering::Equal => {
            println!("You win!");
            break;  // Exit the loop
        }
    }
}
}
Step 3: Handling Invalid Input
Replace .expect() with proper error handling:
#![allow(unused)]
fn main() {
let guess: u32 = match guess.trim().parse() {
    Ok(num) => num,
    Err(_) => {
        println!("Please enter a valid number!");
        continue;  // Skip to next loop iteration
    }
};
}
Back to VSCode
Completing the game
Let's paste the whole thing in and take a look
Comments & Documentation Best Practices
What would happen if you came back to this program in a month?
Inline Comments (//)
- Explain why, not what the code does
- Bad:
// Create a random number - Good:
// Generate secret between 1-100 for balanced difficulty - If it's not clear what the code does you should edit the code!
Doc Comments (///)
- Document meaningful chunks of code like functions, structs, modules
- Show up in
cargo docand IDE tooltips
#![allow(unused)]
fn main() {
/// Prompts user for a guess and validates input
/// Returns the parsed number or continues loop on invalid input
fn get_user_guess() -> u32 {
    // implementation...
}
}
The Better Comments extension
- Color-codes different types of comments in VSCode - let's paste it into
main.rsand see
#![allow(unused)]
fn main() {
// TODO: Add input validation here
// ! FIXME: This will panic on negative numbers
// ? Why does this work differently on Windows?
// * Important: This function assumes sorted input
}
Visual Git Features:
- Source Control panel - See changed files
- Diff view - Side-by-side comparisons
- Stage changes - Click the + button
- Commit - Write message and commit
Still use terminal for:
git status- Quick overviewgit log- Commit historygit push/git pull- Syncing
Activity Time (20 minutes)
Wrap-up
What we've accomplished so far:
- Can now use shell, git, and rust all in one place (VSCode)
- We built a complete, functional game from scratch
- Started learning key Rust concepts: loops, matching, error handling
- We've practiced using GitHub Classroom - you'll use it for HW2!
Looking ahead
- HW1 due tonight at midnight
- HW2 released this evening
- Discussions tomorrow will focus on getting started on HW2
Lecture 7 - Variables and types
Logistics
- HW2 due next Wednesday
- I have office hours today
Circling back on comments
You definitely can make multi-line comments
#![allow(unused)]
fn main() {
// This is a single-line comment
let age = 25; // Comments can go at the end of lines

/*
   This is a multi-line comment
   Useful for longer explanations
   or temporarily disabling code
*/

/// This is a line doc comment that sits on the OUTSIDE
/** Or as a block comment (note the one ending asterisk) */
fn my_function(){
    //! This is a line doc comment that sits on the INSIDE
    /*! this is a block doc comment that sits on the inside */

}
}
Learning Objectives
- Use the
mutkeyword and shadowing withletto modify variables - Declare constants using
const - Use Rust's integer types and floating-point types and understand their ranges
- Understand rust's basic types and their sizes (ints, floats,
bool,char,&str) - Use type annotation (with
let) and type conversion (as) - Work with boolean values using logical operators (
&&,||,!) - Create, access, and destructure tuples
Variables and Mutability
Variables are by default immutable!
Let's try this and then fix it.
fn main(){
    let x = 3;
    x = x + 1;
    println!("{x}")
}
Why can't we do this now?
fn main(){
    let mut x = 3;
    x = 9.5;
    println!("{x}")
}
One way to fix - Variable shadowing: new variable with the same name
fn main(){
    let solution = "4";
    let solution : i32 = solution.parse()
                        .expect("Not a number!");
    let solution = solution * (solution - 1) / 2;
    println!("solution = {}",solution);
    let solution = "This is a string";
    println!("solution = {}", solution);
}
Why does this work even though solution isn't mutable?
Variables vs Constants
Sometimes you need values that never change and are known at compile time:
#![allow(unused)]
fn main() {
const MAX_PLAYERS: u32 = 100;
const PI: f64 = 3.14159;
const GREETING: &str = "Hello, world!";
}
Constants:
- Are always immutable (no
mutallowed) - Use
constinstead oflet - Must have explicit types
- Named in
ALL_UPPERCASEby convention - Can be declared in any scope (including global)
- Must be computable at compile-time (so typically hard-coded)
When to use constants vs variables:
- Constants: Mathematical constants, configuration values, limits
- Variables: Data that might change or is computed at runtime
Types - Integers
Binary representations
Representing 13:
- In decimal (base 10): 13 = 1×10¹ + 3×10⁰
- In binary (base 2): 1101 = 1×2³ + 1×2² + 0×2¹ + 1×2⁰ = 8 + 4 + 0 + 1 = 13
For example, the number 13 in binary is 1101:
Binary:   1 1 0 1
Position: 3 2 1 0
2x^n:     8 4 2 1
Value:    8 4 0 1  → 8+4+1 = 13
T/P/S - What's the largest integer we can represent with 4 binary digits?
So what are ints, under the hood
Unsigned integers are stored in binary format.
But (signed) integers are stored in two's complement format, where:
- if the number is positive, the first bit is 0
- if the number is negative, the first bit is 1
To calculate the two's complement of a negative number, we flip all the bits and add 1.
#![allow(unused)]
fn main() {
// binary representation of 7 and -7
println!("{:032b}", 7);
println!("{:032b}", -7);
}
(Think/pair/share) Why do you think we do it this way?
Bits and bytes
- Bit: The smallest unit of data in computing - can store either 0 or 1
- Byte: A group of 8 bits - the basic addressable unit of memory
- Why 8 bits? 8 bits can represent 2⁸ = 256 different values (0-255)
- Computers typically address memory in byte-sized chunks
- (In sizes like "16 GB of RAM" GB refers to "gigaBYTES" not gigaBITS)
Integers come in all shapes and sizes
- unsigned integers:
u8,u16,u32,u64,u128,usize(architecture specific size)- from \(0\) to \(2^n-1\)
- signed integers:
i8,i16,i32(default),i64,i128,isize(architecture specific size)- from \(-2^{n-1}\) to \(2^{n-1}-1\)
![]() These numbers (like
These numbers (like u16) refer to bits, not bytes!
if you need to convert, use the
asoperator
i128andu128are useful for cryptography
Let's try it - min and max values of int types
#![allow(unused)]
fn main() {
println!("U8 min is {} max is {}", u8::MIN, u8::MAX);
println!("I8 min is {} max is {}", i8::MIN, i8::MAX);
println!("U16 min is {} max is {}", u16::MIN, u16::MAX);
println!("I16 min is {} max is {}", i16::MIN, i16::MAX);
println!("U32 min is {} max is {}", u32::MIN, u32::MAX);
println!("I32 min is {} max is {}", i32::MIN, i32::MAX);
println!("U64 min is {} max is {}", u64::MIN, u64::MAX);
println!("I64 min is {} max is {}", i64::MIN, i64::MAX);
println!("U128 min is {} max is {}", u128::MIN, u128::MAX);
println!("I128 min is {} max is {}", i128::MIN, i128::MAX);
println!("USIZE min is {} max is {}", usize::MIN, usize::MAX);
println!("ISIZE min is {} max is {}", isize::MIN, isize::MAX);
}
Different types don't play nice together
fn main(){
    let x : i16 = 13;
    let y : i32 = -17;
    println!("{}", x * y);   // will not work
    // println!("{}", (x as i32)* y);
}
Be careful with math on ints
u8 is 8 bits and can store maximum value 2^8 - 1 = 255.
If we multiply: \(255*255=65025\).
How many bits do we need to store this value? We can take the log base 2 of the value.
>>> import math
>>> math.log2(255*255)
15.988706873717716
So we need 16 bits to store the product of two u8 values.
In general when we multiply two numbers of size \(n\) bits, we need \(2n\) bits to store the result.
Types - Floats
Why are they called floats?
- Two kinds:
f32andf64(default) - What do these mean?
Sizes of floats
#![allow(unused)]
fn main() {
println!("F32 min is {} max is {}", f32::MIN, f32::MAX);
println!("F32 min is {:e} max is {:e}", f32::MIN, f32::MAX);
println!("F64 min is {:e} max is {:e}", f64::MIN, f64::MAX);
}
Why these sizes?
f32: 1 sign bit + 8 exponent bits + 23 significance bitsf64: 1 sign bit + 11 exponent bits + 52 significance bits
Floats and Rust's type inference system
fn main(){
    let x:f32 = 4.0;
    let y:f32 = 4; // Will not work.  It will not autoconvert for you.

    let z = 1.25; // won't get automatically assigned a type yet

    println!("{:.1}", x * z);

    //println!("{:.1}", (x as f64) * z);
}
Formatting in println! (this didn't make it to your print-outs!)
You can control how numbers are displayed using format specifiers:
#![allow(unused)]
fn main() {
let total = 21.613749999999997;
let big_number = 1_234_567.89;
let small_number = 0.000123;
let count = 42;

// Float formatting
println!("Default: {}", total);         // Default: 21.613749999999997
println!("2 decimals: {:.2}", total);   // 2 decimals: 21.61
println!("Currency: ${:.2}", price);    // Currency: $19.99

// Scientific notation
println!("Scientific: {:e}", big_number);    // Scientific: 1.234568e6
println!("Scientific: {:.2e}", small_number); // Scientific: 1.23e-4

// Integer formatting
println!("Default: {}", count);         // Default: 42
println!("Width 5: {:5}", count);       // Width 5:    42
println!("Zero-pad: {:05}", count);     // Zero-pad: 00042
println!("Binary: {:b}", count);        // Binary: 101010
println!("Hex: {:x}", count);           // Hex: 2a
}
Useful patterns:
{:.2}- 2 decimal places{:e}- scientific notation{:5}- fixed width 5{:b}- binary,{:x}- hexadecimal
Mini-Quiz
Take a minute to talk to a partner about what these do, then I'll call on you
cargo new my_projectcargo checkgit add .rustc hello.rsgit pullcargo run --releasegit commit -m "fix bug"
Types - Booleans (and logical operators)
booluses one byte of memory (why not one bit?)
#![allow(unused)]
fn main() {
let x = true;
let y: bool = false;

println!("{}", x && y); // logical and
println!("{}", x || y); // logical or
println!("{}", !y);    // logical not

}
Bitwise operators (just for awareness)
There are also bitwise operators that look similar to logical operators:
#![allow(unused)]
fn main() {
let x = true;
let y: bool = false;
println!("{}", x & y);  // bitwise and
println!("{}", x | y);  // bitwise or
}
But they also work on integers
fn main(){
    let x = 10;
    let y = 7;
    println!("{x:04b} & {y:04b} = {:04b}", x & y);
    println!("{x:04b} | {y:04b} = {:04b}", x | y);
    // println!("{}", x && y);
    // println!("{}", x || y);
}
So the negation of an int is...
#![allow(unused)]
fn main() {
let y = 7;
println!("!{y:04b} = {:04b} or {0}", !y);
}
Think/pair/share - What is this going to print?
#![allow(unused)]
fn main() {
let y:i8 = 7;
println!("{:016b}", y);
println!("{:016b}", !y);
println!("{:016b}", -1*y);
}
Types - Characters
chardefined via single quotes, uses four bytes of memory (that's how many bits?)- For a complete list of UTF-8 characters check https://www.fileformat.info/info/charset/UTF-8/list.htm
#![allow(unused)]
fn main() {
let x: char = 'a';
let y = '🚦';
let z = '🦕';

println!("{} {} {}", x, y, z);
}
(Fun fact - try Control-Command-Space (Mac) or Windows-Key + . (Windows) to add emojis anywhere!)
Types - Strings
- A string slice (
&str) is defined via double quotes (we'll talk much more about what this means later!)
fn main() {
    let s1 = "Hello! How are you, 🦕?";  // type is immutable borrowed reference to a string slice: `&str`
    let s2 : &str = "Καλημέρα από την Βοστώνη και την DS210";  // here we make the type explicit

    println!("{}", s1);
    println!("{}\n", s2);

    // This doesn't work.  You can't do String = &str
    //let s3: String = "Does this work?";

    let s3: String = "Does this work?".to_string();
    println!("{}", s3);

    let s4: String = String::from("How about this?");
    println!("{}\n", s4);

    let s5: &str = &s3;
    println!("str reference to a String reference: {}\n", s5);

    // This won't work.
    // println!("{}", s1[3]);
    // println!("{}", s4[3]);

    // But you can index this way.
    println!("4th character of s1: {}", s1.chars().nth(3).unwrap());
    println!("3rd character of s3: {}", s4.chars().nth(2).unwrap());
}
Tuples in Rust
Tuples are a general-purpose data structure that can hold multiple values of different types.
#![allow(unused)]
fn main() {
let mut tuple = (1, 1.1);
let mut tuple2: (i32, f64) = (1, 1.1);  // type annotation is optional

let another = ("abc", "def", "ghi");

let yet_another: (u8, u32) = (255, 4_000_000_000);
}
Accessing elements of a tuple
Rust tuples are "0-based":
#![allow(unused)]
fn main() {
let mut tuple = (1,1.1);
println!("({}, {})", tuple.0, tuple.1);

tuple.0 = 2;

println!("({}, {})",tuple.0,tuple.1);

println!("Tuple is {:?}", tuple);
}
We can unpack a tuple by matching a pattern
#![allow(unused)]
fn main() {
// or pattern match and desconstruct
let mut tuple = (1,1.1);
let (a, b) = tuple;
println!("a = {}, b = {}",a,b);
}
Best Practices for tuples
When to Use Tuples:
- Small, related data: 2-4 related values
- Temporary grouping: Short-lived data combinations
- Function returns: Multiple return values
- Pattern matching: When destructuring is useful
Style Guidelines:
#![allow(unused)]
fn main() {
// Good: Clear, concise
let (width, height) = get_dimensions();

// Good: Descriptive destructuring
let (min_temp, max_temp, avg_temp) = analyze_temperatures(&data);

// Avoid: Too many elements
// let config = (true, false, 42, 3.14, "test", 100, false);  // Hard to read

// Avoid: Unclear meaning
// let data = (42, 13);  // What do these numbers represent?
}
Lecture 8 - Functions in Rust
Logistics
- Coffee slots today
- HW2 due Wednesday
- The first midterm is in two weeks
Follow-up to yesterday
- 2's complement (at the board) (but also, don't worry about it)
- The
let x:u8 = 5; let y = -x;error - Going over the shakespeare problem
Learning Objectives
By the end of this lecture, students should be able to:
- Write function signatures including parameter names, types, and return types
- Create functions that return the unit type
()for side-effect-only operations - Explain the difference between an expression and a statement in Rust
- Use expressions to assign values based on conditions
Function Syntax
We've seen lots of examples like this:
#![allow(unused)]
fn main() {
fn my_age_in_5_years(age: i16) -> i16 {
    let new_age = age + 5;
    return age; // you can just put "age" without return but "return" is clearer
}
}
General function template:
#![allow(unused)]
fn main() {
fn function_name(arg_name_1:arg_type_1,arg_name_2:arg_type_2) -> type_returned
  // ^ This part is the "function signature"

{
    // Do stuff
    // return something
}
 // ^ This part is the "function body" and can be a statement or expression
}
Statements and expressions
Just as in math when we have:
- expressions like (\(a^2 + b^2)\)
- and equations like (\(a^2 + b^2 = c^2)\)
In rust we have expressions and statements
- Expressions simplify to a value (like a math expression)
- Statements do things but don't simplify to a value (kind of like an equation?)
So -
y + 2is an expressionlet x = y + 2;is a statement
Statements and expressions can be nested
let x = y + 2; is a statement BUT it INCLUDES y + 2 which is an expression
The reverse is also true - we can build complex expressions that include statements
#![allow(unused)]
fn main() {
let y = {
    let x = 2 * 3;
    x
};
}
A statement or expression - shout it out
#![allow(unused)]
fn main() {
let x = 5;                  // Statement or expression?
x + 2                       // Statement or expression?
println!("hello");          // Statement or expression?
my_function(5)              // Statement or expression?

let y = x + 2;              // Statement or expression?
{
    let z = 10;             // Statement or expression?
    z * 2                   // Statement or expression?
}                           // Statement or expression?

return x + 5;               // Statement or expression?

let x = {
    println!("doing work"); // Statement or expression?
    42                      // Statement or expression?
};                          // Statement or expression?

}
Maybe it was too easy to cheat because...
- Statements always end with semi-colons
- Expressions never end with semi-colons
Key insight: {} blocks are expressions that evaluate to their final line (if no semicolon).
Adding a semicolon turns an expression into a statement
fn main(){
    let a = {
        let x = 10;
        x + 5       // Expression
    };
    println!("{}",a);

    let b = {
        let x = 10;
        x + 5;      // Statement
    };
    println!("{}",b);
}
Let's look at return again now
We have two ways of returning from a function:
#![allow(unused)]
fn main() {
fn my_age_in_5_years(age: i16) -> i16 {
    let new_age = age + 5;
    return new_age;
}
}
#![allow(unused)]
fn main() {
fn my_age_in_5_years(age: i16) -> i16 {
    let new_age = age + 5;
    new_age
}
}
Why are these effectively the same thing?
But what happens if you don't return anything?
fn say_hello(who:&str) { // no -> return_type here
// fn say_hello(who:&str) -> () {
    println!("Hello, {}!",who);
}

fn main() {
    say_hello("world");
    say_hello("Boston");
    say_hello("DS210");

    // let z = say_hello("DS210");
    // println!("The function returned {:?}", z)
}
Functions that return no value
Functions that don't return or end in an expression return "the unit type" ()
() is an empty tuple that takes no memory (think of an empty set!)
This lets us have "side-effects only" functions that perform actions (printing, file I/O, etc.)
Passing parameters
3 ways to pass parameters
- A parameter can be copied into a function (default for
i32,bool,f64, other basic types) - A function can take ownership of a parameter (default for
String, other complex types) - A function can borrow a parameter to "peek" at it without "owning" it (
&str,&i32)
Examples:
#![allow(unused)]
fn main() {
fn greet_person(first_name: String, last_name: &str, age: u32) {
    // first_name now OWNS what was passed to it
    // last_name is BORROWING what was passed to it
    // age COPIED what was passed to it
    println!("Hello, {} {}! You are {} years old.",
             first_name, last_name, age);
}
}
We'll talk a lot more about owning vs borrowing later. For now, some simple rules to get started:
Quick Rules for Beginners:
- Use
&strfor string parameters (lets you pass in any string without taking it) - Use
&before the parameter name when you want to "peek" at data without taking it - Basic types like
i32,f64,boolare automatically copied - no worries there - If Rust complains about ownership, try adding
&to your parameter type - You typically can't use a reference (
&) in a return value - thats why you'll seeStringas a return type in HW2
Examples:
#![allow(unused)]
fn main() {
fn print_name(name: &str) { /* name is borrowed - original still usable */ }
fn calculate_area(width: f64, height: f64) -> f64 { /* both copied */ }
}
Lecture 7 Review Quiz
Take 2 minutes with a partner to discuss these questions and I'll call on you
- Can you change
xto a different type usingmut? Using shadowing? - What's the largest value a
u8can hold? - What are three different changes you could make so that this compiles?
#![allow(unused)]
fn main() {
let x: i32 = 10;
let y: i16 = 5;
let sum = x + y;
}
- What's wrong with this?
const PI = 3.14;
Function Design Principles
Best Practice - Single Responsibility
#![allow(unused)]
fn main() {
// Good: Single purpose
fn calculate_cook_time(base_time: u32, servings: u32) -> u32 {
    base_time + (servings * 2)
}

// Good: Clear separation of concerns
fn format_time(minutes: u32) -> String {
    if minutes >= 60 {
        format!("{}h {}m", minutes / 60, minutes % 60)
    } else {
        format!("{}m", minutes)
    }
}

fn display_recipe_info(base_cook_time: u32, servings: u32) {
    let total_time = calculate_cook_time(base_cook_time, servings);
    println!("Cook time for {} servings: {}",
             servings, format_time(total_time));
}
}
Common Patterns - Pure Functions vs. Side Effects
#![allow(unused)]
fn main() {
// Pure function: No side effects
fn add(x: i32, y: i32) -> i32 {
    x + y
}

// Function with side effects: Prints to console
fn add_and_print(x: i32, y: i32) -> i32 {
    let result = x + y;
    println!("{} + {} = {}", x, y, result);
    result
}
}
Common Patterns - Validation Functions
#![allow(unused)]
fn main() {
fn is_valid_age(age: i32) -> bool {
    age >= 0 && age <= 150
}

fn is_valid_email(email: &str) -> bool {
    email.contains('@') && email.contains('.')
}
}
Common Patterns - Conversion Functions
#![allow(unused)]
fn main() {
fn celsius_to_fahrenheit(celsius: f64) -> f64 {
    celsius * 9.0 / 5.0 + 32.0
}

fn fahrenheit_to_celsius(fahrenheit: f64) -> f64 {
    (fahrenheit - 32.0) * 5.0 / 9.0
}
}
Common Patterns - Helper Functions
#![allow(unused)]
fn main() {
fn get_absolute_value(x: i32) -> i32 {
    if x < 0 { -x } else { x }
}
}
Function Naming Conventions
Rust Naming Guidelines:
- snake_case
- Descriptive names that indicate purpose
- Verb phrases for functions that perform actions
- Predicate phrases for functions that return booleans (
is_,has_,can_)
Examples:
#![allow(unused)]
fn main() {
fn calculate_distance(x1: f64, y1: f64, x2: f64, y2: f64) -> f64 { /* ... */ }
fn is_prime(n: u32) -> bool { /* ... */ }
fn has_permission(user: &str, resource: &str) -> bool { /* ... */ }
fn can_access(user_level: u32, required_level: u32) -> bool { /* ... */ }
}
Last thing - Using if Statements (TC 12:45)
We've glossed over this so far - let's get into some details
Syntax:
#![allow(unused)]
fn main() {
if condition {
    //
} else if {
    //
} else {
    //
}
}
else ifandelseparts optional
Example of if in a function
fn and(p:bool, q:bool, r:bool) -> bool {
    if !p {
        println!("p is false");
        return false;
    }
    if !q {
        println!("q is false");
        return false;
    }
    println!("r is {}", r);
    return r;
}

fn main() {
    println!("{}", and(true, false, true));
}
Best Practices for if statements
- Use consistent indentation (4 spaces or tabs)
- Keep conditions readable - use parentheses for clarity when needed
- Prefer early returns in functions to reduce nesting
- Use
else iffor multiple conditions rather than nestedif
Example of Good Style:
#![allow(unused)]
fn main() {
fn classify_grade(score: f64) -> char {
    if score > 90.0 {
        'A'
    } else if score > 80.0 {
        'B'
    } else if score > 70.0 {
        'C'
    } else {
        'D'
    }
}
}
Even though Rust doesn't require tabs like this it's still a good idea for readability!
Bringing it together with expressions
You can even use conditional expressions as values!
Python:
x = 100 if (x == 7) else 200
Rust:
#![allow(unused)]
fn main() {
let x = 4;
let z = if x == 7 {100} else {200};
println!("{}",z);
}
// won't work: same type needed
fn main(){
    let x = 4;
    println!("{}",if x == 7 {100} else {1.2});
}
But don't do it just because you can
#![allow(unused)]
fn main() {
// This is technically valid but TERRIBLE code please DO NOT DO THIS
let x = 4;
let result = if x > 0 {
    if x < 10 {
        let temp = x * x;
        let bonus = if temp > 10 { 5 } else { 2 };
        temp + bonus
    } else {
        let factor = x / 2;
        if factor > 3 {
            factor * 3
        } else {
            factor + 1
        }
    }
} else {
    0
};
println!("Result: {}", result);
}
Lecture 9 - Loops
Follow-up from Friday
- Your papers are up here
- HW2 is due Wednesday. Please get started soon so we have time to help if you need it!
Office hours updates
Ava - Tuesday 3:45-5:45, 15th floor CDS
Prof Wheelock - Wednesday 2:30-4, 1506 in CDS
Joey - 3:30-5:30 Thursday, 15th floor CDS
Pratik - 4:00-6:00 on Fridays, 15th floor CDS
Clarifying "one expression per scope"
fn classify_grade(score: f64) -> char {
    if score > 90.0 {
        'A'
    } else if score > 80.0 {
        'B'
    } else if score > 70.0 {
        'C'
    } else {
        'D'
    }
}

fn main(){
    println!("{}",classify_grade(5.5));
}
A complete solution to Friday's exercise
fn calculate_final_price(sticker_price: f64, tax_rate: f64, has_membership: bool) -> f64 {
    // Handle edge cases
    if sticker_price < 0.0 { println!("Warning: Negative price detected!"); }

    if tax_rate < 0.0 || tax_rate > 1.0 { println!("Warning: Unusual tax rate: {:.2}", tax_rate); }

    let final_price = if has_membership {
        sticker_price * (1.0 + tax_rate) * 0.9
    } else {
        sticker_price * (1.0 + tax_rate)
    };

    println!("Final Price is ${:.2}", final_price);

    final_price
}
A few ways to write the core of the function (without printing)
#![allow(unused)]
fn main() {
fn calculate_final_price(sticker_price: f64, tax_rate: f64, has_membership: bool) -> f64 {
    if has_membership {
        sticker_price * (1.0 + tax_rate) * 0.9
    } else {
        sticker_price * (1.0 + tax_rate)
    }
}
}
#![allow(unused)]
fn main() {
fn calculate_final_price(sticker_price: f64, tax_rate: f64, has_membership: bool) -> f64 {
    let mut final_price = sticker_price * (1.0 + tax_rate)
    if has_membership { final_price *= 0.9; };
    final_price
}
}
#![allow(unused)]
fn main() {
fn calculate_final_price(sticker_price: f64, tax_rate: f64, has_membership: bool) -> f64 {
    let membership_discount = if has_membership { 0.9 } else { 1.0 };
    sticker_price * (1.0 + tax_rate) * membership_discount
}
}
Learning Objectives
- Use
while,for,loop,break, andcontinueto build flexible loops - Use
breakto return values from loops andcontinueto skip iterations - Use
forloops with ranges (..and..=), array iteration, and enumerate - Create and manipulate fixed-size arrays with indexing, sorting, and length operations
- Apply loop labeling to control nested loop behavior
- Choose appropriate loop types based on use case requirements
for loops and ranges
Usage: loop over a range or collection
A range is (start..end), e.g. (1..5), where the index will vary as
$$ \textrm{start} \leq \textrm{index} < \textrm{end}. $$
Unless you use the notation (start..=end), in which case the index will vary as
$$ \textrm{start} \leq \textrm{index} \leq \textrm{end} $$
#![allow(unused)]
fn main() {
for i in (1..5) {
    println!("{}",i);
};
}
More ways to play with ranges
#![allow(unused)]
fn main() {
for i in (1..5).rev() { // reverse order
    println!("{}",i)
};
}
#![allow(unused)]
fn main() {
for i in (1..=5) { // inclusive range
    println!("{}",i);
};
}
#![allow(unused)]
fn main() {
println!("This is a test");
for i in (1..5).step_by(2) { // every other element
    println!("{}",i);
};
}
#![allow(unused)]
fn main() {
println!("And now for the reverse");
for i in (1..5).step_by(2).rev() {
    println!("{}",i)
};
}
![]() I suggest always trying out / printing what you're looping over during early development to make sure it's doing what you want it to do!
I suggest always trying out / printing what you're looping over during early development to make sure it's doing what you want it to do!
Arrays in Rust
- Arrays in Rust are of fixed length (we'll learn about more flexible
Veclater) - All elements of the same type (unlike tuples)
- You cannot add or remove elements from an array (but you can change its value)
What will this return?
#![allow(unused)]
fn main() {
let mut arr = [1,7,2,5,2];
arr[1] = 13;
println!("{} {}",arr[0],arr[1]);
println!("{}",arr.len());
}
for loop over an array
#![allow(unused)]
fn main() {
let mut arr = [1,7,2,5,2];
for x in arr {
    println!("{}",x);
};
}
Quick tricks for making arrays
#![allow(unused)]
fn main() {
// create array of given length and fill it with a specific value
// note the semi-colon vs the comma!
let arr2 = [15;3];
for x in arr2 {
    print!("{} ",x);
}
println!();
}
#![allow(unused)]
fn main() {
// you can still infer or annotate types
let arr2 : [u8;3] = [15;3];
}
Common Array Operations
Arrays come with useful built-in methods:
#![allow(unused)]
fn main() {
let mut scores = [85, 92, 78, 96, 88];

// Get the length
println!("Number of scores: {}", scores.len());

// Sort the array (modifies the original array)
scores.sort();
println!("Sorted scores: {:?}", scores);

// Check if array contains a value
println!("Contains 92? {}", scores.contains(&92));  // Note the & here!
println!("Contains 100? {}", scores.contains(&100));
}
Note: {:?} is debug formatting - prints the entire array contents
Iterating with Indices
Sometimes you need both the position and the value:
#![allow(unused)]
fn main() {
let fruits = ["apple", "banana", "orange"];

// Method 1: Using enumerate()
for (index, &fruit) in fruits.iter().enumerate() { // note the & here!
    println!("fruits[{}] = {}", index, fruit);
}

// Method 2: Using index range
for i in 0..fruits.len() {
    println!("fruits[{}] = {}", i, fruits[i]);
}
}
When to use each:
- Use
enumerate()when you need both index and value - Stick to index range when you need to modify array elements
Lecture 8 Review Quiz
Take 2 minutes with a partner to review functions from last lecture:
-
What's wrong with this function signature?
#![allow(unused)] fn main() { fn calculate_area(width, height) -> f64 { } -
What's wrong with this function?
#![allow(unused)] fn main() { fn mystery(x: i32) -> i32 { let result = x * 2; result + 1; } } -
How can you fix this so it compiles?
#![allow(unused)]
fn main() {
let x = 4;
let y = 4.5;
let z = x + y;
println!("{}",z);
}
while loops
While loops continue as long as a condition remains true (very similar to python)
#![allow(unused)]
fn main() {
let mut number = 3;

while number != 0 {
    println!("{number}!");
    number -= 1;
}
println!("LIFTOFF!!!");
}
(What's a nice bit of style feedback here?)
Infinite loop
#![allow(unused)]
fn main() {
loop {
    // THIS WILL RUN OVER AND OVER FOREVER
}
}
- Similar to
while (True)in python - Need to use
breakto jump out of the loop!
A loop can return a value (break can act like return)
Just like the body of a function, a loop is an expression
To quit early, with or without a value:
- use
returnin a function - use
breakin a loop
#![allow(unused)]
fn main() {
let mut counter = 0;
let final_count = loop {
    counter += 1;
    if counter > 100 {
        break counter*2; // Return twice the final counter value
    }
};
println!("{}",final_count);
}
You can also break out of for and while loops but can't get a value out of them. Can you guess why? (hint: because it's Rust, it's about safety...)
Using continue to jump to the next iteration
Think/pair/share - what is this going to print?
#![allow(unused)]
fn main() {
let mut x = 1;

let result = loop {  // you can capture a return value
    if x == 3 {
        x = x+1;
        continue;    // skip the rest of this loop body and start the next iteration
    }
    println!("X is {}", x);
    x = x + 1;
    if x==6 {
        break x*2;   // break with a return value
    }
};

println!("Result is {}", result);
}
Labeling loops to target with continue and break.
Labels let you use continue or break on any nested layer.
USE CAUTION - this can make your code hard to read and it's probably a red flag if you find yourself needing it often
fn main() {
    let mut count = 0;
    'counting_up: loop {
        println!("count = {count}");
        let mut remaining = 10;

        loop {
            println!("remaining = {remaining}");
            if remaining == 9 {
                break;
            }
            if count == 2 {
                break 'counting_up;
            }
            remaining -= 1;
        }
        count += 1;
    }
    println!("End count = {count}");
}
Loop Selection Guidelines
For Loops:
- Iterating over ranges or collections
- When you need an index of what loop you're on
While Loops:
- Continue until some condition changes
- Don't know at the start how many times to loop
Loop (Infinite):
- Breaking on complex conditions (too much to include in
while) - Breaking at different places under different conditions
Activity time
Lecture 10 - Enums and Pattern Matching in Rust
Logistics
- Actitvity 9 solutions are posted on the site
- HW3 will be due next Thursday - the night before the exam
- Exam 1 is a week from Friday
- Format: similar to activities (a bit easier) and mid-lecture quizes - match/define, fill-in, find bugs, short answer, one short hand-coding problem
- No notes / reference sheets
- Monday will cover new material that will NOT be on the exam
- On Monday I will give you a final list of topics to review
- Wednesday will be a review session with practice problems
- HW2 is due TONIGHT at midnight
- I have office hours today and we'll answer questions on piazza until ~6pm
- Your submission is done when you've merged your work into main and then pushed to GitHub
- You can check to make everything looks good by navigating to GitHub.
Grading rubric
Homework grading
- On the syllabus: 1/3 correctness, 1/3 process, 1/3 style / best practices
- In practice: 1/2 autograder (passing tests), 1/2 qualitative review (by CAs and TAs)
How this intersects with the lateness and corrections policies
- If you push your last commit before the deadline, you get full credit. If you push again within the 48-hour late submission period, your grade will get scaled to 80%, and corrections can only bring you up to 80%.
- At the 48-hour mark you will be locked out and won't be able to push until after your homework is graded.
- After your homework is graded, you have one week to submit corrections:
- Corrections for correctness / test-passing can recover half-credit
- Corrections from feedback (the rubric) can recover full credit
- A week after the homework is initially graded, we will shut down editing for good and record final grades (if you made corrections).
Some examples
Person 1
- You submit your homework on time and get 100% on the autograder and 70% on the rubric, so your initial grade is 85%.
- You push a new version of your homework within a week of receiving your grade, accounting for all the feedback you received, making your final grade 100%.
Person 2
- You submit your homework 24 hours late and get 100% on the autograder and 90% on the rubric, so your initial grade is 95% * 0.8 = 76%.
- You are capped at 80% for turning the assignment in late and decide not to push corrections, making your final grade 76%.
Person 3
- You submit on time passing 6/10 tests for an autograder score of 60%, and get 70% on the rubric, so your initial grade is 65%.
- You make corrections to pass all tests and fix all points of feedback, improving your autograde score to 80% and rubric score to 100%, making your final grade 90%.
Grading rubric for HW2 (will be similar for future HWs)
- We will add a "code best practices" category later (including "idiomatic" Rust, error handling, efficiency/memory usage, ownership/borrowing) but we're not ready for it yet.
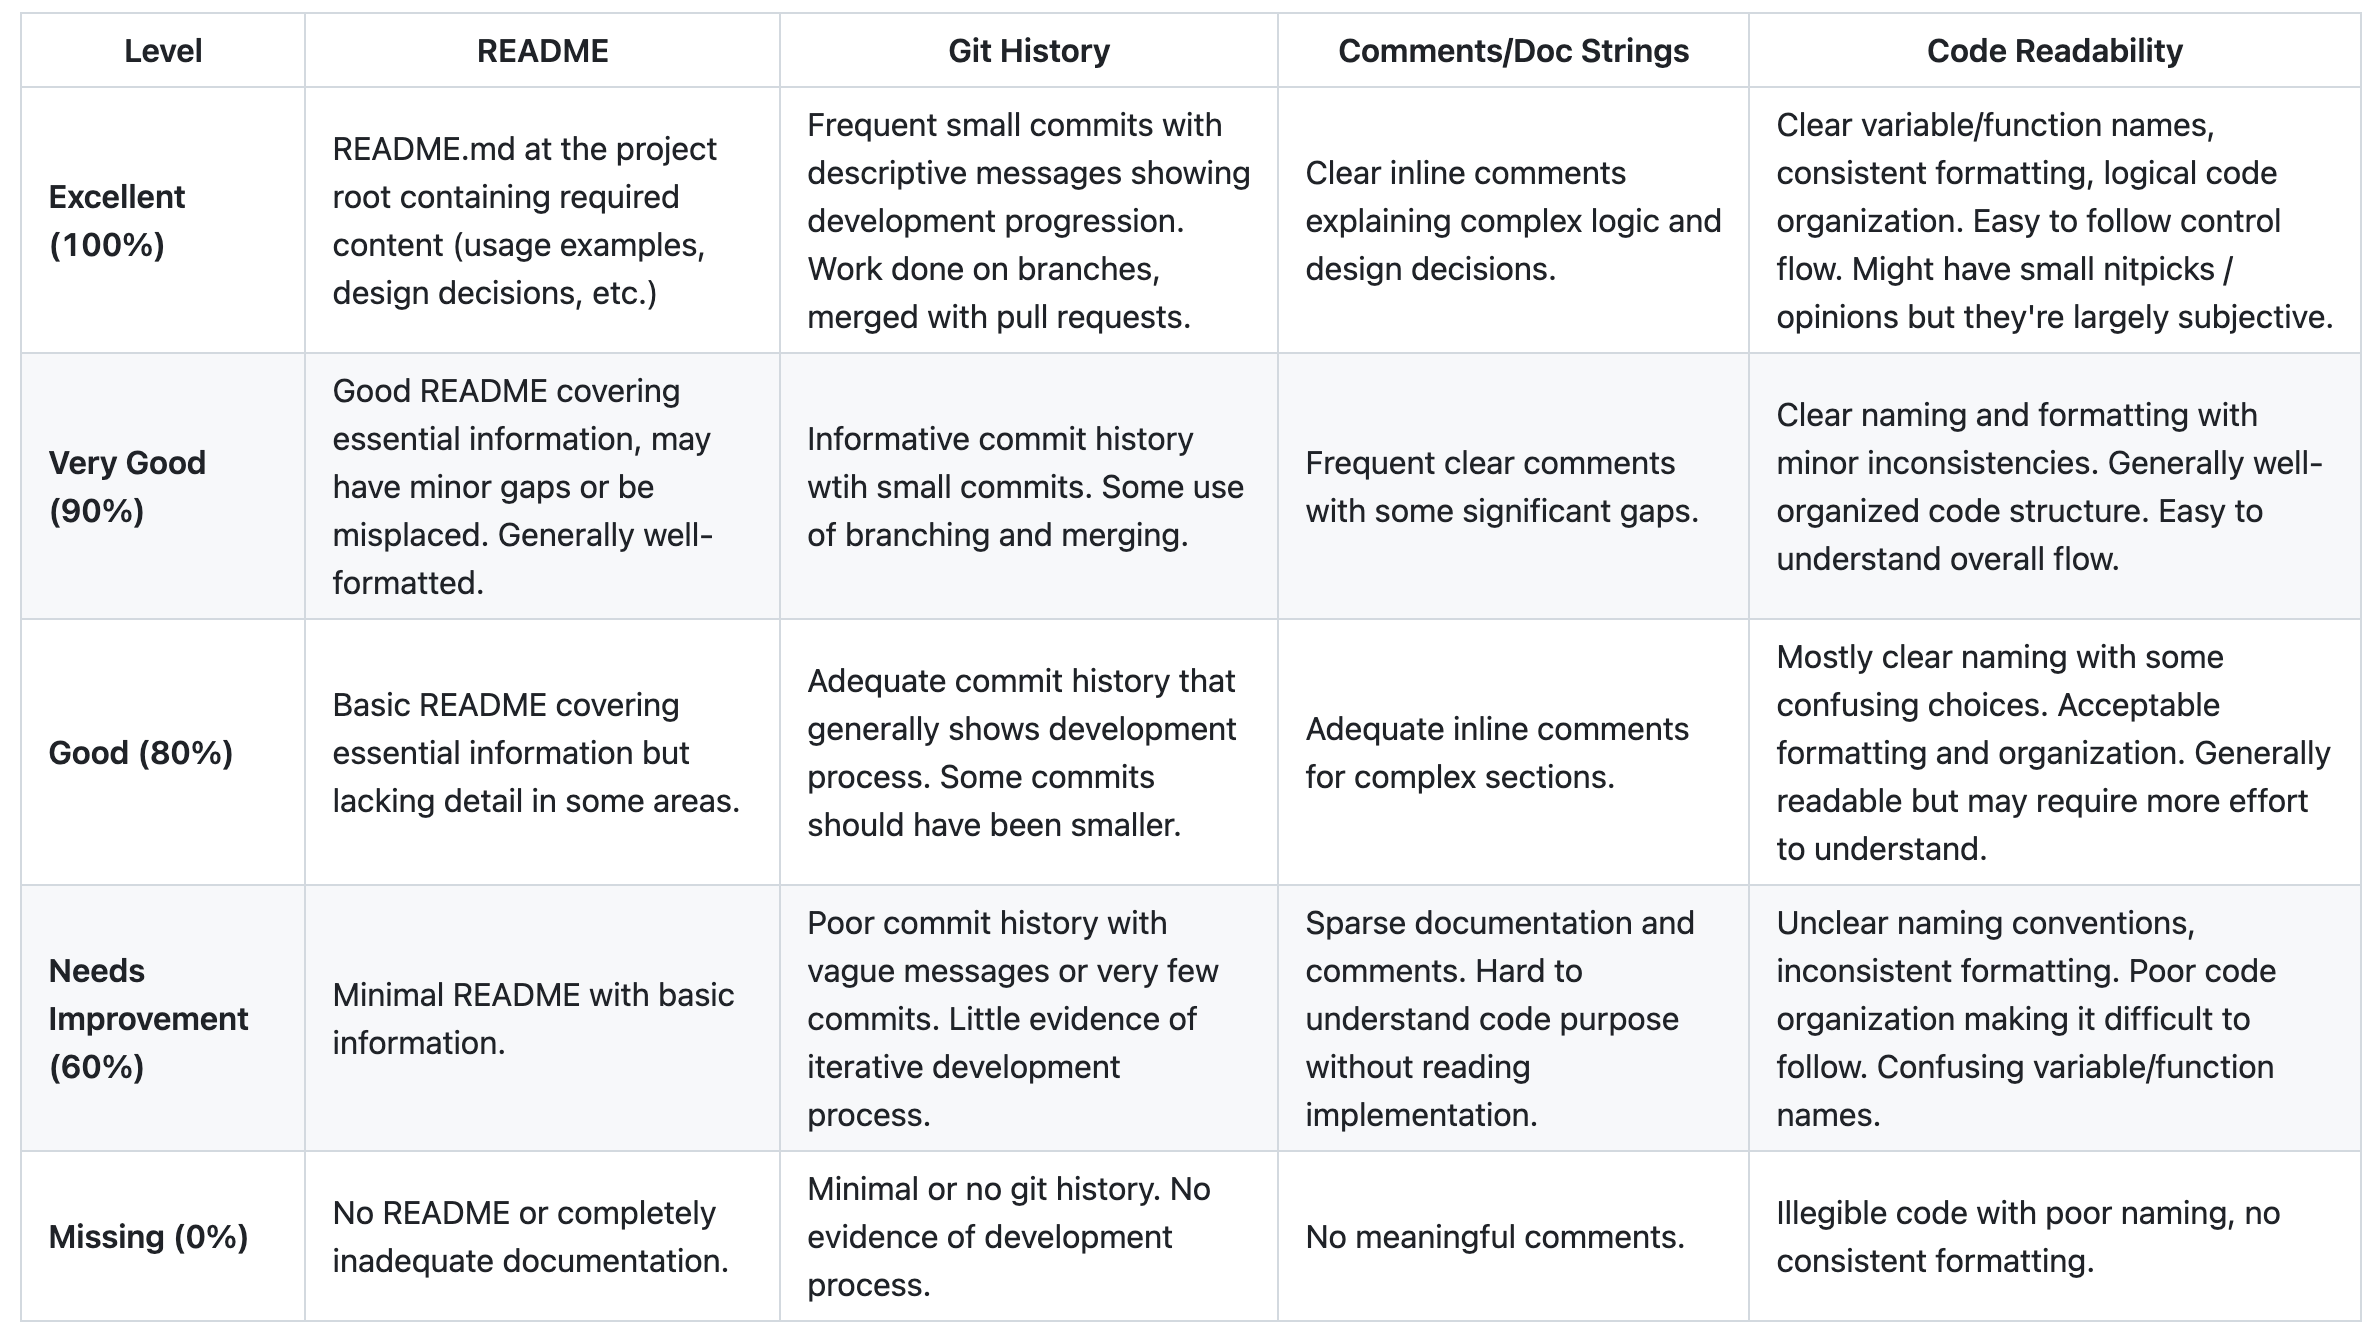
Learning Objectives
By the end of this lecture, students should be able to:
- Define custom enum types with variants and associated data
- Use
#[derive(Debug)]and#[derive(PartialEq)]for displaying and comparing enums - Use
matchstatements for exhaustive pattern matching on enums - Work with Rust's built-in
Option<T>andResult<T, E>enums
Enums
enumfor "enumeration"- allows you to define a type (like
i32orbool) by enumerating its possible variants - use
letto create instances of the enum variants
#![allow(unused)]
fn main() {
// define the enum and its variants
enum Direction {
    North,
    East,
    South,
    West,
    SouthWest,
}

// create instances of the enum variants
let dir_1 = Direction::North;   // dir is inferred to be of type Direction
let dir_2: Direction = Direction::South; // dir_2 is explicitly of type Direction
}
Using "use" as a shortcut
enum Direction {
    North,
    East,
    South,
    West,
    SouthWest,
}
// Bring the variant `East` into scope
use Direction::East;
// Bringing two options into the current scope
use Direction::{South,West};

// we didn't have to specify "Direction::"
let dir_3 = East;
// Bringing all options in - THIS WON'T WORK IF THE ENUM IS IN THE SAME FILE
use Direction::*;
let dir_4 = North;
Using enums as parameters
We can also define a function that takes our new type as an argument.
fn turn(dir: Direction) { ... }
Displaying enums (#[derive(Debug)])
By default Rust doesn't know how to display a new enum type. We actually have to tell Rust we want to be able to do this first by adding the Debug "trait"
// #[derive(Debug)]
enum Direction {
    North,
    East,
    South,
    West,
}
use Direction::*;

fn main(){
    let dir = North;
    println!("{:?}",dir);
}
Comparing enums (#[derive(PartialEq)])
By default Rust doesn't know how to compare enum values for equality. We need to add the PartialEq "trait" to enable == and != comparisons.
// #[derive(PartialEq)]
enum Direction {
    North,
    East,
    South,
    West,
}
use Direction::*;

fn main(){
    let dir1 = North;
    let dir2 = North;
    let dir3 = South;

    println!("{}", dir1 == dir2);
    println!("{}", dir1 != dir3);
}
Control Flow with match
The match statement is used to control flow based on the value of an enum.
let dir = East;

match dir {
    North => println!("N"),
    South => println!("S"),
    West => {  // can do more than one thing
        println!("Go west!");
        println!("W")
    }
    East => println!("E"),
};
If we tried doing this with if/else statements it would have to look like:
// The ugly if/else version:
if dir.as_u8() == Direction::North.as_u8() {
    println!("N");
} else if dir.as_u8() == Direction::East.as_u8() {
    println!("E");
} else if dir.as_u8() == Direction::South.as_u8() {
    println!("S");
} else if dir.as_u8() == Direction::West.as_u8() {
    println!("Go west!");
    println!("W");
} else {
    // This should never happen, but compiler doesn't know that!
    unreachable!();
}
Covering all variants with match
match is exhaustive, so we must cover all the variants!
If we didn't...
enum Direction {
    North,
    East,
    South,
    West,
}
use Direction::*;
fn main() {
let dir_2: Direction = South;

match dir_2 {
    North => println!("N"),
    South => println!("S"),
    // East and West not covered
};
}
But there is a way to match anything left.
enum Direction {
    North,
    East,
    South,
    West,
}
use Direction::*;
fn main() {
let dir_2: Direction = Direction::North;

match dir_2 {
    North => println!("N"),
    South => println!("S"),

    // match anything left
    _ => (),  // covers all the other variants but doesn't do anything
}
}
WARNING - your catch-all has to go last or it'll gobble everything up!
match dir_2 {
    _ => println!("anything else"),

    // will never get here!!
    North => println!("N"),
    South => println!("S"),
}
Putting Data in an Enum Variant
- Each variant can come with additional information
#![allow(unused)]
fn main() {
#[derive(Debug)]
enum DivisionResult {
    Answer(u32),
    DivisionByZero,
}

fn divide(x:u32, y:u32) -> DivisionResult {
    if y == 0 {
        return DivisionResult::DivisionByZero;
    } else {
        return DivisionResult::Answer(x / y);
    }
}

let (a,b) = (9,3);  // this is just short-hand for let a = 9; let b = 3;

match divide(a,b) {
    DivisionResult::Answer(result)  // assigns the variant value to result
        => println!("This result is {}",result),
    DivisionResult::DivisionByZero
        => println!("noooooo!!!!"),
};
}
Variants with multiple values
#![allow(unused)]
fn main() {
enum DivisionResultWithRemainder {
    Answer(u32,u32),  // Store the result of the integer division and the remainder
    DivisionByZero,
}

fn divide_with_remainder(x:u32, y:u32) -> DivisionResultWithRemainder {
    if y == 0 {
        DivisionResultWithRemainder::DivisionByZero
    } else {
        DivisionResultWithRemainder::Answer(x / y, x % y) // Return the integer division and the remainder
    }
}

let (a,b) = (9,4);
match divide_with_remainder(a,b) {
    DivisionResultWithRemainder::Answer(result,remainder) => {
            println!("the result is {}",result);
            println!("the remainder is {}",remainder);
    }
    DivisionResultWithRemainder::DivisionByZero
        => println!("noooooo!!!!"),
};
}
match as expression
The result of a match can be used as an expression.
Each branch (arm) returns a value.
#[derive(Debug)]
enum Direction {
    North,
    East,
    South,
    West,
}
use Direction::*;
fn main() {
// swap east and west
let mut dir_facing = North;
println!("{:?}", dir_facing);

let after_turning_left = match dir_facing {
    North => West,
    West => South,
    South => East,
    East => North
};

println!("{:?}", after_turning_left);
}
Beyond enums - pattern matching other types (FYI)
match works on more than just enums:
Matching tuples:
#![allow(unused)]
fn main() {
let point = (3, 5);
match point {
    (0, 0) => println!("Origin"),
    (0, y) => println!("On Y-axis at {}", y),
    (x, 0) => println!("On X-axis at {}", x),
    (x, y) => println!("Point at ({}, {})", x, y),
}
}
Matching ranges:
#![allow(unused)]
fn main() {
let age = 25;
match age {
    0..=12 => println!("Child"),
    13..=19 => println!("Teenager"),
    20..=64 => println!("Adult"),
    65.. => println!("Senior"),
}
}
Matching conditions:
#![allow(unused)]
fn main() {
let number = 42;
match number {
    x if x % 2 == 0 => println!("{} is even", x),
    x => println!("{} is odd", x),
}
}
Destructuring arrays:
#![allow(unused)]
fn main() {
let arr = [1, 2, 3];
match arr {
    [1, 2, 3] => println!("Exact match"),
    [1, _, _] => println!("Starts with 1"),
    [_, _, 3] => println!("Ends with 3"),
    _ => println!("Something else"),
}
}
Quick Review: Lectures 7-9
1. Variables & Types (Lecture 7)
#![allow(unused)]
fn main() {
let x = 5;
x = 10;  // What happens here?
}
- Works fine
- Compiler error
- Runtime error
2. Functions (Lecture 8)
#![allow(unused)]
fn main() {
fn calculate(a: i32, b: i32) -> i32 {
    a + b;
}
}
What does this function return?
- The sum of a and b
- The unit type ()
- A compiler error
3. Loops & Arrays (Lecture 9)
#![allow(unused)]
fn main() {
let arr = [1, 2, 3, 4, 5];
for (index, value) in arr.iter().enumerate() {
    if value % 2 == 0 {
        ________
    }
    println!("Index: {}, Value: {}", index, value);
}
}
What goes in the blank to skip to next iteration without printing?
Enum Option<T>
There is a built-in enum Option<T> with two variants:
Some(T)-- The variantSomecontains a value of typeTNone
Useful for when there may be no output
- Like
Noneornullin other languages - Rust makes you explicitly handle them, preventing bugs that are extremely common in other languages
- This might look a little like optional parameters in python (
def myfn(arg: Optional[int] = None):but functions differently)
An Option<T> example
Here's example prime number finding code that returns Option<u32> if a prime number is found, or None if not.
If a prime number is found, it returns Some(u32) variant with the prime number.
If the prime number is not found, it returns None.
fn main(){
    fn is_prime(x:u32) -> bool {
        if x <= 1 { return false;}
        for i in 2..=((x as f64).sqrt() as u32) {
            if x % i == 0 { return false; }
        }
        true
    }

    fn prime_in_range(a:u32,b:u32) -> Option<u32> {  // returns an Option<u32>
        for i in a..=b {
            if is_prime(i) {return Some(i);}
        }
        None
    }

    let tmp : Option<u32> = prime_in_range(90,906);
    // let tmp : Option<u32> =  prime_in_range(20,22);
    println!("{:?}",tmp);
}
Extracting the contents of an Option with match
matchfn main() { let tmp : Option<u32> = Some(3); // let tmp: Option<u32> = None; match tmp { Some(x) => println!("A second way: {}",x), None => println!("None"), }; }
FYI - other ways to extract values (but we'll generally prefer match):
fn main() {
let tmp : Option<u32> = Some(3);
// let tmp: Option<u32> = None;

if let Some(x) = tmp {
    println!("One way: {}",x);
}

println!("Another way: {}", tmp.unwrap()); // this will panic if tmp is None!
}
Enum Option<T>: useful methods
Check the variant
.is_some() -> bool.is_none() -> bool
Get the value in Some or terminate with an error
.unwrap() -> T.expect(message) -> T
Get the value in Some or a default value
.unwrap_or(default_value:T) -> T
Enum Result<T, E>
We saw this one with guessing game. Another built-in enum with two variants:
Ok(T)Err(E)
Similar to Option except we have a value associated with both cases.
Useful when you want to pass a solution or information about an error.
For example:
#![allow(unused)]
fn main() {
fn divide_safely(x: f64, y: f64) -> Result<f64, String> {
    if y == 0.0 {
        Err("Cannot divide by zero!".to_string())
    } else {
        Ok(x / y)
    }
}
}
Enum Result<T, E>: useful methods
Check the variant
.is_ok() -> bool.is_err() -> bool
Get the value in Ok or terminate with an error
.unwrap() -> T.expect(message) -> T
Get the value in Ok or a default value
.unwrap_or(default_value:T) -> T
Summary of Option<T> and Result<T,E>
Option<T>has variants that look likeSome(value of type T)andNoneResult<T,E>has variants that look likeOk(value of type T)andErr(error_info of type E)
Activity Time
Bonus - Simplified matching with if let (FYI)
We can't do a quick if on an enum like this:
enum Direction {
    North,
    East,
    South,
    West,
}
use Direction::*;
fn main() {
let dir: Direction = North;
if dir == North {
    println!("North");
}
}
Instead we would have to:
enum Direction {
    North,
    East,
    South,
    West,
}
use Direction::*;
fn main() {
let dir: Direction = North;
match dir {
    North => println!("North"),
    _ => (),
};
}
But this happens often enough that there's a shorthand:
enum Direction {
    North,
    East,
    South,
    West,
}
use Direction::*;
fn main() {
let dir: Direction = North;
if let North = dir { // YES THIS LOOKS BACKWARDS! It's a more like match than if
    println!("North");
};
}
You can use else to match anything else like a regular if statement
if let North = dir {
    println!("North");
} else {
    println!("Going somewhere else");
};
Lecture 11 - Error handling in Rust
Logistics - Homework
- HW1: Posted, corrections due next Friday
- HW2: Feedback will trickle in, grades will be posted after all feedback is in
- HW3: Due next Thursday
Logistics - Exam
What I've heard from you:
- Lectures have felt rushed
- You know you've learned a lot but you're not sure you can demonstrate it
- We need more practice with Rust syntax and core concepts
So:
- I'm postponing Monday's new content until WAY later in the semester
- We'll use Monday AND Tuesday for review and practice
- I'm dropping another homework from the schedule - remaining homeworks will all have 2 weeks to complete
Solutions to Wednesday's Activity
(See class site)
Learning Objectives
By the end of this lecture, students should be able to:
- Understand what
panic!does - Decide when to use
panic!vsResult<T,E> - Use the
panic!macro directly, or implicitly viaunwraporexpect - Create functions that return
Resultand handle both success and error cases - Use
matchand?operator to handle or pass alongResultvalues
Rust's Error Philosophy: Errors as Data (TC 12:25)
Most languages: Errors are "exceptional" events that get thrown and caught
try:
    result = divide(a, b)
    # continue with result
except DivisionByZeroError:
    # handle error
Rust: Errors are just another kind of data that functions can return
#![allow(unused)]
fn main() {
match divide(a, b) {
    Ok(result) => { /* continue with result */ },
    Err(error) => { /* handle error */ },
}
}
Error Handling in Rust
Two basic options:
- terminate when an error occurs: macro
panic!(...) - pass information about an error: enum
Result<T,E>
Option 1 : Choose to panic!
What it means to panic:
- stops execution ("crashes")
- starts "unwinding the stack" (more on that later)
- prints a message to the console
- tells us where in the code the panic occurred
Macro panic!(...)
- Use for unrecoverable errors
fn divide(a:u32, b:u32) -> u32 {
    if b == 0 {
        panic!("I'm sorry, Dave. I'm afraid I can't do that.");
    }
    a/b
}

fn main() {
    println!("{}",divide(20,7));
    // println!("{}",divide(20,0));
}
Getting more info out of a panic!
- Use
RUST_BACKTRACE=1 cargo runto get a backtrace like this:
$ RUST_BACKTRACE=1 cargo run
thread 'main' panicked at src/main.rs:4:6:
index out of bounds: the len is 3 but the index is 99
stack backtrace:
   0: rust_begin_unwind
             at /rustc/4d91de4e48198da2e33413efdcd9cd2cc0c46688/library/std/src/panicking.rs:692:5
   1: core::panicking::panic_fmt
             at /rustc/4d91de4e48198da2e33413efdcd9cd2cc0c46688/library/core/src/panicking.rs:75:14
   2: core::panicking::panic_bounds_check
             at /rustc/4d91de4e48198da2e33413efdcd9cd2cc0c46688/library/core/src/panicking.rs:273:5
   3: <usize as core::slice::index::SliceIndex<[T]>>::index
             at file:///home/.rustup/toolchains/1.85/lib/rustlib/src/rust/library/core/src/slice/index.rs:274:10
   4: core::slice::index::<impl core::ops::index::Index<I> for [T]>::index
             at file:///home/.rustup/toolchains/1.85/lib/rustlib/src/rust/library/core/src/slice/index.rs:16:9
   5: <alloc::vec::Vec<T,A> as core::ops::index::Index<I>>::index
             at file:///home/.rustup/toolchains/1.85/lib/rustlib/src/rust/library/alloc/src/vec/mod.rs:3361:9
   6: panic::main
             at ./src/main.rs:4:6
   7: core::ops::function::FnOnce::call_once
             at file:///home/.rustup/toolchains/1.85/lib/rustlib/src/rust/library/core/src/ops/function.rs:250:5
note: Some details are omitted, run with `RUST_BACKTRACE=full` for a verbose backtrace.
Shortcuts to panic!
Both unwrap and expect will call panic! if there is an error.
#![allow(unused)]
fn main() {
let greeting_file = File::open("hello.txt").unwrap();
}
#![allow(unused)]
fn main() {
let greeting_file = File::open("hello.txt")
        .expect("hello.txt should be included in this project");
}
Quick Quiz
1. Which #[derive()] trait lets you print an enum with {:?}?
2. Why won't this compile?
#![allow(unused)]
fn main() {
enum Status {
    Loading,
    Complete,
    Error,
}

let status = Status::Complete;
match status {
    Status::Complete => println!("Finished!"),
    Status::Error => println!("An error has occurred!"),
}
}
3. What do you think this will print?
#![allow(unused)]
fn main() {
let result = Some(42);
match result {
    Some(x) if x > 40 => println!("Large: {}", x),
    Some(x) => println!("Small: {}", x),
    None => println!("Nothing"),
}
}
Enum Result<T,E>
#![allow(unused)]
fn main() {
enum Result<T,E> {
    Ok(T),
    Err(E),
}
}
Functions can use it to
- return a result
- or information about an encountered error
fn divide(a:u32, b:u32) -> Result<u32, String> {
    if b != 0 {
        Ok(a / b)
    } else {
        let str = format!("Division by zero {} {}", a, b);
        Err(str)
    }
}

fn main(){
    println!("{:?}",divide(20,7));
    // println!("{:?}",divide(20,0));
}
When to use Result<T,E> and when to panic!
- Use
panic!when the error is unrecoverable - Use
Resultwhen you want to handle the error and continue execution
Concept: Propagating Errors
Error propagation means passing errors up through multiple layers of function calls, rather than handling them immediately at the lowest level.
Think of it like a company hierarchy:
- Junior developer encounters a bug they can't fix, reports it to senior developer
- Senior dev can't solve it, escalates to team lead
- Each level decides: "Can I handle this?" or "Pass it up the chain"
Or like the court system:
- Local court -> Appeals court -> State supreme court -> Federal supreme court
- Each level can either handle the case or pass it to a higher authority
┌─────────────────┐    ┌─────────────────┐    ┌─────────────────┐
│   Function A    │───▶│   Function B    │───▶│   Function C    │
│ (high level)    │    │ (middle level)  │    │ (low level)     │
│                 │    │                 │    │                 │
│ Can decide what │    │ Maybe can't     │    │ Detects error   │
│ to do with      │    │ handle errors   │    │ but doesn't     │
│ different errors│    │ meaningfully    │    │ know context    │
└─────────────────┘    └─────────────────┘    └─────────────────┘
                                                      │
                                                      ▼
                                              Error bubbles up!
- Function C (low-level): Knows what went wrong, but not what to do about it
- Function A (high-level): Has context to decide how to respond to different errors
Propagating errors in Rust
- We are interested in the positive outcome:
tinOk(t) - But if an error occurs, we want to propagate it ("pass the buck")
- This can be handled using
matchstatements
// compute a/b + c/d
fn calculate(a:u32, b:u32, c:u32, d:u32) -> Result<u32, String> {
    let first = match divide(a,b) {
        Ok(t) => t,
        Err(e) => return Err(e),
    };
    let second = match divide(c,d) {
        Ok(t) => t,
        Err(e) => return Err(e),
    };
    Ok(first + second)
}

fn divide(a:u32, b:u32) -> Result<u32, String> {
    if b != 0 {
        Ok(a / b)
    } else {
        let str = format!("Division by zero {} {}", a, b);
        Err(str)
    }
}

fn main(){
    println!("{:?}", calculate(16,4,18,3));
    println!("{:?}", calculate(16,0,18,3));
}
The question mark shortcut
-
Place
?after an expression that returnsResult<T,E> -
This will:
- give the content of
Ok(t) - or return
Err(e)from the encompassing function
- give the content of
fn calculate(a:u32, b:u32, c:u32, d:u32) -> Result<u32, String> {
    Ok(divide(a,b)? + divide(c,d)?)
}

fn divide(a:u32, b:u32) -> Result<u32, String> {
    if b != 0 {
        Ok(a / b)
    } else {
        let str = format!("Division by zero {} {}", a, b);
        Err(str)
    }
}

fn main(){
    println!("{:?}", calculate(16,4,18,3));
    println!("{:?}", calculate(16,0,18,3));
}
Caution with ?
The ? operator can only be used in functions whose return type is compatible with the value the ? is used on.
- If you use
?on aResult<T,E>, the function must returnResult<..., E>(with the sameE!) - If you use
?on anOption<T>, the function must returnOption<...>.
Activity Time
Lecture 12 - Midterm Review
Welcome to Review Day!
You've learned a lot in just a few weeks! Today we'll:
- Review key concepts you need to master for the midterm
- Practice with interactive questions
- Clarify what you need to know vs. what's just context
- Build confidence for the exam
Reminders about the exam
- Friday, 12:20-1:10
- No reference sheets or calculators
- Two exam versions and set (but not assigned) seating
How Today Works
- Quick concept review for each topic
- Quick questions think-pair-share and cold calls
Development Tools
Shell/Terminal Commands (Lecture 2)
For the midterm, you should recognize and recall:
pwd- where am I?ls- what's here?ls -la- more info and hidden filesmkdir folder_name- make a foldercd folder_name- move into a foldercd ..- move up to a parent foldercd ~- return to the home directoryrm filename- delete a file
You DON'T need to: Memorize complex command flags or advanced shell scripting
Git Commands (Lecture 3)
For the midterm, you should recognize and recall:
git clone- get a repository, pasting in the HTTPS or SSH linkgit status- see what's changedgit checkout branch_name- switch to a different branchgit checkout -b new_branch- create a branch callednew_branchand switch to itgit add .- stage all recent changesgit commit -m "my commit message"- create a commit with staged changesgit push- send what's on my machine to GitHubgit pull- get changes from GitHub to my machine
You DON'T need to: merge, revert, reset, resolving merge conflicts, pull requests
Cargo Commands (Lecture 5)
For the midterm, you should recognize and recall:
cargo new project_name- create projectcargo run- compile and runcargo run --release- compile and run with optimizations (slower to compile, faster to run)cargo build- just compile without runningcargo check- just check for errors without compilingcargo test- run tests
You DON'T need to: Cargo.toml syntax, how Cargo.lock works, advanced cargo features
Quick Questions: Tools
Question 1
Which command shows your current location on your machine?
Question 2
What's the correct order for the basic Git workflow?
- A) add → commit → push
- B) commit → add → push
- C) push → add → commit
- D) add → push → commit
Question 3
Which cargo command compiles your code without running it?
Rust Core Concepts
Compilers vs Interpreters (Lecture 4)
Key Concepts
- Compiled languages (like Rust): Code is transformed into machine code before running
- Interpreted languages (like Python): Code is executed line-by-line at runtime
- The compiler checks your code for errors and translates it into machine code
- The machine code is directly executed by your computer - it isn't Rust anymore!
- A compiler error means your code failed to translate into machine code
- A runtime error means your machine code crashed while running
Rust prevents runtime errors by being strict at compile time!
Variables and Types (Lecture 7)
Key Concepts
- Defining variables:
let x = 5; - Mutability: Variables are immutable by default, use
let mutto allow them to change - Shadowing:
let x = x + 1;creates a newxvalue withoutmutand lets you change types - Basic types:
i32,f64,bool,char,&str,String - Rough variable sizes: Eg.
i32takes up 32-bits of space and its largest positive value is about half ofu32's largest value - Type annotations: Rust infers types (
let x = 5) or you can specify them (let x: i32 = 5) - Tuples: Creating (
let x = (2,"hi")), accessing (let y = x.0 + 1), destructuring (let (a,b) = x) - Constants: Eg.
const MY_CONST: i32 = 5, always immutable, must have explicit types, written into machine code at compile-time
What's Not Important
- Calculating exact variable sizes and max values
- 2's complement notation for negative integers
- Complex string manipulation details
String vs &str - You're not responsible for it, but let's talk about it
Quick explanation
String= a string = owned text data (like a text file you own)&str= a "string slice = borrowed text data (like looking at someone else's text)- A string literal like
"hello"is a&str(you don't own it, it's baked into your program) - To convert from an &str to a String, use
"hello".to_string()orString::from("hello") - To convert from a String to an &str, use
&my_string(to create a "reference")
Don't stress! You can do most things with either one, and I will not make you do anything crazy with these / penalize you for misusing these on the midterm.
Quick Questions: Rust basics
Question 4
What happens with this code?
#![allow(unused)]
fn main() {
let x = 5;
x = 10;
println!("{}", x);
}
- A) Prints 5
- B) Prints 10
- C) Compiler error
- D) Runtime error
Question 5
What's the type of x after this code?
#![allow(unused)]
fn main() {
let x = 5;
let x = x as f64;
let x = x > 3.0;
}
- A)
i32 - B)
f64 - C)
bool - D) Compiler error
Question 6
How do you access the second element of tuple t = (1, 2, 3)?
- A)
t[1] - B)
t.1 - C)
t.2 - D)
t(2)
Functions (Lecture 8)
Key Concepts
- Function signature:
fn name(param1: type1, param2: type2) -> return_type, returned value must matchreturn_type - Expressions and statements: Expressions reduce to values (no semicolon), statements take actions (end with semicolon)
- Returning with return or an expression: Ending a function with
return x;andxare equivalent - {} blocks are scopes and expressions: They reduce to the value of the last expression inside them
- Unit type: Functions without a return type return
() - Best practices: Keep functions small and single-purpose, name them with verbs
What's Not Important
- Ownership/borrowing mechanics (we'll cover this after the midterm)
- Advanced function patterns
Quick Questions: Functions
Question 7
What is the value of mystery(x)?
#![allow(unused)]
fn main() {
fn mystery(x: i32) -> i32 {
    x + 5;
}
let x = 1;
mystery(x)
}
- A) 6
- B)
i32 - C)
() - D) Compiler error
Question 8
Which is a correct function signature for a function that takes two integers and returns their sum?
Question 9
Which version will compile
#![allow(unused)]
fn main() {
// Version A
fn func_a() {
    42
}

// Version B
fn func_b() {
    42;
}
}
- A) A
- B) B
- C) Both
- D) Neither
Question 10
What does this print?
#![allow(unused)]
fn main() {
let x = println!("hello");
println!("{:?}", x);
}
- A) hello /n hello
- B) hello /n ()
- C) hello
- D) ()
- E) Compiler error
- F) Runtime error
Loops and Arrays (Lecture 9)
Key Concepts
- Ranges:
1..5vs1..=5 - Arrays: Creating (
[5,6]vs[5;6]), accessing (x[i]), 0-indexing - If/else: how to write
if / elseblocks with correct syntax - Loop types:
for,while,loop- how and when to use each breakandcontinue: For controlling loop flow- Basic enumerating
for (i, val) in x.iter().enumerate()
What's Not Important
- Compact notation (
let x = if y ...orlet y = loop {...) - Enumerating over a string array with
for (i, &item) in x.iter().enumerate() - Labeled loops, breaking out of an outer loop
Quick Questions: Loops & Arrays
Question 11
What's the difference between 1..5 and 1..=5?
Question 12
What does this print?
#![allow(unused)]
fn main() {
for i in 0..3 {
    if i == 1 { continue; }
    println!("{}", i);
}
}
Question 13
How do you get both index and value when looping over an array?
Enums and Pattern Matching (Lecture 10)
Key Concepts
- Enum definition: Creating custom types with variants
- Data in variants: Enums can hold data
matchexpressions: syntax by hand, needs to be exhaustive, how to use a catch-all (_)Option<T>: HasSome(value)andNoneResult<T, E>: HasOk(value)andErr(error)#[derive(Debug)]: For making enums printable#[derive(PartialEq)]: For allowing enums to be compared with==and!=- Data extraction: Getting values out of enum variants with
match,unwrap, orexpect
What's Not Important
if letnotation- writing complex matches (conditional statements, ranges, tuples) - you should understand them but don't have to write them
Quick Questions: Enums & Match
Question 14
What's wrong with this code?
#![allow(unused)]
fn main() {
enum Status {
    Loading,
    Complete,
    Error,
}

match Status::Loading {
    Status::Loading => println!("Loading..."),
    Status::Complete => println!("Done!"),
}
}
Question 15
If a function's return type is Option<i32> what values can it return (can be more than one)?
- A)
Some(i32) - B)
Ok - C)
Ok(i32) - D)
None - E)
Err
Question 16
What can go in the ???? to get the value out of Some(42)?
#![allow(unused)]
fn main() {
let x = Some(42);
match x {
    Some(????) => println!("Got: {}", ????),
    None => println!("Nothing"),
}
}
- A)
_and_ - B)
42and42 - C)
xandx - D)
yandy
Question 17
What does #[derive(Debug)] do?
Error Handling (Lecture 11)
Key Concepts
panic!vsResult: Panic when unrecoverable, Result when recoverableResult<T, E>for errors:Ok(value)for success,Err(error)for failure- Error propagation: Passing errors up with
matchor? unwrap()andexpect(): Quick ways to extract values (but they can panic!)- The
?operator: Shortcut for "if error, return it; if ok, give me the value" - only works on sharedE
Quick Questions: Error Handling
Question 18
When should you use panic! vs Result<T, E>?
Question 19
Why won't this code compile?
#![allow(unused)]
fn main() {
fn parse_number(s: &str) -> Result<i32, String> {
    let num = s.parse::<i32>()?;  // parse() returns Result<i32, ParseIntError>
    Ok(num * 2)
}
}
- A) The
?operator can't be used inletstatements - B) You can't multiply by 2 inside
Ok() - C) The error types don't match:
ParseIntErrorvsString - D)
Okdoesn't match theResulttype
Question 20
When might you extract a value with .unwrap()?
- A) When you're pretty sure the value will be
Ok/SomenotErr/None - B) When you want the code to crash if the value is
ErrorNone - C) When you want the value if
Ok/Somebut want to ignore it ifErr/None - D) When you want a more concise version of a match statement
Question 21
What does this return when called with divide(10, 2)?
#![allow(unused)]
fn main() {
fn divide(a: i32, b: i32) -> Result<i32, String> {
    if b == 0 {
        Err("Can't divide by zero".to_string())
    } else {
        Ok(a / b)
    }
}
}
Putting It All Together
What You've Accomplished
In just a few weeks, you've learned:
- Professional development tools (shell, git, github, cargo)
- The foundations of a systems programming language
- Sophisticated pattern matching and error handling techniques
That's genuinely impressive!
And if it doesn't feel fluent yet, give it some time. It's like you memorized your first 500 words in a new spoken language but haven't had much practice actually speaking it yet. It feels awkward, and that's normal.
Midterm Strategy
- Focus on concepts: Understand the "why" behind the syntax and it will be easier to remember
- Practice with your hands: Literally and figuratively - practice solving problems, and practice on paper
- Take big problems step-by-step: Understand each line of code before reading the next. And make a plan before you start to hand-code
Questions and Discussion
What topics would you like to clarify before Wednesday's practice session?
Activity Time - Design your own midterm
No promises, but I do mean it.
You'll find an activity released to you on gradescope to do solo or in groups.
I want you all to spend some time thinking about problems/questions that you could imagine being on our first midterm. If I like your questions, I might include them (or some variation) on the exam!
This also helps me understand what you're finding easy/difficult and where we should focus on Wednesday. It can help you identify areas you might want to brush up on as well.
Aim to come up with 2-3 questions per category (or more!). I'm defining these as:
- EASY You know the answer now and expect most students in the class will get it right
- MEDIUM You feel iffy now but bet you will be able to answer it after studying, and it would feel fair to be on exam
- HARD It would be stressful to turn the page to this question, but you bet you could work your way to partial credit
Requirements for each question:
For each question you create, please include:
- The question itself
- The answer/solution (if you can solve it)
- Why you categorized it as Easy/Medium/Hard
Content Areas to Consider:
Make sure your questions collectively cover the major topics we've studied so far:
- Tools: git, shell, cargo
- Rust: Variables, types, functions, loops, enums & match, error handling
Some formats of problems to consider:
- Definitions
- Multiple choice
- Does this compile / what does it return
- Find and fix the bug
- Fill-in-the-blank in code
- Longer hand-coding problems
- Short answer on concepts (describe how x works...)
Lecture 13 - Midterm Practice Problems
Today's Goals
- Work through realistic practice problems similar to the midterm
- Practice applying multiple concepts together
- Walk through solutions step-by-step
Today's Format:
- Work individually first, then discuss with neighbors
- I'll walk through solutions after you've tried each section
- Ask questions anytime - if you're confused, others probably are too!
Exam tips
Exam format
- Short answer, fill-in, find bugs ~ 60% of the exam
- One hand-coding problem ~ 40% of the exam
Short answer tips
- I was serious about Anki / flashcards - they help!
- When approaching a block of code (to debug, find what it returns, fill in blanks):
- Skim it quickly once to get the gist
- Then read it slowly making sure you understand each part completely
- Write what you know - if you don't know the answer, what DO you know?
Hand-coding tips
- Read the whole problem first and make a plan
- Test your logic by imagining runs with example data
- Show your process (you can write comments by hand too!) - if I can see what you were trying to do I can give you more credit
- Check your function signature - parameter and return types should match!
- Check your syntax! - semicolons,
=vs==,..vs..=, ... did I mention semicolons?
See Activity 13
for the material for the rest of the lecture
First-half Discussion
Let's go through the solutions for Practice Set A together before moving to the longer problem.
Second-half Discussion
If you're finished and want to try out your solution, type it up and email it to laurenbw@bu.edu
I'll put it on the screen (anonymously) and we'll discuss it / debug it together
Questions?
What would help clarify anything before the midterm?
Lecture 14 - Stack / Heap
Logistics - Exam
- You survived the exam!
- I will have grades to you by Friday, probably sooner
- You'll have 1 week to do corrections and/or ask for an oral redo of a topic
- I dropped the hand-coding weight from ~40% to ~20% (it won't hurt you)
Logistics - Exam
Corrections requirements
- Like HW1 corrections
- An explanation of what you misunderstood and what you learned since
- A completely correct answer
- No partial credit
Oral exam option - tweaked since the syllabus
- In addition to corrections for ONE of part of the exam, you can meet with me for a short in-person conversation where we discuss your insight, you answer some related questions, and have the opportunity to recover more points (up to a cap of 90% for the section).
- Some examples:
- You received 7/21 points (33%) for hand-coding. With corrections you can reach 66%. If you come in for an oral exam you may receive additional credit, for a final section score between 66% and 90%.
- You received 15/18 ponts on Part 1 (83%). With corrections you can reach 92%. You can't improve your score on this section with an oral exam.
- With the corrections assignment I'll ask you to elect which section, if any, you'd like to go over together and I'll coordinate scheduling.
Logistics - other stuff
- HW3 is due tonight at midnight - Zach (from A1) has office hours 1:30-3:30 for last-minute questions
- HW2 corrections are due Thursday night
- HW4 will be posted Friday, due two weeks later
Learning Objectives
- Today: We're going to peek under the hood of how computers actually store and manage data
By the end of today, you should be able to:
- Explain what computer memory (RAM) is and how it works
- Understand what memory addresses are and why they matter
- Distinguish between stack and heap memory allocation
- Connect these concepts to Rust code you've already written
- Understand why Rust's approach to memory management is different (and better!)
What is computer memory?
Where are x, name, and scores actually stored when your program runs?
#![allow(unused)]
fn main() {
let x = 42;
let name = "Alice".to_string();
let scores = [85, 92, 78];
}

What's the difference between RAM and storage (hard drive)?
| RAM (Memory) | Storage (Hard Drive/SSD) |
|---|---|
| Super fast (nanoseconds) | Much slower (microseconds to milliseconds) |
| Temporary (lost when power off) | Permanent (survives power off) |
| Small (8-64 GB typical) | Large (500 GB - 4 TB typical) |
Physical difference: RAM uses electronic circuits (transistors/capacitors) that can switch instantly, while storage uses mechanical parts (spinning disks) or slower flash memory cells.
CPU + RAM relationship: The CPU (processor) is like the "brain" that does all the actual work - it reads instructions and data from RAM, processes them, and writes results back to RAM. You can think of of RAM as the CPU's "desk" where it keeps everything it's currently working on.
Key idea: Your program runs entirely in RAM! - Storage is only used to load your program into RAM initially.
A helpful metaphor for RAM
Your RAM is like an organized city made up of buildings and units
- Each unit has a unique address (like "Building A, Floor 5, Apt 12")
- Each unit can hold one piece of data (like one number, one character)
- The computer can look up any unit instantly if it knows the address
- Everyone is renting - limited space / data is lost with power off
- You get there on a bus!
When your program runs, ALL your data has to live somewhere in this city
Memory Addresses - Like Street Addresses
Every location in memory has a unique address -
Memory Address    |  Data Stored There
------------------|------------------
0x7fff5fbff6bc    |  42
0x7fff5fbff6c0    |  'H'
0x7fff5fbff6c4    |  'e'
0x7fff5fbff6c8    |  'l'
0x7fff5fbff6cc    |  'l'
0x7fff5fbff6d0    |  'o'
- Addresses are written in hexadecimal (base 16) - that's why they go up to "f"
- The computer uses these addresses to find your data super quickly
- Pointers are just variables that store memory addresses instead of values
How Memory is Organized - The Big Picture
When your program runs, memory is organized into different "neighborhoods" for different purposes:
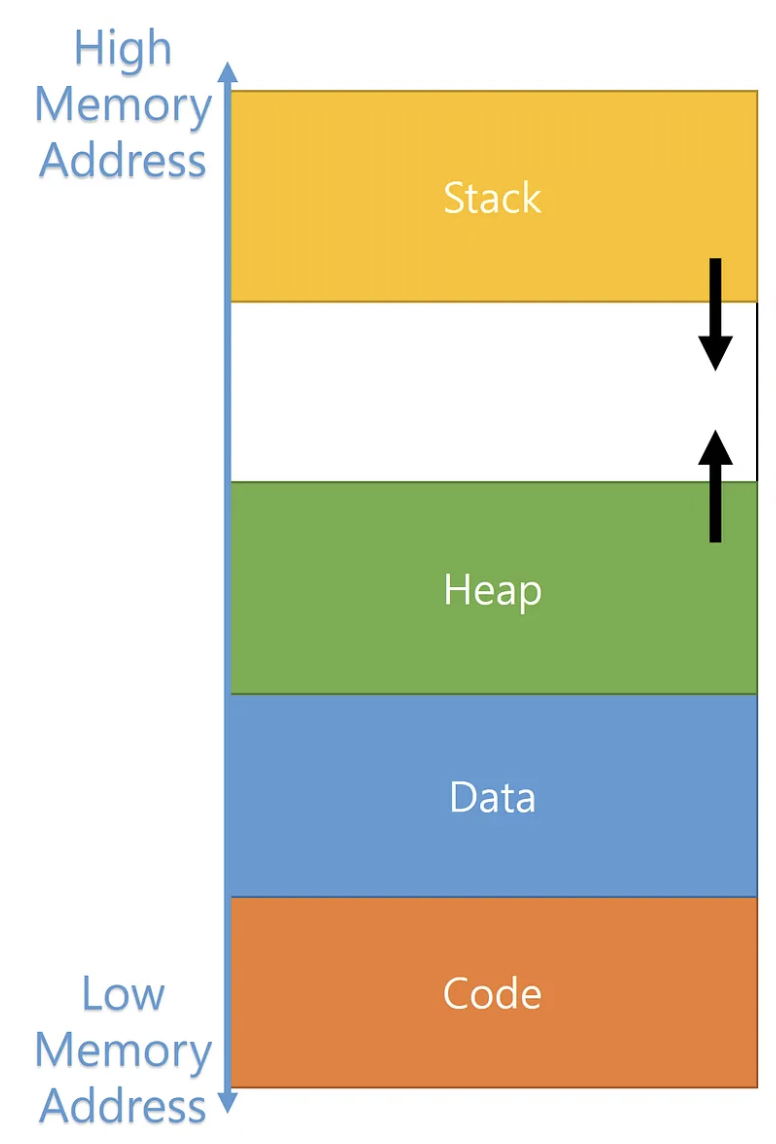
It's as if the city has different districts (from low addresses to high addresses):
- Text/Code - Where your compiled Rust functions live ("business district"?)
- Static Data - Where global constants live ("city hall"?)
- Heap - Where dynamic data lives (like "storage units" - rent them when you need them)
- Stack - Where local variables live temporarily (most like dorms - people move in and out)
We'll mostly care about Stack vs. Heap
Why Should You Care?
Programs need to:
- Get memory when they need to store data ("move in")
- Give it back when they're done with it ("move out")
If programs don't give memory back your computer/program slows down and eventually crashes!
(In the housing analogy, there's a housing shortage, homelessness, and eventually a proletariat uprising?)
Three Approaches to Memory Management
Different programming languages handle this differently:
-
Manual (C/C++): "You figure it out!"
- Programmer manually asks for memory and gives it back (C:
malloc/free) - Super fast, but easy to make dangerous mistakes
- Programmer manually asks for memory and gives it back (C:
-
Garbage Collection (Python/Java): "I'll handle it automatically!"
- Language automatically cleans up unused memory
- Safe but can cause random slowdowns
-
Ownership (Rust): "I'll help you get it right!"
- Compiler enforces rules to prevent mistakes
- Fast AND safe - best of both worlds!
This is why Rust can seem picky sometimes - it's preventing memory bugs!
Stack vs. Heap: The Two Main Memory Types
The Stack: Like a dorm, but also... like a literal stack of plates
Key idea: Last thing you put on, first thing you take off
fn main() {                    // Stack: [        ]
    let x = 42;               // Stack: [x=42     ]
    let y = true;             // Stack: [x=42, y=true]
    println!("{}", x);
}                             // Stack: [        ] ← Everything cleaned up automatically!
Stack characteristics:
- Super fast - just "put on top" or "take off top"
- Limited size - like a small tower of plates
- Automatic cleanup - when a function ends, its "plates" are removed
- Size must be known - each "plate" is a fixed size
Most Rust data you've seen lives on the stack: i32, bool, char, arrays, tuples
Stack Frames: Organized Sections
Each function call gets its own organized section called a stack frame
Stack frame holds all the data for one function call:
- Function parameters
- Local variables
- Return address (where to go back when function ends)
- Other bookkeeping info
Stack Memory:
┌─────────────────┐ ← Top of stack
│   Function C    │ ← Stack frame for Function C
│   parameters    │
│   local vars    │
│   return info   │
├─────────────────┤
│   Function B    │ ← Stack frame for Function B
│   parameters    │
│   local vars    │
│   return info   │
├─────────────────┤
│   Function A    │ ← Stack frame for Function A (main)
│   parameters    │
│   local vars    │
│   return info   │
└─────────────────┘ ← Bottom of stack
When a function ends, its entire stack frame gets removed instantly!
A short example of stack frames
When you call a function, it gets its own stack frame:
fn main() {                    // Stack: [main's stack frame]
    let x = 5;
    let result = double(x);    // Stack: [main's frame][double's frame]
    println!("{}", result);
}                              // Stack: [main's frame] ← double's frame is gone!

fn double(n: i32) -> i32 {
    let doubled = n * 2;       // This lives in double's stack frame
    doubled
}
Stack Overflow - A Real Problem!
What happens if you make too many function calls?
#![allow(unused)]
fn main() {
fn recursive_function(n: u32) -> u32 {
    if n == 0 {
        0
    } else {
        recursive_function(n - 1)  // Each call adds a new "plate" to the stack!
    }
}

// This will crash your program:
recursive_function(1_000_000);  // Too many "plates"!
}
This is where the name "Stack Overflow" (the website) comes from!
The Heap: Like a Storage Unit Facility
Key idea: Rent storage space when you need it, different sizes allowed
fn main() {
    let name = "Alice".to_string();          // The actual "Alice" lives on the heap!
    let scores = vec![85, 92, 78, 96, 88];   // These numbers live on the heap!

    // name and scores themselves are on the stack,
    // but they contain "addresses" pointing to heap data
}
Heap characteristics:
- Flexible size - can grow and shrink as needed
- Slower access - have to "drive to the storage unit"
- Manual management needed - someone has to "return the keys"
- Much larger - way more space available than stack
Rust data that lives on the heap: String, Vec, HashMap, Box
Stack vs. Heap
| Stack 🍽️ | Heap 📦 |
|---|---|
| Fixed size, known at compile time | Variable size, can grow/shrink |
| Super fast access | Slower access (follow pointer) |
| Automatic cleanup | Manual management needed |
| Limited space | Lots of space |
i32, bool, arrays, tuples | String, Vec, HashMap, etc. |
String vs &str - Finally Explained!
We can explain this a bit more now with stack/heap:
String: Owned Text on the Heap
#![allow(unused)]
fn main() {
let name = "Alice".to_string();  // or String::from("Alice")
}
What happens in memory:
Stack:                    Heap:
┌─────────────┐          ┌─────┬─────┬─────┬─────┬─────┐
│ name        │          │ 'A' │ 'l' │ 'i' │ 'c' │ 'e' │
│ ├ ptr ──────┼─────────▶│     │     │     │     │     │
│ ├ len: 5    │          └─────┴─────┴─────┴─────┴─────┘
│ └ cap: 5    │
└─────────────┘
- String = the metadata on the stack (pointer, length, capacity)
- Actual text = lives on the heap
- You own it = you can modify it, and Rust will clean it up for you
&str: Borrowed Text (Points to Existing Data)
#![allow(unused)]
fn main() {
let greeting = "Hello";  // This is &str
}
What happens in memory:
Stack:                    Program Binary (Text Section):
┌─────────────┐          ┌─────┬─────┬─────┬─────┬─────┐
│ greeting    │          │ 'H' │ 'e' │ 'l' │ 'l' │ 'o' │
│ ├ ptr ──────┼─────────▶│     │     │     │     │     │
│ └ len: 5    │          └─────┴─────┴─────┴─────┴─────┘
└─────────────┘
- &str = just a pointer and length on the stack
- Actual text = lives in your compiled program (or points to someone else's String)
- You're borrowing it = you can read it, but you don't own it
Let's Watch the Stack in Action!
Here's an example showing how the stack builds up and comes down as functions are called.
The diagrams will be online after class but there's space on your paper to draw them yourselves as we go.
fn main() {
    let x = 42;                           // Stack variable
    let name = "Alice".to_string();       // Stack + Heap
    let result = process_data(x, &name);
    println!("{}", result);
}

fn process_data(num: i32, text: &str) -> String {
    let mut doubled = num * 2;            // Stack variable

    // A bracketed scope creates its own mini-stack frame!
    {
        let temp_multiplier = 10;         // New scope variable
        let temp_result = doubled * temp_multiplier;  // Another scope variable
        println!("Temp calculation: {}", temp_result);
        doubled = doubled + 1;            // Modify outer variable
    }  // temp_multiplier and temp_result are destroyed here!

    let greeting = format!("Hello {}, your number is {}", text, doubled);
    greeting                              // Return String (heap data)
}
Step 1: main() starts
Stack:                          Heap:
┌─────────────────┐            ┌─────┬─────┬─────┬─────┬─────┐
│ main():         │            │ 'A' │ 'l' │ 'i' │ 'c' │ 'e' │
│ ├ result: ???   │            └─────┴─────┴─────┴─────┴─────┘
│ ├ name: String  │                   ▲
│ │   ptr ────────┼───────────────────┘
│ │   len: 5      │
│ │   cap: 5      │
│ └ x: 42         │
└─────────────────┘
Step 2: Call process_data(x, &name)
Stack:                          Heap:
┌─────────────────┐            ┌─────┬─────┬─────┬─────┬─────┐
│ process_data(): │            │ 'A' │ 'l' │ 'i' │ 'c' │ 'e' │
│ ├ doubled: 84   │            └─────┴─────┴─────┴─────┴─────┘
│ ├ text: &str    │                   ▲   ▲
│ │   ptr ────────┼───────────────────┘   |
│ │   len: 5      │                       |
│ └ num: 42       │                       |
├─────────────────┤                       |
│ main():         │                       |
│ ├ result: ???   │                       |
│ ├ name: String ─┼───────────────────────┘
│ └ x: 42         │
└─────────────────┘
Step 3: Enter the bracketed scope {}
Stack:                          Heap:
┌─────────────────┐
│ { scope }:      │
│ ├temp_result: 840
│ └temp_multiplier:10
├─────────────────┤            ┌─────┬─────┬─────┬─────┬─────┐
│ process_data(): │            │ 'A' │ 'l' │ 'i' │ 'c' │ 'e' │
│ ├ doubled: 85   │ <-modified └─────┴─────┴─────┴─────┴─────┘
│ ├ text: &str    │                   ▲   ▲
│ │   ptr ────────┼───────────────────┘   |
│ │   len: 5      │                       |
│ └ num: 42       │                       |
├─────────────────┤                       |
│ main():         │                       |
│ ├ result: ???   │                       |
│ ├ name: String ─┼───────────────────────┘
│ └ x: 42         │
└─────────────────┘
Step 4: Exit the bracketed scope
Stack:                          Heap:
┌─────────────────┐          ┌─────┬─────┬─────┬─────┬─────┬──────┬──────┐
│ process_data(): │          │ 'H' │ 'e' │ 'l' │ 'l' │ 'o' │ ' '  │ 'A'  │ ...
│  └ greeting:    │          └─────┴─────┴─────┴─────┴─────┴──────┴──────┘
│     String      │                                  ▲
│     ptr ────────┼──────────────────────────────────┘
│     len: 28     │            ┌─────┬─────┬─────┬─────┬─────┐
│     cap: 28     │            │ 'A' │ 'l' │ 'i' │ 'c' │ 'e' │
│ ├ doubled: 85   │← Still 85! └─────┴─────┴─────┴─────┴─────┘
│ ├ text: &str    │                   ▲   ▲
│ │   ptr ────────┼───────────────────┘   |
│ │   len: 5      │                       |
│ └ num: 42       │                       |
├─────────────────┤                       |
│ main():         │                       |
│ ├ result: ???   │                       |
│ ├ name: String ─┼───────────────────────┘
│ └ x: 42         │
└─────────────────┘
Step 5: process_data() returns
Stack:                          Heap:
┌─────────────────┐
│ main():         │         ┌─────┬─────┬─────┬─────┬─────┬──────┬──────┐
│ │   len: 5      │         │ 'H' │ 'e' │ 'l' │ 'l' │ 'o' │ ' '  │ 'A'  │ ...
│ │   cap: 5      │         └─────┴─────┴─────┴─────┴─────┴──────┴──────┘
│ └ result:       │          ▲
│     String      │          │
│     ptr ────────┼──────────┘  ┌─────┬─────┬─────┬─────┬─────┐
│     len: 28     │             │ 'A' │ 'l' │ 'i' │ 'c' │ 'e' │
│     cap: 28     │             └─────┴─────┴─────┴─────┴─────┘
│ ├ name: String ─┼───────────────────────┘
│ ├ x: 42         │
└─────────────────┘
Step 6: main() ends
Stack:              Heap:
┌─────────┐        ┌─────────────┐
│ (empty) │        │ (cleaned up │
└─────────┘        │  by Rust!)  │
                   └─────────────┘
Take-aways from this example
- Stack builds up as functions are called, shrinks as they return
- Bracketed scopes
{}create mini-stack frames within functions - Variables in scopes are destroyed when the scope ends, but changes to outer variables persist (you can think about what that means for shadowing...)
- Heap data can outlive the function that created it (when moved/returned)
- Rust automatically cleans up heap data when no one owns it anymore
Lecture 15 - Ownership and Vec
Logistics
- Midterm grades and corrections assignment posted
- HW3 late deadline tonight
We are here
- Last time: Stack and heap
- Today: Rust's ownership system + Vec+Box for heap data
- Next time: Borrowing and references (&, *)
Learning Objectives
By the end of today, you should be able to:
- Explain Rust's three ownership rules
- Understand when data gets moved vs copied
- Draw stack/heap diagrams showing ownership
- Use
Vec<T>andBox<T>on the heap - Debug common ownership compiler errors
Recall: stack vs heap
Stack: Fast, fixed-size, automatic cleanup
- Like a stack of plates - last in, first out
- Each function call gets its own "stack frame"
- All the simple types you've used:
i32,bool,char, arrays, tuples
Heap: Flexible size, manual management (but Rust helps!)
- Like a warehouse - rent space when you need it
- For data that can grow/shrink or is really big
StringandVec<T>store their actual data here
Key idea: Stack variables can hold pointers (addresses) to heap data
Part 1 - Ownership in Rust
Ownership tracks what variable is responsible for data that is on the heap.
Why ownership:
- It helps efficiently free up memory when it is no longer needed
- It helps prevent "undefined behavior" that arises from less-strict approaches
Rust's Three Ownership Rules
These are the fundamental rules that make Rust memory-safe:
- Each value in Rust has an owner
- There can only be one owner at a time
- When the owner goes out of scope, the value will be dropped
Rule 1: Each value in Rust has an owner
#![allow(unused)]
fn main() {
let s1 = String::from("hello");  // s1 owns the string
// There is exactly ONE owner of the "hello" data on the heap
}
Stack/Heap diagram:
Stack:           Heap:
┌─────────────┐  ┌─────┬─────┬─────┬─────┬─────┐
│ s1: String  │  │ 'h' │ 'e' │ 'l' │ 'l' │ 'o' │
│ ├ ptr ──────┼─▶│     │     │     │     │     │
│ ├ len: 5    │  └─────┴─────┴─────┴─────┴─────┘
│ └ cap: 5    │  ↑
└─────────────┘  Owner: s1
Rule 2: There can only be one owner at a time
fn main(){
let s1 = String::from("hello");
let s2 = s1;  // Ownership MOVES from s1 to s2
// println!("{}", s1);  // ERROR! s1 no longer owns the data
println!("{}", s2);     // OK! s2 now owns it
}
What happens in memory:
Before move:         After move:
Stack:               Stack:
┌─────────────┐     ┌─────────────┐
│ s1: String  │     │ s2: String  │
│ ├ ptr ──────┼──┐  │ ├ ptr ──────┼─┐
│ ├ len: 5    │  │  │ ├ len: 5    │ │
│ └ cap: 5    │  │  │ └ cap: 5    │ │
└─────────────┘  │  ├─────────────┘ │
                 │  │  s1: ???    │ │
                 │  └─────────────┘ │
                 │                  │
                 │  Heap:           │
                 │  ┌─────┬─────┬─────┬─────┬─────┐
                 └─▶│ 'h' │ 'e' │ 'l' │ 'l' │ 'o' │
                    └─────┴─────┴─────┴─────┴─────┘
Rule 3: When the owner goes out of scope, the value is dropped
fn main(){ { let s = String::from("hello"); // s owns the string } // s goes out of scope, heap memory is freed automatically! println!("{}", s); }
Move vs Copy: The Key Distinction
Stack data gets copied
#![allow(unused)] fn main() { let x = 5; let y = x; // x is copied to y println!("{} {}", x, y); // Both work! }
Heap data gets moved
#![allow(unused)] fn main() { let s1 = String::from("hello"); let s2 = s1; // s1 is moved to s2 // println!("{}", s1); // s1 is no longer valid println!("{}", s2); // Only s2 works now }
Why would an int get copied but a string get moved by default?
Think-pair-share
Passing data to functions follows the same rules
fn takes_ownership(some_string: String) { println!("in fn: {}", some_string); } // some_string goes out of scope and heap memory is freed fn makes_copy(some_integer: i32) { println!("in fn: {}", some_integer); } // some_integer goes out of scope, but it's just a copy fn main() { let s = String::from("hello"); takes_ownership(s); // s is moved into the function // println!("in main: {}", s); // ERROR! s is no longer valid let x = 5; makes_copy(x); // x is copied into the function println!("in main: {}", x); // OK! x is still valid }
Function return values also transfer ownership
fn gives_ownership() -> String { let some_string = String::from("yours"); some_string // Ownership moves to caller } fn takes_and_gives_back(a_string: String) -> String { a_string // Ownership moves back to caller } fn main() { let s1 = gives_ownership(); // Ownership moves from function to s1 let s2 = String::from("hello"); // s2 comes into scope let s3 = takes_and_gives_back(s2); // s2 moves in, s3 gets it back // s2 is no longer valid, but s1 and s3 are println!("s1: {}", s1); // println!("s2: {}", s2); println!("s3: {}", s3); }
Let's draw these moves on the board.
Try to predict what happens before running:
Think-pair-share
fn main() { let s1 = String::from("world"); let s2 = process_string(s1); println!("{}", s2); // Will this work? println!("{}", s1); // Will this work? } fn process_string(input: String) -> String { format!("Hello, {}!", input) }
Part 2 - Vec and Box on the heap
Finally! I know some of you have been using Vec anyway because Rust's arrays are so limiting...
Now we'll get to start using Vec for real.
Why arrays were such a pain
- They live on the stack, so... they're fixed size and size must be known at compile time
What is a Vec
- Contains a single type, like an array
- Can change sizes!
- Lives on the heap
Creating Vec
#![allow(unused)] fn main() { // Three ways to create a Vec: let mut numbers = Vec::new(); // Empty vector let mut scores = vec![85, 92, 78]; // With initial data let mut names: Vec<String> = Vec::new(); // Empty with type annotation }
Vec in memory (let's trace vec![85, 92, 78]):
Stack: Heap:
┌─────────────────┐ ┌────┬────┬────┬────┐
│ scores: Vec<i32>│ │ 85 │ 92 │ 78 │ ?? │
│ ├ ptr ──────────┼─────▶│ │ │ │ │
│ ├ len: 3 │ └────┴────┴────┴────┘
│ └ cap: 4 │ capacity = 4, length = 3
└─────────────────┘
Basic Vec Operations
fn main() { let mut numbers = vec![1, 2, 3]; // Add elements (might reallocate!) numbers.push(4); numbers.push(5); // Other basic operations numbers.pop(); let num_len = numbers.len(); // Access elements (copies the value!) let first = numbers[0]; let third = numbers[2]; println!("First: {}, Third: {}", first, third); println!("Vec: {:?}", numbers); }
Let's draw it on the board!
Key insight: numbers[0] copies the value from heap to stack because i32 is a "copy type".
Capacity vs Length
#![allow(unused)] fn main() { let mut vec = Vec::with_capacity(4); // Reserve space for 4 elements println!("Length: {}, Capacity: {}", vec.len(), vec.capacity()); vec.push(1); vec.push(2); println!("Length: {}, Capacity: {}", vec.len(), vec.capacity()); vec.push(3); vec.push(4); vec.push(5); // This might cause reallocation! println!("Length: {}, Capacity: {}", vec.len(), vec.capacity()); }
When Vec grows beyond capacity: Rust allocates a bigger chunk of heap memory, copies all data over, and frees the old chunk. You don't have to worry about this!
Vec Ownership in Action
Moving Vec to functions:
fn main() { let my_vec = vec![1, 2, 3]; let result = process_numbers(my_vec); // my_vec moves into function // println!("{:?}", my_vec); // ERROR! my_vec no longer valid println!("{:?}", result); // OK! result owns the data now } fn process_numbers(mut numbers: Vec<i32>) -> Vec<i32> { numbers.push(99); numbers }
Copying values FROM Vec:
fn main() { let numbers = vec![10, 20, 30, 40]; // These copy values from heap to stack: let first = numbers[0]; // first = 10 (copied) let second = numbers[1]; // second = 20 (copied) // Original Vec still owns the heap data: println!("Vec still works: {:?}", numbers); println!("Copied values: {}, {}", first, second); }
Stack/heap after copying:
Stack: Heap:
┌─────────────────┐
│ second: 20 │
├─────────────────┤
│ first: 10 │
├─────────────────┤ ┌────┬────┬────┬────┐
│ numbers: Vec │ │ 10 │ 20 │ 30 │ 40 │
│ ├ ptr ──────────┼─────▶│ │ │ │ │
│ ├ len: 4 │ └────┴────┴────┴────┘
│ └ cap: 4 │
└─────────────────┘
What About Vec<String>?
Important difference: Vec<String> contains heap data inside heap data!
fn main(){ let mut names = vec![ String::from("Alice"), String::from("Bob") ]; // This WON'T work the same way: // let first_name = names[0]; // Can't copy String! }
Stack/heap with Vec
Stack: Heap (Vec data): Heap (String data):
┌────────────────┐ ┌─────────────────┐ ┌─────┬─────┬─────┬─────┬─────┐
│ names: Vec │ │ String("Alice") │───────▶│ 'A' │ 'l' │ 'i' │ 'c' │ 'e' │
│ ├ ptr ─────────┼────▶│ ├ ptr ──────────┼────────┤ │ │ │ │ │
│ ├ len: 2 │ │ ├ len: 5 │ └─────┴─────┴─────┴─────┴─────┘
│ └ cap: 2 │ │ └ cap: 5 │
└────────────────┘ ├─────────────────┤ ┌─────┬─────┬─────┐
│ String("Bob") │───────▶│ 'B' │ 'o' │ 'b' │
│ ├ ptr ──────────┼────────┤ │ │ │
│ ├ len: 3 │ └─────┴─────┴─────┘
│ └ cap: 3 │
└─────────────────┘
Why? String doesn't implement Copy - we'd be copying heap pointers, which violates ownership rules.
We'll learn how to handle this next lecture with borrowing!
Box - for when your stack data is REALLY BIG
Sometimes data that would usually go on the stack is just too big:
#![allow(unused)] fn main() { // This is fine - small array let small_data = [0; 1000]; // This might crash your program - too big for the stack! // let huge_data = [0; 10_000_000]; }
So we create a Box to force it onto the heap:
Box: Moving big data to the warehouse
#![allow(unused)] fn main() { let huge_data = Box::new([0; 10_000_000]); println!("Successfully created {} numbers", huge_data.len()); }
You can actually put practically anything in a box! We'll discuss them more later, but for now, they're just another tool for us to think about stack/heap and ownership.
When do you need a box?
- Large datasets: Millions of records
- Big matrices: Large 2D arrays for data analysis
- Deep structures: Complex nested data
Just for fun - nesting things in boxes (Yes, even boxes in boxes!)
You can put complex heap-allocated types inside a Box:
// Box containing a Vec of Strings (heap in heap in heap!) let boxed_names = Box::new(vec![ String::from("Alice"), String::from("Bob"), String::from("Charlie") ]); println!("Names in box: {:?}", boxed_names); // Box in a Box (why not?) let box_in_box = Box::new(Box::new(42)); println!("Deeply boxed value: {}", box_in_box); // Box containing a Vec of Boxes (getting silly now!) let boxes_in_vec_in_box = Box::new(vec![ Box::new(1), Box::new(2), Box::new(3) ]); println!("Box containing Vec of Boxes: {:?}", boxes_in_vec_in_box);
What's happening here?
boxed_names: Stack has a Box pointer -> Heap has Vec metadata -> Heap has String pointers -> Heap has actual string databox_in_box: Stack has a Box pointer -> Heap has another Box pointer -> Heap has the number 42boxes_in_vec_in_box: Stack has a Box pointer -> Heap has Vec metadata -> Heap has Box pointers -> Heap has the actual numbers
Activity time before Part 3!
Act 1: Copy vs Move (6 students)
fn main() { let x = 5; let y = x; let s1 = String::from("hello"); let s2 = s1; println!("{} {}", x, y); // println!("{} {}", s1, s2); }
Act 2: Function calls and returning ownership (4 students)
fn main() { let data = vec![1, 2, 3]; let data = process(data); println!("{:?}", data); // Works! } fn process(mut numbers: Vec<i32>) -> Vec<i32> { numbers.push(4); numbers }
Act 3: Attack of the Clones (8 students)
fn main() { let s1 = String::from("hello"); let s2 = s1.clone(); println!("{} {}", s1, s2); let s3 = s1; let s4 = s2; println!("{} {}", s3, s4); let names = vec![s3, s4]; }
Finale: The Box Office (14 students!!)
fn main() { let ticket_number = 42; let venue = String::from("Stage"); let guest_list = vec![ String::from("Alice"), String::from("Bob") ]; // Box in a Box! let vip_box = Box::new(Box::new(String::from("VIP"))); let show = prepare_show(guest_list, vip_box); println!("Show at {} with ticket {}", venue, ticket_number); println!("Final show: {:?}", show); } fn prepare_show(mut guests: Vec<String>, special: Box<Box<String>>) -> Box<Vec<String>> { guests.push(String::from("Charlie")); guests.push(*special); // Unbox twice! Box::new(guests) }
If you weren't selected, please leave a note on stage or email me after class so I can track you were here!
Part 3: Debugging Ownership Errors
Let's practice fixing common ownership errors you'll encounter:
Error 1: Use After Move
This code won't compile:
fn main() { let data = vec![1, 2, 3]; process_data(data); println!("{:?}", data); // ERROR! } fn process_data(vec: Vec<i32>) { println!("Processing: {:?}", vec); }
Compiler error: "borrow of moved value: data"
Fix option 1: Return the data from the function
fn main() { let data = vec![1, 2, 3]; let data = process_data(data); // Get it back! println!("{:?}", data); // OK! } fn process_data(vec: Vec<i32>) -> Vec<i32> { println!("Processing: {:?}", vec); vec // Return ownership }
Fix option 2: Clone the data (makes a copy)
fn main() { let data = vec![1, 2, 3]; process_data(data.clone()); // Send a copy println!("{:?}", data); // OK! } fn process_data(vec: Vec<i32>) { println!("Processing: {:?}", vec); }
Error 2: Multiple Moves
This code won't compile:
fn main() { let message = String::from("Hello"); let a = message; let b = message; // ERROR! Can't move twice println!("{} {}", a, b); }
Compiler error: "use of moved value: message"
Fix: Clone for multiple copies
fn main() { let message = String::from("Hello"); let a = message.clone(); // Make a copy let b = message; // Move original println!("{} {}", a, b); // Both work! }
Error 3: Trying to Copy Non-Copy Types
This code won't compile:
fn main() { let names = vec![String::from("Alice"), String::from("Bob")]; let first = names[0]; // ERROR! Can't copy String println!("{}", first); }
Compiler error: "cannot move out of index of Vec<String>"
Fix: Clone the specific element
fn main() { let names = vec![String::from("Alice"), String::from("Bob")]; let first = names[0].clone(); // Clone just this element println!("{}", first); // Works! println!("{:?}", names); // Original Vec still works! }
Lecture 16 - Borrowing and References
Logistics
- Last time: Ownership system and Vec for heap data
- Today: Borrowing and references (&, *)
- HW4 will be released today
- There's pre-work for Tuesday but not Wednesday
- No sign-ups yet for coffee today (there really is coffee)
Learning Objectives
By the end of today, you should be able to:
- Use the & operator to create references (borrowing)
- Use the * operator to dereference and access borrowed data
- Apply borrowing rules to avoid "ownership too strict" problems
- Debug common ownership and borrowing compiler errors
Part 1 - Wrapping up Ownership
Let's practice fixing common ownership errors you'll encounter:
Error 1: Use After Move
This code won't compile:
fn main() { let data = vec![1, 2, 3]; process_data(data); println!("{:?}", data); // ERROR! } fn process_data(vec: Vec<i32>) { println!("Processing: {:?}", vec); }
Compiler error: "borrow of moved value: data"
Error 1: Use After Move
Compiler error: "borrow of moved value: data"
Fix option 1: Return the data from the function
fn main() { let data = vec![1, 2, 3]; let data = process_data(data); // Get it back! println!("{:?}", data); // OK! } fn process_data(vec: Vec<i32>) -> Vec<i32> { println!("Processing: {:?}", vec); vec // Return ownership }
Error 1: Use After Move
Compiler error: "borrow of moved value: data"
Fix option 2: Clone the data (makes a copy)
fn main() { let data = vec![1, 2, 3]; process_data(data.clone()); // Send a copy println!("{:?}", data); // OK! } fn process_data(vec: Vec<i32>) { println!("Processing: {:?}", vec); }
Error 2: Multiple Moves
This code won't compile:
fn main() { let message = String::from("Hello"); let a = message; let b = message; // ERROR! Can't move twice println!("{} {}", a, b); }
Compiler error: "use of moved value: message"
Error 2: Multiple Moves
Compiler error: "use of moved value: message"
Fix: Clone for multiple copies
fn main() { let message = String::from("Hello"); let a = message.clone(); // Make a copy let b = message; // Move original println!("{} {}", a, b); // Both work! }
Error 3: Trying to Copy Non-Copy Types
This code won't compile:
fn main() { let names = vec![String::from("Alice"), String::from("Bob")]; let first = names[0]; // ERROR! Can't copy String println!("{}", first); }
Compiler error: "cannot move out of index of Vec<String>"
Error 3: Trying to Copy Non-Copy Types
Compiler error: "cannot move out of index of Vec<String>"
Fix: Clone the specific element
fn main() { let names = vec![String::from("Alice"), String::from("Bob")]; let first = names[0].clone(); // Clone just this element println!("{}", first); // Works! println!("{:?}", names); // Original Vec still works! }
What's really going on with Copy and Clone (TC 12:25)
Sometimes you actually want duplicates of your data. Rust provides two mechanisms: Copy and Clone.
- Copy: Simple bitwise copy of stack bytes. (typically of data, sometimes of pointers)
- Clone: Explicit duplication that can do whatever the type needs
- might duplicate heap data (like String or Vec)
- might just copy stack values (like i32)
- might run a custom cloning function on your custom types
ROUGHLY BUT NOT EXACTLY:
- Copy duplicates values on the stack
- Clone duplicates values on the heap
Clone: Explicit Deep Copying
Use .clone() to make an explicit, complete copy of data:
fn main() { let mut vec1 = vec![1, 2, 3]; let mut vec2 = vec1.clone(); // Explicit copy of ALL the data // Proof they're separate - modify one vec1.push(4); // Both work! They're completely separate println!("vec1: {:?}", vec1); println!("vec2: {:?}", vec2); }
What .clone() does for Vec:
Before clone: After clone and push:
Stack: Heap: Stack: Heap:
┌─────────────┐ ┌─────────────┐
│ vec1: Vec │ ┌───────────┐ │ vec2: Vec │ ┌───────────┐
│ ├ ptr ──────┼──▶│ 1 │ 2 │ 3 │ │ ├ ptr ──────┼───▶│ 1 │ 2 │ 3 │
│ ├ len: 3 │ └───────────┘ │ ├ len: 3 │ └───────────┘
│ └ cap: 3 │ │ └ cap: 3 │
└─────────────┘ ├─────────────┤
│ vec1: Vec │ ┌───────────────┐
│ ├ ptr ──────┼───▶│ 1 │ 2 │ 3 │ 4 |
│ ├ len: 4 │ └───────────────┘
│ └ cap: 4 │
└─────────────┘
Adding Clone to Your Types
Use #[derive(Clone)] to make your custom types cloneable:
#[derive(Clone, Debug)] enum Temperature { Fahrenheit(f64), Celsius(f64), } fn main() { let temp1 = Temperature::Celsius(12.0); let temp2 = temp1.clone(); // Now this works! println!("temp1: {:?}", temp1); println!("temp2: {:?}", temp2); }
Copy: Automatic, Cheap Duplication
Some types are so simple that Rust can copy them automatically without .clone():
fn main() { // These types implement Copy - no explicit .clone() needed let a = 42; // i32 let b = a; // Automatic copy println!("{} {}", a, b); // Both work let e = true; // bool let f = e; // Automatic copy println!("{} {}", e, f); // Both work let g = (1, 2); // (i32, i32) - tuples of Copy types are Copy let h = g; // Automatic copy println!("{:?} {:?}", g, h); // Both work }
Adding Copy to Your Types
Use #[derive(Copy, Clone)] for simple types (note: Copy requires Clone):
#[derive(Copy, Clone, Debug)] enum Temperature { Fahrenheit(f64), Celsius(f64), } fn main() { let temp1 = Temperature::Celsius(12.0); let temp2 = temp1; // Now automatically copies! println!("temp1: {:?}", temp1); println!("temp2: {:?}", temp2); }
YOU CAN ONLY DO THIS IF the types inside the enum (or other structures) all have Copy as well
YOU CAN'T DO THIS IF YOUR ENUM CONTAINS STRINGS
This kind of sucks though right?
- Functions steal ownership even when they just want to read data
- You have to pass data back and forth like a hot potato
- You have to clone the contents of a vec/array when you just want to view it
- You wind up with code like this:
fn analyze_data(data: Vec<i32>, usernames: Vec<String>, big_array: Box<[i32]>) -> (Vec<i32>, Vec<String>, Box<[i32]>) { println!("Processing {} items", data.len()); // ... do some data cleaning ... (data, usernames, big_array) // Have to return it back! } fn main() { let my_data = vec![1, 2, 3, 4, 5]; let my_usernames = vec!["Alice", "Bob", "Charlie"]; let my_box = Box::new([0; 10_000_000]); let (my_data, my_usernames, my_box) = analyze_data(my_data, my_usernames, my_box); // Awkward! }
Rust's solution: Borrowing - let functions temporarily use data without taking ownership!
Part 2 - What is Borrowing? (TC 12:30)
Borrowing means temporarily accessing data without taking ownership of it.
Think of it like borrowing a book from a friend:
- Your friend still owns the book (original owner keeps ownership)
- You can read it while you have it (temporary access)
- You give it back when done (reference goes out of scope)
- Your friend can still use it after you return it (original data still accessible)
Creating References with &
The & operator creates a reference (pointer) to data without taking ownership:
fn main() { let data = vec![10, 20, 30]; // Create a reference to data (borrowing) let data_ref = &data; // Both work! No ownership was moved println!("Original: {:?}", data); // data still valid println!("Reference: {:?}", data_ref); // reference works too }
Stack/heap diagram:
Stack: Heap:
┌─────────────────┐
│ data_ref: &Vec │────┐ points to
├─────────────────┤ │ the stack!
│ data: Vec<i32> │◄───┘ ┌────┬────┬────┐
│ ├ ptr ──────────┼───────────────▶ │ 10 │ 20 │ 30 │
│ ├ len: 3 │ └────┴────┴────┘
│ └ cap: 3 │
└─────────────────┘
References in Functions
This is where borrowing shines:
fn main() { let my_data = vec![1, 2, 3, 4, 5]; analyze_data(&my_data); // Pass a reference let total = calculate_sum(&my_data); // Still works! println!("Original data: {:?}", my_data); // Still have it! println!("Sum: {}", total); } fn analyze_data(data: &Vec<i32>) { // Takes a reference! println!("Processing {} items", data.len()); println!("First item: {}", data[0]); // No need to return anything! } fn calculate_sum(data: &Vec<i32>) -> i32 { // Also takes a reference! data.iter().sum() }
No more ownership juggling! Each function borrows the data, uses it, and gives it back automatically.
Let's see it with a String
The & creates a new value on the stack that points to existing data:
fn main() { let name = String::from("Alice"); let name_ref = &name; // name_ref is a new stack value pointing to name println!("Name: {}", name); // Direct access println!("Reference: {}", name_ref); // Access through reference }
Stack diagram:
Stack: Heap:
┌─────────────────┐
│name_ref: &String│────┐ points to
├─────────────────┤ │ the stack!
│ name: String │◄───┘ ┌─────┬─────┬─────┬─────┬─────┐
│ ├ ptr ──────────┼───────────────▶ │ 'A' │ 'l' │ 'i' │ 'c' │ 'e' │
│ ├ len: 5 │ └─────┴─────┴─────┴─────┴─────┘
│ └ cap: 5 │
└─────────────────┘
String types: String vs &str vs &String (TC 12:35)
Lecture 17 will be the end of this craziness I promise!
You've seen different string types - let's clarify:
String: Owned, growable string on the heap (like we've been using)&str: A "string slice" - a reference directly to string data (points to heap or static memory)&String: A reference to a String (points to the String's stack metadata)
fn main() { let owned: String = String::from("Hello"); let string_ref: &String = &owned; // Reference to the String let str_slice: &str = &owned; // Slice of the string data let literal: &str = "Hello"; // String literal (also &str) println!("{}", owned); println!("{}", string_ref); println!("{}", str_slice); println!("{}", literal); }
Let's draw it out! (with cold calls)
In practice: Functions usually take &str as parameters, but you can pass &String and Rust will coerce it to &str automatically!
When to borrow and when to copy/clone?
Use borrowing (&) when:
- You just need to read/use the data temporarily and don't want to pass ownership around
- The data is large/expensive to copy
Use copying/cloning when:
- You're passing data to functions that need to own it
- You need to modify a copy without affecting the original
Part 3 - References and Dereferencing (& and *) (TC 12:40)
The & Operator (Creating References)
& creates a reference to existing data:
fn main() { let x = 42; let x_ref = &x; // Create reference to x let scores = vec![85, 92, 78]; let scores_ref = &scores; // Create reference to vec let name = String::from("Bob"); let name_ref = &name; // Create reference to string println!("x: {}, x_ref: {}", x, x_ref); println!("scores: {:?}, scores_ref: {:?}", scores, scores_ref); println!("name: {}, name_ref: {}", name, name_ref); }
Memory layout:
Stack: Heap:
┌─────────────────┐
│ name_ref: &String──┐
├─────────────────┤ │
│ name: String │◄─┘ ┌─────┬─────┬─────┐
│ ├ ptr ──────────┼────────────────▶│ 'B' │ 'o' │ 'b' │
│ ├ len: 3 │ └─────┴─────┴─────┘
│ └ cap: 3 │
├─────────────────┤
│ scores_ref: &Vec┼──┐
├─────────────────┤ │
│ scores: Vec │◄─┘ ┌────┬────┬────┐
│ ├ ptr ──────────┼─────────────────▶│ 85 │ 92 │ 78 │
│ ├ len: 3 │ └────┴────┴────┘
│ └ cap: 3 │
├─────────────────┤
│ x_ref: &i32 ────┼──┐
├─────────────────┤ │
│ x: 42 │◄─┘
└─────────────────┘
We can go on and on...
fn main() { let x = 42; let x_ref = &x; // Create reference to x let x_ref_2 = &x; // Create another reference to x let x_ref_ref = &x_ref; // Create another reference to x_ref println!("x_ref_2: {}, x_ref_ref: {}", x_ref_2, x_ref_ref); // thanks to the macro! }
Memory layout:
Stack: Heap:
┌─────────────────┐
│ x_ref_ref:&&i32 ┼────────────┐
├─────────────────┤ │
│ x_ref_2: &i32 ──┼────┐ │
├─────────────────┤ │ │
│ x_ref: &i32 ────┼──┐ │ ◄─────┘
├─────────────────┤ │ │
│ x: 42 │◄─┘─┘
└─────────────────┘
The * Operator (Dereferencing)
* is the inverse-operation to & and extracts data:
fn main() { let x = 42; let y = 10; let x_ref = &x; let y_ref = &y; // let sum = x_ref + y_ref; // Must dereference to do math! let sum = *x_ref + *y_ref; // Must dereference to do math! println!("Sum: {}", sum); // sometimes Rust helpfully "auto-dereferences" for you println!("x: {}", x); // Direct access: 42 println!("x_ref: {}", x_ref); // Through reference: 42 (auto-dereference) println!("*x_ref: {}", *x_ref); // Manual dereference: 42 }
Why do we need * and when will it auto-deref?
- References are pointers, not the actual data
- Some operations need the actual value, not the pointer (like math operations and comparisons, and
match) - Not always needed - Rust often auto-dereferences for convenience (like in
println!or vec functions likelenandcontains) - But you're always safe if you dereference yourself
Part 4 - References to Elements Inside Collections (TC 12:45)
One of the trickiest parts about references is working with elements inside collections. Let's demystify this!
fn main() { // Vec of Copy types (i32) let numbers = vec![10, 20, 30]; let first = numbers[0]; // Copies the value let first_ref = &numbers[0]; // Reference to the element println!("Copied value: {}", first); println!("Referenced value: {}", first_ref); }
Memory diagram for the numbers example:
Stack: Heap:
┌─────────────────┐
│ first_ref: &i32 ┼───────────────────┐
├─────────────────┤ │
│ first: 10 │ (copied) │
├─────────────────┤ │
│ numbers: Vec │ ┌────┬────┬────┐
│ ├ ptr ──────────┼───────────────▶ │ 10 │ 20 │ 30 │
│ ├ len: 3 │ └────┴────┴────┘
│ └ cap: 3 │
└─────────────────┘
It's trickier with elements that live on the heap
fn main() { // Vec of non-Copy types (String) let names = vec![ String::from("Alice"), String::from("Bob") ]; // let name = names[0]; // ERROR! Can't move out of Vec let name_ref = &names[0]; // OK! Borrow the element let name_clone = names[0].clone(); // OK! Clone it println!("Referenced name: {}", name_ref); println!("Cloned name: {}", name_clone); }
Memory diagram for the names example:
Stack: Heap:
┌──────────────────┐ ┌─────┬─────┬─────┬─────┬─────┐
│ name_clone:String│ │ 'A' │ 'l' │ 'i' │ 'c' │ 'e' │ (cloned copy)
│ ├ ptr ───────────┼──────────▶└─────┴─────┴─────┴─────┴─────┘
│ ├ len: 5 │
│ └ cap: 5 │ Vec
├──────────────────┤ ┌─────────────────┐
│ name_ref: &String┼─────────▶ │String("Alice") │ ┌─────┬─────┬─────┬─────┬─────┐
├──────────────────┤ (to [0]) │ ├ ptr ──────────┼────▶│ 'A' │ 'l' │ 'i' │ 'c' │ 'e' │
│ names: Vec │ │ ├ len: 5 │ └─────┴─────┴─────┴─────┴─────┘
│ ├ ptr ───────────┼──────────▶│ └ cap: 5 │
│ ├ len: 2 │ (to vec) ├─────────────────┤
│ └ cap: 2 │ │String("Bob") │ ┌─────┬─────┬─────┐
└──────────────────┘ │ ├ ptr ──────────┼────▶│ 'B' │ 'o' │ 'b' │
│ ├ len: 3 │ └─────┴─────┴─────┘
│ └ cap: 3 │
└─────────────────┘
Key insight: vec[i] tries to move/copy the value. For non-Copy types, use &vec[i] to borrow instead.
Iterating with .iter() - Why We Get References
When you iterate with .iter(), you get references to elements, not the elements themselves:
fn main() { let numbers = vec![10, 20, 30]; // .iter() gives us &i32 (references) for num_ref in numbers.iter() { println!("Type is &i32: {}", num_ref); // To use in math, dereference: let doubled = *num_ref * 2; println!("Doubled: {}", doubled); } // Original vec still valid! println!("Original: {:?}", numbers); }
Let's draw it (with cold calls)
.iter() creates references so the Vec retains ownership—iteration doesn't consume the data!
Whereas what we used before (for i in arr to loop through an array) passes ownership (or copies simple types)
Pattern Matching to Extract Values: &val (TC 12:50)
You can use pattern matching to automatically dereference:
fn main() { let numbers = vec![10, 20, 30]; // Without pattern matching - need to dereference manually for num_ref in numbers.iter() { let squared = *num_ref * *num_ref; println!("{}", squared); } // With pattern matching - automatic dereference! for &num in numbers.iter() { let squared = num * num; // num is i32, not &i32 println!("{}", squared); } }
The & in the pattern &num says: "Match a reference, and bind the value it points to"
Enumerate with References
.enumerate() gives you (index, &value):
fn main() { let scores = vec![85, 92, 78, 95]; // enumerate gives (usize, &i32) for (i, score_ref) in scores.iter().enumerate() { println!("Score {}: {}", i, score_ref); } // Pattern match to get the value directly for (i, &score) in scores.iter().enumerate() { if score > 90 { println!("High score at index {}: {}", i, score); } } }
Quick Reference: Iterator Types
fn main() { let vec = vec![1, 2, 3]; // Three ways to iterate: for val in vec.iter() { // val: &i32 (borrow each element) println!("{}", val); } for val in &vec { // val: &i32 (shorthand for .iter()) println!("{}", val); } for val in vec.iter_mut() { // val: &mut i32 (mutable borrow - next lecture!) *val += 10; } // for val in vec { // val: i32 (consumes the vec) // println!("{}", val); // } // Can't use vec here - it was moved! }
Activity time!
Lecture 17 - &mut and the Borrow Checker
Logistics
- Last time: Immutable references (&) and basic borrowing
- Today: Mutable references (&mut) and complete borrowing rules
Things "in flight"
- HW1 correction grading should be complete - if not let me know - your corrected % was in the update email
- HW2 correction grading is in progress, will be done by Thursday - status was in update email
- HW3 grading has started, should be done by Friday
- HW4 is open, due on 10/24 - you should have everything you need after tomorrow (Strings)
- Exam 1 corrections are due this Wednesday evening - if you're interested in an oral exam please fill out that part of the assignment.
- There's no 48-hour late window
- There was apparently a bug in the correction item for question 1.8 - if you already submitted a correction for that please double-check that it's there.
Learning Objectives
By the end of today, you should be able to:
- Use mutable references (&mut T) to modify borrowed data
- Understand and apply Rust's borrowing rules (the borrow checker)
- Debug more borrowing compiler errors
Let's review (and clarify) immutable borrows (TC 12:25)
Question 1 from Friday
fn main() { let data = vec![1, 2, 3]; print_data(data); println!("{:?}", data); // Fix this! } fn print_data(v: Vec<i32>) { println!("{:?}", v); }
Question 2 from Friday
fn main() { let scores = vec![85, 92, 78]; let first = scores[0]; // This works, but... let names = vec![String::from("Alice")]; let first_name = names[0]; // This doesn't! Fix it println!("First score: {}", first); println!("First name: {}", first_name); }
A note about Question 5:
fn main() { let pairs = vec![(1, 2), (3, 4), (5, 6)]; for (a, b) in pairs.iter() { let sum = a + b; // Error! Can't add references println!("{} + {} = {}", a, b, sum); } println!("Pairs still available: {:?}", pairs); }
This actually compiles, and practically anything I tried to do to break it compiles too.
In fact, it looks like + actually auto-dereferences &i32 (in contrast with what I said Friday).
Clarifying how *&x != x exactly
While * and & are inverse operations, dereferencing doesn't transfer ownership:
fn main() { let x = 42; let x_ref = &x; let y = *x_ref; // For Copy types, this copies the value println!("x: {}, y: {}", x, y); // Both work let name = String::from("Bob"); let name_ref = &name; // let owned = *name_ref; // ERROR! Would need to move, but we only borrowed let cloned = (*name_ref).clone(); // Must explicitly clone println!("name: {}, cloned: {}", name, cloned); }
Stack/heap diagram:
For: let name_ref = &name; and accessing *name_ref
Stack: Heap:
┌─────────────────┐
│ name_ref ───────┼──┐ ┌─────┬─────┬─────┐
├─────────────────┤ │ │ 'B' │ 'o' │ 'b' │
│ name: String │◄─┘ └─────┴─────┴─────┘
│ ├ ptr ──────────┼─────────────────▶
│ ├ len: 3 │
│ └ cap: 3 │
└─────────────────┘
Summary:
*&xgives you access tox's value- For
Copytypes: makes a copy - For non-
Copytypes: gives access but can't take ownership (you only borrowed!)
Draw out copy case on the board
Pattern Matching with &: Only for Copy Types!
When you use for &val in arr.iter(), the & pattern extracts the value from the reference:
fn main() { // With Copy types - works! let numbers = vec![1, 2, 3]; for &num in numbers.iter() { // num is i32 (copied from &i32) println!("{}", num * 2); } // With non-Copy types - ERROR! let names = vec![String::from("Alice"), String::from("Bob")]; // for &name in names.iter() { // Can't move out of borrowed reference // let name_copy = name.clone(); // println!("{}", name_copy); // } // Must keep as reference for non-Copy types for name in names.iter() { // name is &String let name_copy = (*name).clone(); // Need * to clone println!("Cloned: {}", name_copy); } }
What's happening:
&valpattern matching extracts the value, not a reference- For Copy types: copies the value out →
valisT - For non-Copy types: would try to move → ERROR (can't move from borrowed content)
- Solution for non-Copy: use
valwithout&→valis&T
Mutable References (&mut T) (TC 12:30)
Use &mut to create a mutable reference that allows modification:
fn main() { let mut data = vec![1, 2, 3]; // Must be mut to begin with! let data_ref = &mut data; // Mutable reference // Can modify through mutable reference: data_ref.push(4); data_ref[0] = 10; println!("Modified: {:?}", data_ref); add_item(&mut data, 5); println!("After adding: {:?}", data); // [10, 2, 3, 4, 5] } fn add_item(data: &mut Vec<i32>, item: i32) { // Mutable reference parameter data.push(item); // Can modify! }
Stack/Heap with Mutable References
fn main() { let mut message = String::from("Hello"); modify_string(&mut message); println!("{}", message); // "Hello - modified!" } fn modify_string(text: &mut String) { text.push_str("!!!"); }
Memory progression through the function call:
Step 1: Before calling modify_string()
Stack: Heap:
┌─────────────────┐ ┌─────┬─────┬─────┬─────┬─────┐
│ message: String │ │ 'H' │ 'e' │ 'l' │ 'l' │ 'o' │
│ ├ ptr ──────────┼────────────────▶│ │ │ │ │ │
│ ├ len: 5 │ └─────┴─────┴─────┴─────┴─────┘
│ └ cap: 5 │
└─────────────────┘
Step 2: During modify_string() call (before push_str)
Stack: Heap:
┌─────────────────┐
│ text: &mut String─────┐
├─────────────────┤ │
│ message: String │◄────┘ ┌─────┬─────┬─────┬─────┬─────┐
│ ├ ptr ──────────┼────────────────▶│ 'H' │ 'e' │ 'l' │ 'l' │ 'o' │
│ ├ len: 5 │ └─────┴─────┴─────┴─────┴─────┘
│ └ cap: 5 │
└─────────────────┘
Step 3: After text.push_str(" - modified!")
Stack: Heap:
┌─────────────────┐
│ text: &mut String─────┐
├─────────────────┤ │
│ message: String │◄────┘ ┌─────┬─────┬─────┬─────┬─────┬─────┬─────┬─────┐
│ ├ ptr ──────────┼────────────────▶│ 'H' │ 'e' │ 'l' │ 'l' │ 'o' │ '!' │ '!' │ '!' │
│ ├ len: 17 │ └─────┴─────┴─────┴─────┴─────┴─────┴─────┴─────┘
│ └ cap: 18 │
└─────────────────┘
Step 4: After function returns
Stack: Heap:
┌─────────────────┐
│ message: String │ ┌─────┬─────┬─────┬─────┬─────┬─────┬─────┬─────┐
│ ├ ptr ──────────┼────────────────▶│ 'H' │ 'e' │ 'l' │ 'l' │ 'o' │ '!' │ '!' │ '!' │
│ ├ len: 17 │ └─────┴─────┴─────┴─────┴─────┴─────┴─────┴─────┘
│ └ cap: 18 │
└─────────────────┘
Borrowing Rules (The Borrow Checker) (TC 12:35)
Rust enforces strict rules about borrowing to prevent memory corruption:
- Rule 1: You can have EITHER many immutable references OR ONE mutable reference
- Rule 2: References must be valid (they cannot outlive what they refer to)
Rule 1: You can have EITHER many immutable references OR ONE mutable reference
This works (multiple immutable references):
fn main() { let data = vec![1, 2, 3]; let ref1 = &data; let ref2 = &data; let ref3 = &data; println!("{:?} {:?} {:?}", ref1, ref2, ref3); // All read-only }
This works (one mutable reference):
fn main() { let mut data = vec![1, 2, 3]; let ref1 = &mut data; ref1.push(4); println!("{:?}", ref1); // Only one mutable reference }
This does NOT work:
fn main() { let mut data = vec![1, 2, 3]; let ref1 = &data; // Immutable reference let ref2 = &mut data; // ERROR! Can't have both! println!("{:?} {:?}", ref1, ref2); }
Rule 2: References must be valid (they cannot outlive what they refer to)
This does NOT work:
fn main() { let reference; { let value = vec![1, 2, 3]; reference = &value; // ERROR! value will be dropped } // value goes out of scope here // println!("{:?}", reference); // reference would be dangling! }
This is why you can't return from a function a reference to a variable you defined inside the function
Why These Rules Matter
Without these rules, you could have:
- Data races: Two threads modifying the same data simultaneously
- Use-after-free: Using memory that's been freed
- Iterator invalidation: Modifying a collection while iterating
Rust prevents all of these at compile time!
Important: Modifying Through the Original Name
Even modifying through the original variable name counts as a mutable borrow!
fn main() { let mut x = 10; println!("{}", x); let y = &x; // Immutable borrow x = 20; // ERROR! Tries to mutably borrow x println!("{}", y); // y is still being used }
Error: "cannot assign to x because it is borrowed"
Why? When you have an active reference (y), Rust must guarantee that reference stays valid. Modifying x directly would be a mutable operation, which conflicts with the immutable borrow.
fn main() { let mut x = 10; let y = &x; println!("{}", y); // Last use of y x = 20; // OK! y is no longer used println!("{}", x); }
Key insight: The original variable name doesn't give you special privileges! While a reference exists and is being used, you can't modify the data through any path—not even the original name.
Mutable and immutable borrowing in practice
fn main() { let mut scores = vec![85, 92, 78, 96, 88]; // Analyze first (immutable borrow) let (total, average) = analyze_data(&scores); println!("Total: {}, Average: {:.1}", total, average); // Then normalize (mutable borrow) normalize_data(&mut scores); println!("Normalized: {:?}", scores); } fn analyze_data(data: &Vec<i32>) -> (i32, f64) { let sum: i32 = data.iter().sum(); let avg = sum as f64 / data.len() as f64; (sum, avg) } fn normalize_data(data: &mut Vec<i32>) { let max = *data.iter().max().unwrap(); for item in data.iter_mut() { *item = *item * 100 / max; } }
This works because:
analyze_datafinishes beforenormalize_datastarts- No overlap between immutable and mutable borrows
- Original data stays accessible in
main
Note on function signatures: In these examples we use &Vec<i32> for clarity. In practice, Rust developers usually use slices (&[i32]) which are more flexible. We'll cover slices in the next lecture!
Think-Pair-Share: Mutable Borrowing vs Ownership (TC 12:40)
Question: How are mutable borrowing and transferring ownership the same, and how are they different? When should you use one vs the other?
Think (1 minute): Consider these two function signatures:
#![allow(unused)] fn main() { fn process_data(data: Vec<i32>) -> Vec<i32> // Takes ownership fn process_data(data: &mut Vec<i32>) // Borrows }
What are the tradeoffs? When would you choose each approach?
Mutable Borrowing vs Ownership
Similarities:
Differences:
Use &mut T (mutable borrow) when:
Use T (transfer ownership) when:
Rule of thumb:
Mixing Immutable and Mutable References
The timing matters! This works:
fn main() { let mut integer = 10; // Use immutable reference first let ir = &integer; println!("Reading: {}", ir); // ir is no longer used after this point // Now we can create a mutable reference let mr = &mut integer; *mr += 5; println!("After modification: {}", mr); // Can create new immutable references after mutable is done let ir2 = &integer; println!("Reading again: {}", ir2); }
But this doesn't work:
fn main() { let mut integer = 10; let ir = &integer; // Immutable reference let mr = &mut integer; // ERROR! Can't create mutable while immutable exists println!("{}", ir); // ir is still being used *mr += 5; }
Key insight: Rust tracks when references are last used, not just when they go out of scope!
More on iter() and iter_mut() (TC 12:45)
We saw .iter() last time - now we'll add .iter_mut():
.iter(): Gives you immutable references (&T) to each element.iter_mut(): Gives you mutable references (&mut T) to each element
fn main() { let mut numbers = vec![1, 2, 3, 4, 5]; // .iter() - read-only access for num in numbers.iter() { println!("{}", num); // num is &i32 // *num += 1; // ERROR! Can't modify through immutable reference } // .iter_mut() - mutable access for num in numbers.iter_mut() { *num += 10; // num is &mut i32 - can modify! } println!("Modified: {:?}", numbers); // [11, 12, 13, 14, 15] }
Dereferencing with iter_mut()
Unlike with .iter() where you can use for &num in... pattern matching (for copy types!), with .iter_mut() you always need to dereference with * to modify the value:
fn main() { let mut numbers = vec![1, 2, 3, 4, 5]; // Must use * to modify through mutable reference for num in numbers.iter_mut() { *num *= 2; // num is &mut i32, *num is i32 } println!("{:?}", numbers); // [2, 4, 6, 8, 10] }
Why no pattern matching? With .iter() you can work off a copy because you're just reading. With .iter_mut() you need the mutable reference itself to assign through it, so you must use *.
Enumerate with iter_mut()
You can combine .iter_mut() with .enumerate() to get both the index and a mutable reference:
fn main() { let mut scores = vec![78, 85, 92, 67, 88]; // enumerate gives (usize, &mut i32) for (i, score_ref) in scores.iter_mut().enumerate() { println!("Score {}: {}", i, score_ref); // Modify based on index if i == 0 { *score_ref += 10; // Bonus for first student } } println!("Updated scores: {:?}", scores); // [88, 85, 92, 67, 88] }
Type breakdown:
iisusize(the index)score_refis&mut i32(mutable reference to the element)- Use
*score_refto modify the value
Activity Time
Key Takeaways
- Mutable references (&mut T): Allow modification of borrowed data
- Borrowing rules prevent bugs: No data races, no use-after-free, no iterator invalidation
- Two key rules: Many readers OR one writer (and not both!), references must live long enough
- Timing matters: Rust tracks when references are last used, not just scope
- Sequential borrowing: You can have mutable then immutable, or vice versa
- Design principle: Separate read-only and modification phases in your code
Lecture 18 - Strings and Slices
Logistics
- Same notes as yesterday re HWs, Exams (Exam corrections are due tonight)
- I'll schedule the oral exams early Thursday, they'll start on Friday
- Request from Joey - For homeworks, please just ignore the "feedback" branch/PR, don't merge it
Learning Objectives
By the end of today, you should be able to:
- (Really!) Understand the difference between
Stringand&strtypes - Understand Unicode and UTF-8 encoding basics
- Apply ownership rules correctly when working with strings and slices
Part 1 - Review and Clarification
Clarifying - modifying through a mutable reference
fn main() { let mut vec = vec![1, 2, 3]; let vec_ref = &mut vec; // Method 1: Call methods that modify in-place vec_ref.push(4); // Method 2: Use * to dereference and assign *vec_ref = vec![5,6,7]; println!("vec is now: {:?}", vec); // [5, 6, 7] let mut x = 5; let y = &mut x; // Dereferencing is your only option here *y = 10; println!("x is now: {}", x); // 10 }
Understanding mut in Different Positions
fn main() { let mut x = 5; let mut y = &mut x; // Two different 'mut' keywords here! // First mut: y itself can be reassigned to point elsewhere // Second mut: y points to mutable data (can modify *y) *y = 10; // OK - modify the value y points to println!("y is now: {}", y); // Now that we're done with y we can look at: println!("x is now: {}", x); // y = 5; // ERROR! Can't assign i32 to &mut i32 // This would try to change y from a reference into a number // but we could make it a different &mut i32: let mut z = 6; y = &mut z; println!("y is now: {}", y); }
Key insight:
*y = valuechanges whatypoints toy = &mut otherchanges whereypoints- Methods like
.push()automatically dereference, so no*needed
Review - Some common borrowing patterns
Pattern 1: Read-Only Processing
fn find_max(numbers: &Vec<i32>) -> Option<&i32> { numbers.iter().max() } fn count_even(numbers: &Vec<i32>) -> usize { let mut count = 0; for &n in numbers.iter() { if n % 2 == 0 { count += 1; } } count } fn main() { let data = vec![1, 2, 3, 4, 5, 6, 7, 8, 9, 10]; // Can call multiple read-only functions: let max_val = find_max(&data); let even_count = count_even(&data); let sum: i32 = data.iter().sum(); println!("Max: {:?}, Even count: {}, Sum: {}", max_val, even_count, sum); println!("Original data still available: {:?}", data); }
Pattern 2: In-Place Modification
fn double_all(numbers: &mut Vec<i32>) { for item in numbers.iter_mut() { *item *= 2; } } fn filter_positive(numbers: &mut Vec<i32>) { let mut i = 0; while i < numbers.len() { if numbers[i] <= 0 { numbers.remove(i); } else { i += 1; } } } fn main() { let mut data = vec![-2, 1, -1, 3, 0, 4]; println!("Original: {:?}", data); double_all(&mut data); println!("Doubled: {:?}", data); filter_positive(&mut data); println!("Positive only: {:?}", data); }
Part 2 - Slices
A slice is a reference to a contiguous portion of data without ownership:
Key points: &[T] type, borrowed references, syntax &collection[start..end]
#![allow(unused)] fn main() { let data = [1, 2, 3, 4, 5, 6]; let slice1 = &data[1..4]; // [2, 3, 4] let slice2 = &data[..3]; // [1, 2, 3] - from start let slice3 = &data[2..]; // [3, 4, 5, 6] - to end println!("Slice3: {:?}", slice3); }
Mutable Slices
Note the index is relative to the slice!
#![allow(unused)] fn main() { let mut numbers = [10, 20, 30, 40, 50]; { let slice = &mut numbers[1..4]; slice[0] = 999; // Modify through slice } // slice scope ends println!("{:?}", numbers); // [10, 999, 30, 40, 50] }
Slices of Different Types
Slices work with any contiguous data:
&[T]- slice of array/Vec elements&str- slice of string bytes (UTF-8)
fn main() { // Slice of an array let array = [1, 2, 3, 4, 5]; let array_slice: &[i32] = &array[1..4]; println!("Array slice: {:?}", array_slice); // Slice of a Vec let vec = vec![1.1, 2.2, 3.3, 4.4, 5.5]; let vec_slice: &[f32] = &vec[2..]; println!("Vec slice: {:?}", vec_slice); // Slice of a String (string slice = &str) let string = String::from("Hello World"); let str_slice: &str = &string[0..5]; println!("String slice: {}", str_slice); // Slice of a slice let vec_slice_slice: &[f32] = &vec_slice[0..2]; println!("Slice of a slice: {:?}", vec_slice_slice); }
Memory Representation of Slices
Slices are "fat pointers" - they contain pointer + length:
#![allow(unused)] fn main() { let v = vec![10, 20, 30, 40, 50]; let x = &v[1..4]; // Points to middle 3 elements }
STACK Heap
┌───────────────┐ ┌────────────────────────┐
│ x: &[i32] │ │ 10 │ 20 │ 30 │ 40 │ 50 │
│ ptr ───────┼──────────|───►│──────────────┤ │
│ len: 3 │ └────────────────────────┘
├───────────────┤ ▲
│ v: Vec<i32> │ │
│ ptr ───────┼─────────────────┘
│ len: 5 │
│ capacity: 5│
└───────────────┘
Ownership Interlude: Slice Borrowing
What do you think happens in this code?
#![allow(unused)] fn main() { let mut data = vec![1, 2, 3, 4]; let slice1 = &data[0..2]; let slice2 = &mut data[2..4]; println!("{:?} {:?}", slice1, slice2); }
A) Compiles fine - non-overlapping slices (indices 0 and 1 vs 2 and 3)
B) Compiler error - mixing mutable and immutable borrows
C) Runtime panic
Part 3 - Strings Deep-dive
The FOUR (or 3) kinds of Strings
#![allow(unused)] fn main() { let s = String::from("Hello DS210"); // Heap allocation - owned String let s_ref: &String = &s; // Reference to the String itself let literal: &str = "literal"; // String slice from program binary let slice: &str = &s[0..5]; // String slice from heap (borrows from s) }
STACK HEAP PROGRAM BINARY
┌──────────────────┐ ┌─────────────┐ ┌─────────────┐
│ s: String │◄─┐ │"Hello DS210"│ │ "literal" │
│ ptr ───────────┼──┼─────►│ │ └─────────────┘
│ len: 11 │ │ └─────────────┘ ▲
│ capacity: 20 │ │ ▲ │
├──────────────────┤ │ │ │
│ s_ref: &String │ │ │ │
│ ptr ───────────┼──┘ │ │
├──────────────────┤ │ │
│ literal: &str │ │ │
│ ptr ───────────┼──────────────┼──────────────────────┘
│ len: 7 │ │
├──────────────────┤ │
│ slice: &str │ │
│ ptr ───────────┼──────────────┘ (points to "Hello" in heap)
│ len: 5 │
└──────────────────┘
String encodings: Unicode and UTF-8
Unicode is a standard that assigns a unique number (called a "code point") to every character across all writing systems. For example:
- 'A' = U+0041
- 'é' = U+00E9
- '你' = U+4F60
- '🦀' = U+1F980
The char type in Rust stores this value directly - so there are always 4 bytes per char
UTF-8 is an encoding (a way to represent those Unicode code points as bytes in memory/files). It's one of several ways to encode Unicode:
- UTF-8: Variable-length (1-4 bytes per character), backward compatible with ASCII
- UTF-16: Variable-length (2 or 4 bytes per character)
- UTF-32: Fixed-length (always 4 bytes per character)
UTF-8 encoding uses variable-length bytes per character:
Character UTF-8 Bytes Binary Representation
'A' 1 byte 01000001
'é' 2 bytes 11000011 10101001
'你' 3 bytes 11100100 10111000 10101101
'🦀' 4 bytes 11110000 10011111 10100110 10000000
Strings in Rust use UTF-8 so use 1-4 bytes per character as needed.
Strings Are Collections of Characters
A String or &str is a sequence of Unicode characters encoded in UTF-8:
#![allow(unused)] fn main() { let emoji = "🦀🚀"; println!("Bytes: {}", emoji.len()); // 8 bytes (4 + 4 in UTF-8) println!("Characters: {}", emoji.chars().count()); // 2 characters let accents = "Aé"; println!("Bytes: {}", accents.len()); // 3 bytes (1 + 2 in UTF-8) println!("Characters: {}", accents.chars().count()); // 2 characters }
The key insight:
.len()returns bytes, not character count!- Use
.chars()to iterate over actual characters
Converting Between char and String
#![allow(unused)] fn main() { // char to String let c: char = '🦀'; let s: String = c.to_string(); // String to chars let text = "Hello"; for ch in text.chars() { // ch is type char println!("{}", ch); } // Collecting chars into a String let chars: Vec<char> = vec!['H', 'i', '!']; let s: String = chars.iter().collect(); // we'll see collect more soon }
So THAT'S why string indexing is forbidden
text[0] would return a byte, potentially splitting a multi-byte character and corrupting Unicode data.
fn main() { let text = "Hello, 世界!"; // let c = text[0]; // ERROR! let first = text.chars().next().unwrap(); // Safe let first_three: String = text.chars().take(3).collect(); // Also safe }
Slices won't throw compiler errors but are also potentially dangerous:
fn main() { // ASCII - works fine let text = "Hello, world!"; let hello = &text[0..5]; // OK - slices at character boundaries // Emoji at the boundary - PANIC! // let text = "🦀Hello"; // let slice = &text[0..2]; // PANIC! - slices through middle of 🦀 (4 bytes) // Emoji not at boundary - OK let text = "🦀Hello"; let slice = &text[4..9]; // OK - starts after 🦀, slices "Hello" }
Ownership Interlude: String Ownership Quiz
Question: What happens here?
#![allow(unused)] fn main() { let s1 = String::from("Hello"); let s2 = s1; let s3 = s2.clone(); println!("{} {}", s1, s2); // What happens? }
A) Prints "Hello Hello"
B) Compiler error - s1 cannot be assigned to s2 on line 2
C) Compiler error - s2 cannot be cloned on line 3
D) Compiler error - s1 cannot print on line 4
E) Runtime panic
String Concatenation
#![allow(unused)] fn main() { // Method 1: Mutation (keeps ownership) let mut s = String::from("Hello"); s.push_str(" World"); // Mutates s // Method 2: + operator (moves first string) let s1 = String::from("Hello"); let s2 = s1 + " World"; // s1 is moved! // Method 3: format! (no ownership taken) let name = "Data"; let num = 210; let result = format!("{} Science {}", name, num); // name & num still usable }
Ownership note: + moves first operand, format! borrows all inputs.
Function Parameters: &str vs &String
#![allow(unused)] fn main() { // Good: accepts &String, and &str fn analyze_text(text: &str) -> usize { ... // Less flexible: only accepts &String fn analyze_ref(text: &String) -> usize { ... // Moves ownership fn analyze_owned(text: String) -> usize { ... }
Best practice: Use &str parameters - more flexible, no ownership transfer.
Memory Layout: Passing &String to &str Parameter
When you pass &String to a function expecting &str, Rust converts it for you:
fn analyze_text(text: &str) -> usize { text.len() } fn main() { let s = String::from("Hello DS210"); let s_ref = &s; analyze_text(s_ref); // &String → &str conversion }
STACK HEAP
┌─ analyze_text ──┐ ┌─────────────────┐
│ text: &str │ │ "Hello DS210" │
│ ptr ──────────┼──────────┤─►┤───────────│ │
│ len: 11 │ └─────────────────┘
└─────────────────┘ ▲
│
┌──── main ───────┐ │
│ s_ref: &String │ │
│ ptr ──────────┼──┐ │
├─────────────────┤ │ │
│ s: String │◄─┘ │
│ ptr ──────────┼─────────────────────┘
│ len: 11 │
│ capacity: 20 │
└─────────────────┘
What happens:
sowns the heap datas_refis a reference tositself (points to stack)- When passed to
analyze_text, Rust converts&String→&str textis a string slice pointing directly to the heap data
Think-Pair-Share: String Slice Safety
Thought Experiment:
Consider this situation:
#![allow(unused)] fn main() { let mut s = String::from("Hello"); let slice = &s[0..5]; // Points directly to heap data }
The string slice slice points directly to the heap, not to s on the stack.
Question: What happens if we modify s after creating the slice?
#![allow(unused)] fn main() { let mut s = String::from("Hello"); let slice = &s[0..5]; s.push_str(" World!"); // String grows, might reallocate! println!("{}", slice); // Is slice still valid? }
Since slice points directly to heap memory, and the String might reallocate to a new location when it grows, won't the slice pointer become invalid (dangling)?
Part 4 - Iter and Collect
More on iter() and iter_mut()
We saw .iter() before - now we'll add .iter_mut():
.iter(): Gives you immutable references (&T) to each element.iter_mut(): Gives you mutable references (&mut T) to each element
fn main() { let mut numbers = vec![1, 2, 3, 4, 5]; // .iter() - read-only access for num in numbers.iter() { println!("{}", num); // num is &i32 // *num += 1; // ERROR! Can't modify through immutable reference } // .iter_mut() - mutable access for num in numbers.iter_mut() { *num += 10; // num is &mut i32 - can modify! } println!("Modified: {:?}", numbers); // [11, 12, 13, 14, 15] }
Dereferencing with iter_mut()
With .iter_mut() you always need to dereference with * to modify the value:
Why no pattern matching? With .iter() you can work off a copy because you're just reading. With .iter_mut() you need the mutable reference itself to assign through it, so you must use *.
fn main() { let mut numbers = vec![1, 2, 3, 4, 5]; // Must use * to modify through mutable reference for num in numbers.iter_mut() { *num *= 2; // num is &mut i32, *num is i32 } println!("{:?}", numbers); // [2, 4, 6, 8, 10] }
Enumerate with iter_mut()
You can combine .iter_mut() with .enumerate() to get both the index and a mutable reference:
fn main() { let mut scores = vec![78, 85, 92, 67, 88]; // enumerate gives (usize, &mut i32) for (i, score_ref) in scores.iter_mut().enumerate() { println!("Score {}: {}", i, score_ref); // Modify based on index if i == 0 { *score_ref += 10; // Bonus for first student } } println!("Updated scores: {:?}", scores); // [88, 85, 92, 67, 88] }
Intro to functions on iterators: sum() and collect()
.iter() also enables you to use:
- Math functions like
sum()andmax() - The
.collect()method, which can transform an iterator into various types (more on this later)
fn main() { let numbers = vec![1, 2, 3, 4, 5]; // sum() consumes the iterator and returns a single value let total: i32 = numbers.iter().sum(); println!("Total: {}", total); // 15 (empty iter -> 0) // max() returns an Option<&i32> let largest = numbers.iter().max(); println!("Largest: {:?}", largest); // Some(5) (empty iter -> None) // Collect strings into a single String let words = vec!["Hello", "world", "!"]; let sentence: String = words.iter().collect(); println!("Sentence: {}", sentence); // "Helloworld!" // .collect() can build different types based on the type annotation! }
More Examples of .collect()
.collect() is very flexible - it can build different collection types based on your type annotation:
fn main() { // Collect chars into a String let letters = vec!['H', 'e', 'l', 'l', 'o']; let word: String = letters.iter().collect(); println!("{}", word); // "Hello" // Collect into a Vec let numbers = [1, 2, 3, 4, 5]; // this is "closure" notation we'll learn later: let doubled: Vec<i32> = numbers.iter().map(|x| x * 2).collect(); println!("{:?}", doubled); // [2, 4, 6, 8, 10] // Collect string slices into a String let parts = vec!["Data", " ", "Science", " ", "210"]; let course: String = parts.iter().collect(); println!("{}", course); // "Data Science 210" // Collect range into a Vec let range_vec: Vec<i32> = (0..5).collect(); println!("{:?}", range_vec); // [0, 1, 2, 3, 4] // Collect chars from a string into a Vec let text = "Hello"; let char_vec: Vec<char> = text.chars().collect(); println!("{:?}", char_vec); // ['H', 'e', 'l', 'l', 'o'] // Take first 3 chars and collect back into String let first_three: String = "Hello World".chars().take(3).collect(); println!("{}", first_three); // "Hel" }
Lecture 19 - HashMap and HashSet
Logistics
- Exam 1 corrections are done, oral exams are Monday and Tuesday
- HW4 due in a week - Joey will intro in discussions on Tuesday
- Reminder to cite sources and be skeptical of AI answers
Learning Objectives
By the end of today, you should be able to:
- Use
HashMap<K, V>to quickly look up data by key - Use
HashSet<T>to find unique values and check membership - Understand what these have in common with Vec and String (besides capital letters)
What are collections?
Collections are types that can hold multiple values of a specified type.
So far
Heap-allocated collections:
Vec<T>- Growable array of items of typeT(Lecture 15)String- Growable text data (Lecture 18)
Stack-allocated collections:
- Arrays
[T; N]- Fixed number of items, known at compile time
Today we get two more collections
HashMap<K, V>- Look up values by key (like a dictionary)HashSet<T>- Store unique values (no duplicates allowed)
Both are heap-allocated and follow the same ownership patterns as Vec!
The Problem: Looking Up Data Quickly
Imagine you're analyzing customer data with a million records.
You need to find customer "Alice Smith"'s phone number quickly.
Option 1: Search through a list
#![allow(unused)] fn main() { let customer_data = vec![("John Doe", 12345), ("Jane Smith", 56789), ("Alice Smith", 11235), /* ... 999,997 more */]; // This is slow - might check every name! for customer in customer_data.iter() { if customer.0 == "Alice Smith" { println!("{}", customer.1); break; } } }
Option 2: Sort and box them?
Instead of searching, what if we kept the information in organized drawers so we could jump directly to Alice's information?
Option 3: ???
Option 3: The miraculous HashMap
(Yep, it's basically a python dict)
#![allow(unused)] fn main() { use std::collections::HashMap; // Create a "phone book" for customer_data let mut customer_data = HashMap::new(); customer_data.insert("Alice Smith".to_string(), 12345); customer_data.insert("Bob Jones".to_string(), 56789); customer_data.insert("Carol White".to_string(), 11235); // Look up Alice's data instantly match customer_data.get("Alice Smith") { Some(x) => println!("Alice's data is {}", x), None => println!("Alice not found"), } }
NOTE .get() returns an Option type!
Memory Layout: HashMap on Stack and Heap
What does a HashMap look like in memory?
#![allow(unused)] fn main() { let mut customer_data = HashMap::new(); customer_data.insert("Alice Smith".to_string(), 12345); customer_data.insert("Bob Jones".to_string(), 56789); }
STACK HEAP
┌──────────────────────┐ ┌──────────────────────────────┐
│ customer_data: │ │ Bucket Array (simplified) │
│ HashMap<String,i32> │ │ │
│ ptr ───────────────┼────────────►│ [0]: (hash) ──────┐ │
│ len: 2 │ │ [1]: empty │ │
│ capacity: 8 │ │ [2]: (hash) ─┐ │ │
└──────────────────────┘ │ [3]: empty │ │ │
│ ... │ │ │
└───────────────┼────┼─────────┘
│ │
┌───────────────┘ │
▼ ▼
┌──────────────┐ ┌──────────────┐
│"Bob Jones" │ │"Alice Smith" │
│ (String) │ │ (String) │
├──────────────┤ ├──────────────┤
│ 56789 │ │ 12345 │
│ (i32) │ │ (i32) │
└──────────────┘ └──────────────┘
Key points:
- HashMap lives on the stack (pointer + metadata)
- The bucket array lives on the heap
- Both keys (Strings) and values are stored on the heap
- Hash function determines which bucket stores each key-value pair
Adding and Updating Data
#![allow(unused)] fn main() { use std::collections::HashMap; // Store product prices let mut prices = HashMap::new(); prices.insert("laptop".to_string(), 999.99); prices.insert("mouse".to_string(), 25.50); prices.insert("keyboard".to_string(), 75.00); // Update an existing price prices.insert("laptop".to_string(), 899.99); // overwrites // Only add if not already there if !prices.contains_key("tablet") { prices.insert("tablet".to_string(), 199.99); } // More concise way to add but avoid overwriting: prices.entry("tablet".to_string()).or_insert(199.99); }
How does this really work?
It's not Quite A-Z rooms with A-Z cabinets with A-Z drawers...
If you did that for our class (of 46 students):
- 9 of you have A names (~20%)
- No one has F, I, N, O, P, Q, R, U, X, Z
- Not a great use of space!
Okay, then we'll just make... two A rooms
This is kind of how libraries do it:
We have the Dewey Decimal System:
- Looking for "The Rust Programming Language"?
- Turn it into code "005.133"
- Find the appropriate shelf : "005.8-005.212"
- Find the book on that shelf
- Looking for "The Lord of the Rings"?
- Turn it into code "823.912"
- Find the right shelf: "823-824"
- Find the book on that shelf
And we can have some shelves cover fewer numbers and some shelves cover more...
But we don't know at first what the distribution will be!
The solution - hashes
A hash function takes any input and converts it to a number.
Key properties:
- Deterministic: Same input always produces same output
- Fast: Takes milliseconds even for large inputs
- Uniform: Spreads values evenly across a range
- Avalanche effect: Small changes in input → big changes in output
hash("Alice")-> 42hash("alice")-> 8374 (just lowercase 'A' changed everything!)
- Hard to invert and Collisions are rare -> useful in security (eg passwords!)
A Toy Hash Function Example
Here's a simplified hash function to show the concept (real ones are much more sophisticated!):
#![allow(unused)] fn main() { fn toy_hash(s: &str) -> i32 { let mut hash: i32 = 0; for ch in s.chars() { hash = hash.wrapping_mul(31).wrapping_add(ch as i32); } hash } // Examples: println!("{}", toy_hash("Alice")); println!("{}", toy_hash("Bob")); println!("{}", toy_hash("alice")); // (lowercase 'a' changes everything!) }
Real hash functions (like the ones Rust uses) are much more complex and optimized, but they follow the same principle: turn any input into a number that can be used as an array index!
What does Rust use? Depends on what you're hashing, but if you must know... the default is SipHash 1-3 (have fun going down that rabbit hole!) - it is slower but more secure
From Hash Value to Bucket Index
Important distinction: The hash value is NOT the same as the bucket index! (ie the code isn't the shelf)
Let's say we have a HashMap with 8 buckets:
1. Calculate hash value (can be any i32):
hash("Alice") = 1,234,567,890
2. Convert to bucket index using modulo:
bucket_index = 1,234,567,890 % 8 = 2
3. Store in bucket [2]
Why use modulo?
- Hash values can be HUGE (billions)
- We only have a limited number of buckets (e.g., 8, 16, 100)
- Modulo (
%) wraps the hash value to fit our bucket array
So here's what HashMap does
- Turns a key into a hash
- Turns a hash into a bucket array index
- Stores the (key, value) pair at the bucket array index
Iterating on a HashMap
Continuing our example:
#![allow(unused)] fn main() { use std::collections::HashMap; let mut prices = HashMap::new(); prices.insert("laptop".to_string(), 999.99); prices.insert("mouse".to_string(), 25.50); prices.insert("keyboard".to_string(), 75.00); // Look at all products and prices for (product, price) in prices.iter() { // product and price are both & println!("{}: ${:.2}", product, price); } // Give everything a 10% discount for (product, price) in prices.iter_mut() { // product is &, price is &mut *price = *price * 0.9; } // And printing them again for (product, price) in prices.iter() { // product and price are both & println!("{}: ${:.2}", product, price); } }
Ownership Interlude: What happens here?
#![allow(unused)] fn main() { use std::collections::HashMap; let product = String::from("smartphone"); let mut prices = HashMap::new(); prices.insert(product, 599.99); println!("Product: {}", product); // What happens? }
Common Pattern: Counting Things
Let's count how many times each word appears in text:
#![allow(unused)] fn main() { use std::collections::HashMap; let text = "the cat sat on the mat"; let mut word_counts = HashMap::new(); for word in text.split_whitespace() { let new_count = match word_counts.get(word) { Some(x) => x+1, None => 1 }; word_counts.insert(word.to_string(), new_count); } for (word, count) in &word_counts { println!("'{}' appears {} times", word, count); } }
Alternatively:
#![allow(unused)] fn main() { use std::collections::HashMap; let text = "the cat sat on the mat"; let mut word_counts = HashMap::new(); for word in text.split_whitespace() { let count = word_counts.entry(word.to_string()).or_insert(0); // this gives a mutable reference! *count += 1; } for (word, count) in &word_counts { println!("'{}' appears {} times", word, count); } }
Take-away: .entry().or_insert() gives you a mutable reference to the value in the key-value pair!
HashSet - the baby sibling of HashMap
The Problem: Duplicate Data
You have customer data but some customers appear multiple times:
#![allow(unused)] fn main() { let customers = vec![ "Alice", "Bob", "Alice", "Carol", "Bob", "Devon", "Alice" ]; }
How many unique customers do we have? (How would you solve this without hashing?)
HashSet: Automatic Uniqueness
(Yep, you've seen this too in a python set)
#![allow(unused)] fn main() { use std::collections::HashSet; let customers = vec!["Alice", "Bob", "Alice", "Carol", "Bob", "David", "Alice"]; // Put all customers in a HashSet - duplicates automatically removed let unique_customers: HashSet<&str> = customers.iter().cloned().collect(); println!("Original list: {} customers", customers.len()); // 7 println!("Unique customers: {}", unique_customers.len()); // 4 // See who the unique customers are for customer in &unique_customers { println!("Customer: {}", customer); } }
Understanding .iter().cloned().collect()
Let's break down what's happening in that HashSet creation:
#![allow(unused)] fn main() { let customers = vec!["Alice", "Bob", "Alice"]; let unique: HashSet<&str> = customers.iter().cloned().collect(); }
Step by step:
-
.iter()- Creates an iterator over references to the elements- Type:
Iterator<Item = &&str>(references to string slices)
- Type:
-
.cloned()- Makes copies of each reference- Takes each
&&strand "clones" it to get&str - For Copy types like
&str,i32, this is cheap (just copies the pointer/value) - Type:
Iterator<Item = &str>
- Takes each
-
.collect()- Gathers all items into a HashSet- Looks at the type annotation (
: HashSet<&str>) - Creates a HashSet and inserts each
&str, automatically removing duplicates - Type:
HashSet<&str>
- Looks at the type annotation (
Creating HashSets from Different Vec Types
From Vec
use std::collections::HashSet; fn main(){ let numbers = vec![1, 2, 3, 2, 4, 1, 5]; // Option 1: Use .iter().cloned().collect() let unique_nums: HashSet<i32> = numbers.iter().cloned().collect(); println!("{:?}", numbers); // still valid // Option 2: Use .into_iter().collect() (consumes the Vec) let unique_nums: HashSet<i32> = numbers.into_iter().collect(); // println!("{:?}", numbers); // won't compile println!("{:?}", unique_nums); // {1, 2, 3, 4, 5} (order may vary) }
Strings work the same way - clone or move ownership
use std::collections::HashSet; fn main(){ let names = vec![ String::from("Alice"), String::from("Bob"), String::from("Alice") ]; // Option 1: Clone all Strings (original Vec still valid) let unique_names: HashSet<String> = names.iter().cloned().collect(); println!("Original: {:?}", names); // Still works! println!("Unique: {:?}", unique_names); // Option 2: Move Strings into HashSet (consumes the Vec) let unique_names: HashSet<String> = names.into_iter().collect(); // println!("{:?}", names); // ERROR! names was moved }
Checking if something is in the hashset
#![allow(unused)] fn main() { use std::collections::HashSet; let mut valid_products = HashSet::new(); valid_products.insert("laptop".to_string()); valid_products.insert("mouse".to_string()); valid_products.insert("keyboard".to_string()); // Check if a product is valid let product_to_check = "tablet"; if valid_products.contains(product_to_check) { println!("{} is a valid product", product_to_check); } else { println!("{} is not in our catalog", product_to_check); } }
A realistic example
You have 100,000 customer IDs and need to check if 10,000 orders are from valid customers. Which is faster?
#![allow(unused)] fn main() { // Option A: Keep customer IDs in a Vec let customers_vec = vec![/* 100,000 customer IDs */]; for order_id in order_ids { if customers_vec.contains(&order_id) { // Process valid order } } // Option B: Keep customer IDs in a HashSet let customers_set: HashSet<_> = customer_ids.into_iter().collect(); for order_id in order_ids { if customers_set.contains(&order_id) { // Process valid order } } }
They look the same - the difference is in how they work
- Vec has to potentially check ALL 100,000 each time to find a match! Up to 100k TIMES 10k operations
- HashSet just hashes each order and checks against the list - only order 10k
Activity 19 - Explain the Anagram Finder
On gradescope you'll find a complete program for finding anagrams. The code is functional (for once!) - your job is to understand it.
You can discuss in groups but each gradescope submission has a cap of 2.
- Take some time to explain in the in-line commments what each line of code is doing.
- In the triple /// doc-string comments before each function, explain what the function does overall and what its role is in the program.
- Consider renaming functions and variables (and if you do, replacing it elsewhere!) to make it clearer what's going on
You can paste this into your IDE/VSCode or Rust Playground - whichever's easier.
Regardless of how far you get, paste your edited code into gradescope by the end of class.
Lecture 20 - Structs and Methods
Logistics
- HW3 was graded - you have until Sunday at midnight (11:59pm Sunday) if you want to do corrections
- Oral exams are today and tomorrow
- HW4 is due Friday (Joey will cover in discussion tomorrow)
Learning Objectives
By the end of today, you should be able to:
- Define custom data types using structs
- Implement methods and associated functions with
implblocks - Use different types of
selfparameters (&self,&mut self,self)
The Problem: Organizing Related Data
Imagine you're analyzing customer data. You could use separate variables:
#![allow(unused)] fn main() { let customer_name = "Alice Smith"; let customer_age = 25; let customer_state = State::NY; let customer_member = true; }
Problem: Easy to mix up, hard to pass around, no guarantee they belong together!
Solution: Group related data into a custom type called a "struct".
#![allow(unused)] fn main() { enum State { MA, NY, // ... } struct Customer { name: String, age: u32, state: State, member: bool, } let alice = Customer { name: "Alice".to_string(), age: 25, state: State::NY, member: true, }; }
Benefit: All related data stays together and has clear names.
Using Your Struct
#![allow(unused)] fn main() { #[derive(Debug)] enum State { MA, NY, // ... } #[derive(Debug)] struct Customer { name: String, age: u32, state: State, member: bool, } let mut alice = Customer { name: "Alice".to_string(), age: 25, state: State::NY, member: true, }; // Access fields with dot notation println!("{}'s age is {}", alice.name, alice.age); // Modify fields (if struct is mutable) alice.age = 26; println!("{:?}", alice); // since customer (and State!) have Debug }
Memory insight: How structs store data
STACK HEAP
┌──────student─────┐
│ name: ptr ──────┼──────────► ┌─────────────┐
│ len: 11 │ │"Alice Smith"│
│ cap: 11 │ └─────────────┘
│ age: 20 │
│ state: 0 (NY) │ ← Just a number representing the variant
│ member: 1 (true) │ ← Just 0 or 1
└──────────────────┘
Tuple structs: When you don't need field names (TC 12:30)
Sometimes you want type safety but don't need named fields:
#![allow(unused)] fn main() { #[derive(Debug)] struct Point3D(f64, f64, f64); #[derive(Debug)] struct BoxOfDonuts(i32); let point = Point3D(3.0, 4.0, 5.0); let temp = BoxOfDonuts(12); // Access with .0, .1, .2 println!("X: {}, Y: {}, Z: {}", point.0, point.1, point.2); }
Benefit: Prevents accidentally mixing up similar data types.
Ownership Interlude: Struct Move Quiz
Question: What happens in this code?
#![allow(unused)] fn main() { struct Point { x: f64, y: f64 } struct NamedPoint { name: String, point: Point } let p1 = Point { x: 1.0, y: 2.0 }; let np1 = NamedPoint { name: "Origin".to_string(), point: p1 }; let np2 = NamedPoint { name: "Copy".to_string(), point: p1 }; }
A) Compiles fine - Point is copied
B) Compiler error - p1 was moved
C) Runtime panic
Creating similar structs with update syntax
Sometimes you want to create a new struct that's mostly the same as an existing one, but with a few fields changed.
The long way (repetitive!):
#![allow(unused)] fn main() { #[derive(Debug)] enum State { MA, NY, // ... } struct Customer { name: String, age: u32, state: State, member: bool, } let alice = Customer { name: "Alice".to_string(), age: 25, state: State::NY, member: true, }; // Want to create another NY member? Copy all the fields! let bob = Customer { name: "Bob".to_string(), age: 30, state: State::NY, // Same as alice member: true, // Same as alice }; }
The better way (using ..):
#![allow(unused)] fn main() { // Create bob with only the fields that differ let bob = Customer { name: "Bob".to_string(), age: 30, ..alice // Copy remaining fields (state, member) from alice }; // Create another NY member let charlie = Customer { name: "Charlie".to_string(), age: 28, ..alice // Gets state: NY and member: true from alice }; // alice is still valid! The copied fields (state, member) are Copy types }
Important ownership note: The .. syntax will move any non-Copy fields that aren't explicitly specified. In our example, state and member are both Copy types, so alice remains valid. But watch out:
#![allow(unused)] fn main() { // A different struct with a non-Copy field at the end struct Order { customer_name: String, quantity: u32, notes: String, // Not a Copy type! } let order1 = Order { customer_name: "Alice".to_string(), quantity: 5, notes: "Rush delivery".to_string(), }; let order2 = Order { customer_name: "Bob".to_string(), ..order1 // This MOVES order1.notes! order1 is now invalid }; // but this is safe! let order3 = Order { customer_name: "Bob".to_string(), ..order1.clone() }; }
Part 2: Methods - Adding behavior to your data
What Are Methods?
Methods let you add behavior (functions) that belong to your struct:
#![allow(unused)] fn main() { struct Rectangle { width: f64, height: f64, } // Instead of separate functions: fn calculate_area(rect: &Rectangle) -> f64 { ... } fn calculate_perimeter(rect: &Rectangle) -> f64 { ... } // You can attach them to the struct: impl Rectangle { fn area(&self) -> f64 { ... } // Method fn perimeter(&self) -> f64 { ... } // Method } // Usage: rect.area() instead of calculate_area(&rect) }
Benefit: Methods keep related functionality together with the data.
Basic Method Example
#![allow(unused)] fn main() { #[derive(Debug)] struct Rectangle { width: f64, height: f64, } impl Rectangle { fn area(&self) -> f64 { self.width * self.height } } let rect = Rectangle { width: 10.0, height: 5.0 }; println!("Area: {}", rect.area()); // Much cleaner than area(&rect) }
Self?
What is self?
self is a special parameter that refers to the instance of the struct the method is called on.
#![allow(unused)] fn main() { let rect = Rectangle { width: 10.0, height: 5.0 }; rect.area(); // When you call area(), "self" inside area() refers to rect }
Think of it like: "the rectangle that I'm calculating the area of."
Understanding &self (Borrowed Reference)
#![allow(unused)] fn main() { #[derive(Debug)] struct Rectangle { width: f64, height: f64, } impl Rectangle { fn area(&self) -> f64 { self.width * self.height } } let rect = Rectangle { width: 10.0, height: 5.0 }; let a = rect.area(); // rect.area() is like calling area(&rect) println!("{}", rect.width); // rect is still usable! }
Why &self?
- We just need to read the data, not change it
- The rectangle is still usable after the method call
- Most methods use
&self- it's the safest default
Understanding &mut self (Mutable Reference)
#![allow(unused)] fn main() { #[derive(Debug)] struct Rectangle { width: f64, height: f64, } impl Rectangle { fn scale(&mut self, factor: f64) { self.width *= factor; self.height *= factor; } } let mut rect = Rectangle { width: 10.0, height: 5.0 }; rect.scale(2.0); // Changes rect's width and height println!("{}", rect.width); // Now 20.0 - rect was modified! }
Why &mut self?
- We need to change the struct's data
- The struct must be declared
mutto call these methods - Use when the method modifies internal state
Passing self itself (taking ownership)
#[derive(Debug)] struct Rectangle { width: f64, height: f64, } impl Rectangle { fn into_area(self) -> f64 { self.width * self.height // Rectangle is consumed here! } } fn main(){ let rect = Rectangle { width: 10.0, height: 5.0 }; let a = rect.into_area(); // println!("{}", rect.width); // ERROR! rect was moved }
Why self?
- The method consumes the struct
- Use for conversions or when the struct shouldn't be used again
- Less common - only use when you truly need to consume
Quick Reference
| Parameter | Meaning | When to use | After calling |
|---|---|---|---|
&self | Borrow (read-only) | Reading data, calculations | Struct still usable |
&mut self | Borrow mutably | Modifying struct data | Struct still usable |
self | Take ownership | Converting, consuming | Struct is moved |
We've seen lots of these before! (dot methods) (TC 12:40)
You've been using methods all semester - now you know what they really are!
#![allow(unused)] fn main() { let mut numbers = vec![1, 2, 3]; numbers.push(4); // What's really happening? let size = numbers.len(); // What about this? }
Under the hood, these are methods implemented on the Vec struct:
#![allow(unused)] fn main() { impl<T> Vec<T> { // push takes &mut self - it needs to modify the vector fn push(&mut self, value: T) { // ... add value to the vector } // len takes &self - it just reads the length fn len(&self) -> usize { // ... return the length } // new doesn't take self at all - it creates a new Vec fn new() -> Vec<T> { // ... create empty vector } } }
Now it makes sense!
numbers.push(4)callspush(&mut numbers, 4)(needs&mut selfto modify)numbers.len()callslen(&numbers)(needs&selfto read)Vec::new()has no instance yet so noselfparameter!
More Examples You've Used
| What you wrote | What it really is | self type |
|---|---|---|
my_string.len() | String::len(&my_string) | &self (just reading) |
my_string.push('!') | String::push(&mut my_string, '!') | &mut self (modifying) |
my_vec.iter() | Vec::iter(&my_vec) | &self (just reading) |
Some(5).unwrap() | Option::unwrap(Some(5)) | self (consuming!) |
The pattern: If a method can be called multiple times on the same value, it uses &self or &mut self. If it can only be called once (like unwrap()), it takes self.
Constructor Functions
You can create your own "constructor" functions like Vec::new to make building structs easier:
#![allow(unused)] fn main() { #[derive(Debug)] struct DataSet { name: String, values: Vec<f64>, } impl DataSet { // Constructor - no self parameter, returns new instance fn new(name: String) -> DataSet { DataSet { name, // shorthand for name: name values: Vec::new(), } } } // Much easier than writing out the whole struct: let dataset = DataSet::new("Experiment".to_string()); }
Enums vs Structs
Remember the temperature problem from homework? Let's redo it with impl (which works for enums too!) and then structs
Approach 1: Enum (what you've seen before)
#![allow(unused)] fn main() { #[derive(Debug, Clone, Copy)] enum Temperature { Celsius(f64), Fahrenheit(f64), } impl Temperature { fn to_celsius(&self) -> f64 { match self { Temperature::Celsius(val) => *val, Temperature::Fahrenheit(val) => (val - 32.0) * 5.0 / 9.0, } } fn to_fahrenheit(&self) -> f64 { match self { Temperature::Celsius(val) => val * 9.0 / 5.0 + 32.0, Temperature::Fahrenheit(val) => *val, } } } let temp = Temperature::Celsius(25.0); println!("{}°F", temp.to_fahrenheit()); // 77°F }
Key idea: A temperature is either Celsius or Fahrenheit. The enum says "this value IS one of these variants."
Approach 2: Struct (more flexible)
#![allow(unused)] fn main() { #[derive(Debug, Clone, Copy)] enum Scale { Celsius, Fahrenheit, } #[derive(Debug)] struct Temperature { value: f64, scale: Scale, } impl Temperature { fn new(value: f64, scale: Scale) -> Temperature { Temperature { value, scale } } fn to_celsius(&self) -> f64 { match self.scale { Scale::Celsius => self.value, Scale::Fahrenheit => (self.value - 32.0) * 5.0 / 9.0, } } fn to_fahrenheit(&self) -> f64 { match self.scale { Scale::Celsius => self.value * 9.0 / 5.0 + 32.0, Scale::Fahrenheit => self.value, } } } let temp = Temperature::new(25.0, Scale::Celsius); println!("{}°F", temp.to_fahrenheit()); // 77°F }
Key idea: A temperature has a value and a scale. The struct groups related data together.
When to Use Each?
| Use Enum when: | Use Struct when: |
|---|---|
| Data can be one of several alternatives | Data has multiple attributes that all exist together |
| The variants are fundamentally different | The fields work together as a unit |
Example: Result<T, E> (Ok or Err) | Example: Customer (has name and age and state) |
Example: Option<T> (Some or None) | Example: Rectangle (has width and height) |
Combining Them is Powerful!
Notice in the struct version, we used both:
- Struct (
Temperature) to groupvalueandscaletogether - Enum (
Scale) to represent that scale is one of two alternatives
This is a very common pattern in Rust! Use structs to group related data, and enums inside structs to represent choices.
Pre-activity example: Student grade tracker
#![allow(unused)] fn main() { #[derive(Debug)] struct Student { name: String, grades: Vec<f64>, } impl Student { fn new(name: String) -> Student { Student { name, grades: Vec::new(), } } fn add_grade(&mut self, grade: f64) { self.grades.push(grade); } fn average(&self) -> f64 { if self.grades.is_empty() { 0.0 } else { self.grades.iter().sum() / self.grades.len() as f64 } } } // Usage let mut alice = Student::new("Alice".to_string()); alice.add_grade(85.0); alice.add_grade(92.0); println!("{}'s average: {:.1}", alice.name, alice.average()); }
Activity time
In groups of 5-6, you'll design a struct-based system for a real-world scenario.
Focus on:
- What fields belong in your structs
- What enums represent choices in your domain
- What methods you need and what type of
selfparameter each uses - How structs and enums work together
Write as much proper code as you can
- Use
enum,struct, andimpl - Use
self,&selfand&mut selfin your method signatures - But feel free to leave the inside of each method
unimplemented()
Be ready to present:
- Choose one person who will come to the front to explain your design
- We'll go by task, so we'll hear two approaches to each problem
Lecture 21 - Pattern Matching and Review
Logistics
- HW4 due Friday night
- HW3 corrections due Sunday night
- Feedback on pre-task value: mixed
- After oral exams and corrections, 25/50/75 %iles: 86%, 92%, 95%
- Our next midterm is in 2 weeks
- Changes to corrections procedure for midterm 2
Presenting Struct Design from Monday
See PDFs - 10 min
Learning Objectives
By the end of today, you should be able to:
- Use pattern matching to extract data from structs and enums
- Apply simple pattern guards for conditional matching
- Review ownership concepts from L14-L20
Part 1 - Pattern Matching with Structs
Getting data out of enums and structs
The same match statements we saw for enums works for structs:
#![allow(unused)] fn main() { #[derive(Debug)] struct Book { title: String, year: u32, rating: f64, genre: Genre, } enum Genre { Fiction, NonFiction, Mystery, SciFi, } // Extract data from enums fn describe_genre(genre: &Genre) -> &str { match genre { Genre::Fiction => "Literary fiction", Genre::NonFiction => "Factual content", Genre::Mystery => "Mystery and suspense", Genre::SciFi => "Science fiction", } } // Extract data from structs fn get_rating(book: &Book) -> f64 { match book { Book { rating, .. } => *rating, } } fn check_highly_rated(book: &Book) -> bool { match book { Book { rating, .. } if *rating >= 4.5 => true, _ => false, } } }
Pattern Guards for Complex Conditions
#![allow(unused)] fn main() { #[derive(Debug)] struct Book { title: String, rating: f64, pages: u32, } }
#![allow(unused)] fn main() { fn classify_book(book: &Book) -> &'static str { match book { Book { rating, pages, .. } if rating >= 4.5 && pages >= 400 => { "Epic Bestseller" } Book { rating, pages, .. } if rating >= 4.5 => { "Highly Rated" } Book { pages, .. } if pages >= 600 => "Epic", Book { pages, .. } if pages >= 300 => "Standard Novel", Book { rating, .. } if rating < 2.0 => "Needs Review", _ => "Short Read", } } }
Destructuring in Let Bindings
#[derive(Debug)] struct DataPoint { x: f64, y: f64, label: String, confidence: f64, } let point1 = DataPoint { x: 1.5, y: 2.3, label: "Positive".to_string(), confidence: 0.95, }; let point2 = DataPoint { x: 5.0, y: -1.1, label: "Negative".to_string(), confidence: 0.70, };
#![allow(unused)] fn main() { // Destructure in let binding let DataPoint { x, y, label, confidence } = point1; println!("({}, {}) - {} ({:.1}%)", x, y, label, confidence * 100.0); // Partial destructuring let DataPoint { label, confidence, .. } = point2; // Ignore x, y println!("We only learned: {} ({:.1}%)", label, confidence * 100.0); // In function parameters fn print_coords(DataPoint { x, y, .. }: &DataPoint) { println!("Point at ({:.2}, {:.2})", x, y); } }
Ownership Interlude: Destructuring Moves Quiz
Question: After this destructuring, what can we still use?
#![allow(unused)] fn main() { let point = DataPoint { x: 1.0, y: 2.0, label: "test".to_string(), confidence: 0.9, }; let DataPoint { x, label, .. } = point; }
What's still usable: point, point.x, point.y, point.label, point.confidence?
Part 2: Review of L14-L20
Stack vs. Heap (Lecture 14)
- Stack: Fast, fixed-size, automatic cleanup (LIFO - "stack of plates")
- Each function call gets a stack frame
- Stores simple types:
i32,bool,char, arrays, tuples - Variables cleaned up when function ends
- Heap: Flexible size, manual management (Rust helps!)
- For data that can grow/shrink or are very large
- Types like
String,Vec,HashMap,Boxstore data here - Stack holds pointers to heap data
- Memory addresses: Every location has a unique address to a physical part of RAM (like 0x7fff5fbff6bc)
Ownership Rules (Lecture 15)
The three fundamental ownership rules:
- Each value has an owner
- Only one owner at a time
- When owner goes out of scope, value is dropped
Key concepts:
- Move semantics:
let s2 = s1;moves ownership for heap types (String,Vec) - Copy semantics:
let y = x;copies value for stack types (i32,bool) - Clone:
.clone()creates explicit copy of heap data (and copies stack data) - Function calls: Passing to function moves or copies (same rules)
- Return values: Transfer ownership back to caller
Borrowing and References (Lecture 16)
- Creating references:
&operator borrows without taking ownershiplet data_ref = &data;- bothdataanddata_refusable
- Functions with references:
fn process(data: &Vec<i32>)- can use data without moving it - Dereferencing:
*operator accesses value through reference*x_ref > *y_refto compare values, and for use inmatch- Often auto-dereferenced (eg
println!and arithmetic)
- Pattern matching:
for &num in numbers.iter()extracts values (Copy types only)
Mutable References (Lecture 17)
Borrowing rules (the borrow checker):
- Rule 1: Many immutable references OR one mutable reference (not both!)
- Rule 2: References must not outlive what they point to
Mutable references (&mut T):
fn modify(data: &mut Vec<i32>)- can change borrowed data- Must declare variable as
mutto create mutable reference - Can't have other references (mutable or immutable) at same time
- Use
*to modify through reference:*x = 10;
Reference timing:
- Rust tracks when references are last used
- Can create new references after previous ones stop being used
Strings and Slices (Lecture 18)
- String types:
String: Owned, growable string on heap&str: String slice - reference to string data (points to the heap)- string literals point to the binary itself
- string slices built on owned strings point to the heap
- they have the same type/structure (a "fat pointer")
&String: Reference to a String (points to the stack)
Slices:
- Syntax:
&data[start..end],&data[..3],&data[2..] &[T]: Slice of array/Vec elements (pointer + length)- Slices are references - don't take ownership
UTF-8 encoding:
- Characters can be 1-4 bytes
.len()returns bytes, not character count- Use
.chars()to iterate over characters - No
text[0]indexing - would fail to compile
Iterators:
.iter(): Generates immutable references&T.iter_mut(): Generates mutable references&mut T.iter().enumerate(): Generates pairs (i32,&T).iter_mut().enumerate(): Generates pairs (i32,&mut T).collect(): Collapse iterators into target type
HashMap and HashSet (Lecture 19)
Hash functions:
- Convert any input to a number (deterministic, fast, uniform distribution)
- Used to determine bucket index:
hash % capacity
HashMap<K, V>:
- Hashes the key to get a hash value
- Creates a bucket array that stores hash values and pointers to (key, value) pairs
- Create:
HashMap::new()or collect from iterator - Insert:
.insert(key, value)- overwrites if key exists - Get:
.get(&key)returnsOption<&V> - Check:
.contains_key(&key)returnsbool - Iterate:
for (key, value) in map.iter() - Pattern:
.entry(key).or_insert(value)for counting/defaults
HashSet
- Stores unique values (no duplicates)
.insert(value),.contains(&value)- Create from Vec:
vec.iter().cloned().collect() - Fast membership testing (better than Vec for large data)
Structs and Methods (Lecture 20)
Defining structs:
#![allow(unused)] fn main() { struct Customer { name: String, age: u32, member: bool, } }
- Group related data together
- Access fields with dot notation:
customer.name - Tuple structs:
struct Point(f64, f64, f64); - Update syntax:
Customer { name: "Bob".to_string(), ..alice }
Methods (impl blocks):
#![allow(unused)] fn main() { impl Customer { fn new(name: String) -> Customer { ... } // Constructor fn display(&self) { ... } // Read-only fn update_age(&mut self, age: u32) { ... } // Modify fn into_name(self) -> String { ... } // Consume } }
Some function signature best practices
#![allow(unused)] fn main() { // ❌ BAD: Unnecessary ownership transfer fn bad_process(key: String, value: f64) -> f64 { value * 2.0 // Doesn't need to own `key`! } // ✅ GOOD: Flexible parameter fn good_process(key: &str, value: f64) -> f64 { value * 2.0 // Accepts both String and &str } // ❌ BAD: Dangerous unwrap fn bad_lookup(map: &HashMap<String, i32>, key: &str) -> i32 { map.get(key).unwrap() // Panics if key missing! } // ✅ GOOD: Safe Option handling fn good_lookup(map: &HashMap<String, i32>, key: &str) -> Option<i32> { map.get(key).copied() // Returns Option for safety } }
Debug Quiz
Question: What's wrong with this code?
#![allow(unused)] fn main() { fn get_first_line(text: String) -> &str { let lines: Vec<&str> = text.lines().collect(); if lines.is_empty() { "" } else { lines[0] } } }
A) Should return Option<&str> for safety
B) Can't return reference to text which goes out of scope
C) collect() is unnecessary here
A few common ownership issues
#![allow(unused)] fn main() { #[derive(Debug, Clone)] struct Data { value: i32, label: String } // Issue 1: Unnecessary ownership fn process_label(label: String) -> String { // Should be &str? label.to_uppercase() } // Issue 2: Lifetime problem fn get_first_item(items: Vec<String>) -> &String { // ERROR - Can't return ref to owned data! &items[0] } // Issue 3: Move in loop fn analyze_data(data_list: Vec<Data>) { for data in data_list { // Moves each Data println!("{:?}", data); } println!("Count: {}", data_list.len()); // ERROR - data_list moved! } // Issue 4: Borrowing conflict fn modify_and_read(items: &mut Vec<i32>) { let first = &items[0]; // Immutable borrow items.push(42); // ERROR - Mutable borrow while immutable exists! println!("First: {}", first); } }
Lecture 22 - Generics and Type Systems
Logistics
- HW4 due tonight (new policy doesn't apply)
- New HW policy for HW5-7 (see Piazza after class)
Take-aways from "comfort-check" quiz
Most comfortable:
- Stack and heap memory
- What
.clone()does .iter()vs.iter_mut()&self,&mut self,self
High variance:
- Ownership and borrow-checker rules
- Why you can't do
text[0]on a String - Modifying a Vec when using
.iter()
Least comfortable:
- What
.collect()does .entry().or_insert()for hashmaps.get()on hashmaps returning an Option- Tuple structs
Learning Objectives (TC 12:25)
By the end of today, you should be able to:
- Write generic functions and structs using type parameters
- Use trait bounds to constrain generic behavior
- Recognize when you've been using generics all along
The Problem with Type-Specific Functions
Python is dynamically typed and quite flexible. We can pass many different types to a function:
def max(x, y):
return x if x > y else y
>>> max(3, 2)
3
>>> max(3.1, 2.2)
3.1
>>> max('s', 't')
't'
Very flexible! Any downsides?
- Requires inferring types each time function is called
- Incurs runtime penalty
- No compile-time guarantees about type safety
Type system approaches (review)
Dynamic Typing (Python, JavaScript, Ruby, R):
- Types checked at runtime
- Flexible coding
- Prone to runtime errors
Static Typing (C/C++, Java, Rust, Go):
- Types checked at compile-time
- Fast execution
- Early error detection
Rust without generics
Rust is strongly typed, so we would have to create a version of the function for each type:
#![allow(unused)] fn main() { fn max_i32(x: i32, y: i32) -> i32 { if x > y { x } else { y } } fn max_f64(x: f64, y: f64) -> f64 { if x > y { x } else { y } } fn max_char(x: char, y: char) -> char { if x > y { x } else { y } } // ... etc., etc. }
Problem: Supporting N types = writing N functions!
fn main() { println!("{}", max_i32(3, 8)); // 8 println!("{}", max_f64(3.3, 8.1)); // 8.1 println!("{}", max_char('a', 'b')); // b }
The dilemma: Python's flexibility with runtime costs vs. Rust's safety with code duplication?
Solution: Generics give us both flexibility AND compile-time guarantees!
Compiling generic functions (Monomorphization)
Insight: Generics = compile-time code generation for zero runtime cost!
SOURCE CODE COMPILED OUTPUT
┌─ fn max<T>(x: T, y: T) ─┐ ┌ Specialized Functions ─┐
│ where T: PartialOrd │ ───► │ fn max_i32(x: i32, ...)│
│ { │ │ fn max_f64(x: f64, ...)│
│ if x > y { x } else{y}│ │ fn max_char(x: char,..)│
│ } │ └────────────────────────┘
└─────────────────────────┘ Monomorphization
A Simple Generic Example (TC 12:30)
Let's try writing a super simple generic function. Use the <T> syntax to indicate that the function is generic:
#![allow(unused)] fn main() { fn passit<T>(x: T) -> T { x } }
The T is a placeholder for the type (could be any letter, but T for "Type" is conventional).
#![allow(unused)] fn main() { fn passit<T>(x: T) -> T { x } let x = passit(5); println!("x is {}", x); // x is 5 let x = passit(1.1); println!("x is {}", x); // x is 1.1 let x = passit('s'); println!("x is {}", x); // x is s }
This works! The function just passes through whatever type it receives.
Okay but that was pretty boring...
Let's try writing a generic max function.
#![allow(unused)] fn main() { fn max<T>(x: T, y: T) -> T { if x > y { x } else { y } } }
... but wait, there's a compiler error!
Problem: Not all types support > comparison!
The Rust compiler is thorough enough to recognize that not all generic types may have the behavior we want.
Solution: Trait bounds specify required behavior.
Trait Bounds: Constraining Generic Types
So how can we make our max function? We need to add a trait bound to specify that T must support comparison:
use std::cmp::PartialOrd; fn max<T: PartialOrd>(x: T, y: T) -> T { if x > y { x } else { y } // Now it works! } fn main() { // Type inference determines T: println!("{}", max(5, 10)); // T = i32 println!("{}", max(3.14, 2.7)); // T = f64 println!("{}", max('a', 'b')); // T = char let i = num::complex::Complex::new(10, 20); let j = num::complex::Complex::new(20, 5); // println!("{:?}", max(i, j)); // Won't compile if T doesn't implement PartialOrd }
Key insight: T: PartialOrd = "T must support comparison operations"
We can place restrictions on the generic types we would support.
Quick note on use std::cmp::PartialOrd;
PartialOrd needed to be imported from std::cmp::PartialOrd
(We didn't have to do this for things like #[derive(PartialOrd)] because those were macros!)
Other imports we might need:
#![allow(unused)] fn main() { use std::fmt::{Debug, Display}; use std::cmp::{PartialOrd, Eq, Ord}; use std::ops::{Add, Sub, Mul, Div}; }
Some traits like Copy, Clone, PartialEq are in the prelude (automatically imported), but others need explicit imports.
Monomorphization in Action (TC 12:35)
// What you write: fn max<T: PartialOrd>(x: T, y: T) -> T { if x > y { x } else { y } } fn main() { println!("{}", max(5, 10)); println!("{}", max(3.14, 2.7)); }
// What the compiler generates (conceptually): fn max_i32(x: i32, y: i32) -> i32 { if x > y { x } else { y } } fn max_f64(x: f64, y: f64) -> f64 { if x > y { x } else { y } } fn main() { println!("{}", max_i32(5, 10)); println!("{}", max_f64(3.14, 2.7)); }
Generic Structs
#![allow(unused)] fn main() { #[derive(Debug)] struct Point<T> { x: T, y: T, } // Type inference at work: let int_point = Point { x: 5, y: 10 }; // Point<i32> let float_point = Point { x: 3.14, y: 2.7 }; // Point<f64> }
Generic Struct Memory Layout
STACK
┌─ Point<i32> ───┐
│ x: 5 [4 bytes]│
│ y: 10 [4 bytes]│
└────────────────┘
8 bytes total
┌─ Point<f64> ─────┐
│ x: 3.14 [8 bytes]│
│ y: 2.7 [8 bytes]│
└──────────────────┘
16 bytes total
Memory insight: Generic structs adapt their size to the contained types!
Methods on Generic Structs
#![allow(unused)] fn main() { #[derive(Debug)] struct Point<T> { x: T, y: T, } impl<T> Point<T> { fn new(x: T, y: T) -> Point<T> { Point { x, y } } fn get_x(&self) -> &T { &self.x } } // Works for any type: let point1 = Point::new(1, 2); // Point<i32> let point2 = Point::new(1.5, 2.5); // Point<f64> println!("{}", point1.get_x()); println!("{}", point2.get_x()); }
Trait Bounds on Methods (TC 12:40)
Sometimes a method only works for certain types. Let's implement a swap method:
#![allow(unused)] fn main() { #[derive(Debug)] struct Point<T> { x: T, y: T, } // This won't compile! impl<T> Point<T> { fn new(x: T, y: T) -> Point<T> { Point { x, y } } fn swap(&mut self) { let temp = self.x; // Might not be Copy! self.x = self.y; self.y = temp; } } }
Problem: We're trying to move self.x out, but T might not implement Copy! (Compiler error gives a different helpful suggestion to add Clone)
Solution: Add a trait bound to the impl block:
#![allow(unused)] fn main() { #[derive(Debug)] struct Point<T> { x: T, y: T, } // Only implement swap for types that are Copy impl<T> Point<T> { fn new(x: T, y: T) -> Point<T> { Point { x, y } } } impl<T: Copy> Point<T> { fn swap(&mut self) { let temp = self.x; // OK - T implements Copy self.x = self.y; self.y = temp; } } let mut point = Point::new(2, 3); println!("{:?}", point); // Point { x: 2, y: 3 } point.swap(); println!("{:?}", point); // Point { x: 3, y: 2 } }
Key insight: impl<T: Copy> means "this implementation only exists for types that implement Copy"
Common Traits and Bounds (TC 12:45)
#![allow(unused)] fn main() { use std::fmt::Debug; // Need to import Debug! // Debug: Check if it can be printed with {:?} fn debug_value<T: Debug>(val: T) { println!("Value: {:?}", val); } // Clone: Check if it can be duplicated with .clone() fn duplicate<T: Clone>(val: &T) -> T { val.clone() } // Copy: Check if it is automatically copied (no moves) fn safe_copy<T: Copy>(val: T) -> (T, T) { (val, val) // val still usable! } }
Built-in Generic Types (You Know These!)
Remember these from earlier in the semester?
#![allow(unused)] fn main() { // Option<T> - maybe has a value let maybe_number: Option<i32> = Some(42); // Result<T, E> - success or error let outcome: Result<i32, String> = Ok(42); // Vec<T> - growable array let numbers: Vec<i32> = vec![1, 2, 3]; // Box<T> - heap-allocated value let boxed_data: Box<i32> = Box::new(5); }
Now you understand what the <T> means!
These are all generic types that work with any type T.
When you wrote Option<i32>, you were using a generic enum specialized for i32.
When you wrote Result<f64, String>, you were using a generic enum specialized for returning f64 on success and String on error
Ownership Interlude: Trait Bounds Quiz
Question: Explain this function signature / why it's a "safe" max
#![allow(unused)] fn main() { use std::cmp::PartialOrd; fn safe_max<T: PartialOrd + Clone>(x: &T, y: &T) -> T { if x > y { x.clone() } else { y.clone() } } }
Answer: We take &T parameters to avoid moving the arguments, but need Clone to return an owned T. PartialOrd enables the comparison operation!
Generic vs. Type-Specific Implementations (TC 12:50)
Even though we have generic methods defined, we can still specify methods for specific types!
#[derive(Debug)] struct Point<T> { x: T, y: T, } // Generic implementation - works for any type T impl<T> Point<T> { fn new(x: T, y: T) -> Point<T> { Point { x, y } } } // Specialized implementation - ONLY for Point<i32> impl Point<i32> { fn distance_from_origin(&self) -> f64 { ((self.x.pow(2) + self.y.pow(2)) as f64).sqrt() } } // Specialized implementation - ONLY for Point<f64> impl Point<f64> { fn distance_from_origin(&self) -> f64 { (self.x.powi(2) + self.y.powi(2)).sqrt() } } fn main(){ let int_point = Point::new(3, 4); println!("Distance: {}", int_point.distance_from_origin()); // 5.0 let float_point = Point::new(3.0, 4.0); println!("Distance: {}", float_point.distance_from_origin()); // 5.0 // let char_point = Point::new('a', 'b'); // char_point.distance_from_origin(); // Error! No such method for Point<char> }
Why Use Specialized Implementations?
- Different algorithms work better for different types (ints, floats)
- Some methods only make sense for certain types
- Sometimes you want drastically different behavior (eg
are_you_a_float)
Readable bounds using where
#![allow(unused)] fn main() { use std::cmp::PartialOrd; use std::fmt::Debug; fn analyze_data<T>(values: &[T]) -> Option<T> where T: PartialOrd + Clone + Debug { values.iter().max().cloned() } }
This is the same as:
#![allow(unused)] fn main() { fn analyze_data<T: PartialOrd + Clone + Debug>(values: &[T]) -> Option<T> { values.iter().max().cloned() } }
Use where when you have multiple bounds - it's more readable!
"Polymorphism" and "Monomorphization"
We say max
GENERIC SOURCE COMPILER OUTPUT (roughly)
┌─────────────────┐ ┌─────────────────┐
│ fn max<T>(x, y) │ ────────► │ fn max_i32(...) │
│ where T: Ord │ │ fn max_f64(...) │
│ { ... } │ │ fn max_char(...)│
└─────────────────┘ └─────────────────┘
One source Multiple functions
What we mean by "zero cost polymorphism"
The compiler generates specialized functions for each type you use.
#![allow(unused)] fn main() { max(5, 10); // Compiles to direct i32 comparison (as fast as hand-written max_i32) max(3.14, 2.7); // Compiles to direct f64 comparison (as fast as hand-written max_f64) }
"Zero cost" means:
- No runtime type checking ("is this an i32 or f64?")
- No performance penalty compared to writing separate functions by hand
This is different from languages like Java (type erasure adds overhead) or Python (dynamic dispatch at runtime).
Activity time
See Gradescope and our B1 website (linked on Piazza) for Activity 22 instructions
Lecture 23 - Traits
Logistics
- HW5-7 opt in emails due tonight if you're interested
- I moved a couple topics around for next week (you probably won't notice unless you're reading far ahead)
Learning Objectives
By the end of today, you should be able to:
- Define and implement traits for custom types
- Understand what
#[derive(...)]really does - More on trait bounds for writing flexible functions
- Recognize more traits you've been using all along (Debug, Clone, PartialEq)
The Problem: Code Duplication Across Types
Let's say we want to print information about different types:
#![allow(unused)] fn main() { struct SoccerPlayer { name: String, age: u32, team: String, } struct Dataset { name: String, rows: usize, columns: usize, } }
#![allow(unused)] fn main() { // Without traits, we need separate functions: fn describe_player(p: &SoccerPlayer) { println!("{}, age {}, plays for {}", p.name, p.age, p.team); } fn describe_dataset(d: &Dataset) { println!("{}: {} rows × {} columns", d.name, d.rows, d.columns); } }
Problem: We're duplicating the pattern of "describe this thing" for each type!
Solution: Traits let us define shared behavior across different types.
What Are Traits?
A trait defines shared behavior - a set of methods that types can implement. Let's define a custom trait for the behavior we want:
#![allow(unused)] fn main() { trait Describable { fn describe(&self) -> String; } }
This says: "Any type that implements Describable must provide a describe method that takes an immutable self reference and returns a String."
Now we can implement this trait for our types:
#![allow(unused)] fn main() { impl Describable for SoccerPlayer { fn describe(&self) -> String { format!("{}, age {}, plays for {}", self.name, self.age, self.team) } } impl Describable for Dataset { fn describe(&self) -> String { format!("{}: {} rows × {} columns", self.name, self.rows, self.columns) } } }
From other languages: Similar to interfaces in Java or protocols in Swift
Using traits in function parameters
Now we can write one function that works with any type that implements Describable:
#![allow(unused)] fn main() { fn print_description(item: &impl Describable) { println!("{}", item.describe()); } // Works with both types! let player = SoccerPlayer { name: "Messi".to_string(), age: 36, team: "Inter Miami".to_string() }; let data = Dataset { name: "iris".to_string(), rows: 150, columns: 4 }; print_description(&player); // Messi, age 36, plays for Inter Miami print_description(&data); // iris: 150 rows × 4 columns }
Key insight: The function doesn't care about the specific type, only that it can be described!
Didn't we do this last time kinda?
The &impl Describable syntax is shorthand for what you saw last lecture. Here's the equivalent using generics:
#![allow(unused)] fn main() { // Short form (what we just saw) fn print_description(item: &impl Describable) { println!("{}", item.describe()); } // Long form (using generic type parameter) fn print_description<T: Describable>(item: &T) { println!("{}", item.describe()); } }
Both do exactly the same thing! They both say: "accepts a reference to any type T that implements Describable"
When to use which?
&impl Trait- simpler, good for single parameters<T: Trait>- better when you need multiple parameters of the same type or have complex, multi-trait criteria
#![allow(unused)] fn main() { // This ensures both parameters are the SAME type fn compare<T: Describable>(item1: &T, item2: &T) { println!("{}", item1.describe()); println!("{}", item2.describe()); } }
A More Complete Example: The Person Trait (TC 12:30)
Let's define a trait with multiple methods:
#![allow(unused)] fn main() { trait Person { // Required methods - must be implemented fn get_name(&self) -> String; fn get_age(&self) -> u32; // Default method - can be overridden fn description(&self) -> String { format!("{} ({})", self.get_name(), self.get_age()) } } }
New feature: Default implementations! Types get this method for free unless they override it.
Implementing Person for SoccerPlayer
#![allow(unused)] fn main() { struct SoccerPlayer { name: String, age: u32, team: String, } impl Person for SoccerPlayer { fn get_name(&self) -> String { self.name.clone() } fn get_age(&self) -> u32 { self.age } // We get description() for free from the default! } }
#![allow(unused)] fn main() { let messi = SoccerPlayer { name: "Lionel Messi".to_string(), age: 36, team: "Inter Miami".to_string(), }; println!("{}", messi.description()); // Lionel Messi (36) }
Implementing Person for Another Type
#![allow(unused)] fn main() { struct Student { first_name: String, last_name: String, year_born: u32, } impl Person for Student { fn get_name(&self) -> String { format!("{} {}", self.first_name, self.last_name) } fn get_age(&self) -> u32 { 2024 - self.year_born } // Again, description() comes for free! } let student = Student { first_name: "Alice".to_string(), last_name: "Chen".to_string(), year_born: 2003, }; println!("{}", student.description()); // Alice Chen (21) }
Using Traits in Functions
#![allow(unused)] fn main() { fn greet(person: &impl Person) { println!("Hello, {}! I see you're {} years old.", person.get_name(), person.get_age()); } greet(&messi); // Hello, Lionel Messi! I see you're 36 years old. greet(&student); // Hello, Alice Chen! I see you're 21 years old. }
Alternative syntax (same meaning):
#![allow(unused)] fn main() { fn greet<T: Person>(person: &T) { println!("Hello, {}!", person.get_name()); } }
Both mean: "This function works with any type T that implements Person"
Trait Extension: Building on Other Traits
Sometimes you want one trait to require another trait. This is called trait extension or supertraits.
#![allow(unused)] fn main() { // Employee extends Person - any Employee must also be a Person! trait Employee: Person { fn employee_id(&self) -> u32; fn department(&self) -> String; // Can use Person methods in default implementations fn badge_name(&self) -> String { format!("{} - #{}", self.get_name(), self.employee_id()) } } }
Syntax: Employee: Person means "to implement Employee, you must also implement Person"
Implementing Extended Traits
#![allow(unused)] fn main() { struct Engineer { first_name: String, last_name: String, age: u32, emp_id: u32, } // First, implement the base trait (Person) impl Person for Engineer { fn get_name(&self) -> String { format!("{} {}", self.first_name, self.last_name) } fn get_age(&self) -> u32 { self.age } } // Then, implement the extended trait (Employee) impl Employee for Engineer { fn employee_id(&self) -> u32 { self.emp_id } fn department(&self) -> String { "Engineering".to_string() } // badge_name() uses the default implementation } }
The Debug Trait
Debug is a trait that enables printing with {:?}:
#![allow(unused)] fn main() { trait Debug { fn fmt(&self, f: &mut Formatter) -> Result; } }
When you write #[derive(Debug)], Rust automatically implements this trait for you!
Manually implementing Debug (you usually don't need to):
#![allow(unused)] fn main() { use std::fmt; enum Direction { North, South, East, West, } impl fmt::Debug for Direction { fn fmt(&self, f: &mut fmt::Formatter) -> fmt::Result { match self { Direction::North => write!(f, "North"), Direction::South => write!(f, "South"), Direction::East => write!(f, "East"), Direction::West => write!(f, "West"), } } } let dir = Direction::North; println!("{:?}", dir); // North }
Takeaway: #[derive(Debug)] automatically generates this code for you!
The Display Trait
Display is like Debug, but for user-friendly output with {}:
#![allow(unused)] fn main() { use std::fmt; impl fmt::Display for Direction { fn fmt(&self, f: &mut fmt::Formatter) -> fmt::Result { match self { Direction::North => write!(f, "→ Going North"), Direction::South => write!(f, "↓ Going South"), Direction::East => write!(f, "→ Going East"), Direction::West => write!(f, "← Going West"), } } } let dir = Direction::North; println!("{}", dir); // Going North println!("{:?}", dir); // North }
Debug vs Display:
Debug({:?}): For developers/debugging - can be derivedDisplay({}): For end users - must be manually implemented
The Clone and PartialEq Traits
Clone: Enables explicit duplication with .clone()
#![allow(unused)] fn main() { trait Clone { fn clone(&self) -> Self; } }
When you derive it: let copy = original.clone(); works!
PartialEq: Enables comparison with == and !=
#![allow(unused)] fn main() { trait PartialEq { fn eq(&self, other: &Self) -> bool; } }
When you derive it: if point1 == point2 { ... } works!
#![allow(unused)] fn main() { #[derive(Clone, PartialEq)] enum Status { Active, Inactive, } let s1 = Status::Active; let s2 = s1.clone(); // Clone trait if s1 == s2 { // PartialEq trait println!("Same status!"); } }
So what Does #[derive(...)] Actually Do?
#[derive(...)] is a macro that auto-generates trait implementations.
#![allow(unused)] fn main() { // What you write: #[derive(Debug, Clone, PartialEq)] struct Point { x: i32, y: i32, } // What Rust generates (conceptually): impl Debug for Point { /* ... */ } impl Clone for Point { /* ... */ } impl PartialEq for Point { /* ... */ } }
Our common derivable traits:
Debug- debug printing with{:?}Clone- explicit copying with.clone()Copy- implicit copying (for simple types)PartialEq- equality comparison with==Eq- full equality (rare, requires PartialEq)PartialOrd- ordering with<,>, etc.Ord- total ordering (rare, requires PartialOrd)
When to derive vs. implement manually?
- Derive: When the default behavior is what you want (most cases!)
- Manual: When you need custom behavior (like hiding sensitive data in Debug)
Multiple trait bounds - three ways
Sometimes you need a type to implement multiple traits:
#![allow(unused)] fn main() { use std::fmt::Debug; // Option 1: Using + with impl fn analyze_1(item: &(impl Debug + Clone)) { println!("Debug: {:?}", item); let copy = item.clone(); } // Option 2: Using + with generics fn analyze_2<T: Debug + Clone>(item: &T) { println!("Debug: {:?}", item); let copy = item.clone(); } }
#![allow(unused)] fn main() { // Option 3: Using where clause (more readable for many bounds) fn analyze_3<T>(item: &T) where T: Debug + Clone + PartialEq { println!("Debug: {:?}", item); let copy = item.clone(); if item == © { println!("Clone worked correctly!"); } } }
Bringing it together - implementing traits on generics
#![allow(unused)] fn main() { #[derive(Debug)] struct Point<T> { x: T, y: T, } // Implement Clone for Point<T>, but only if T is Clone impl<T: Clone> Clone for Point<T> { fn clone(&self) -> Self { Point { x: self.x.clone(), y: self.y.clone(), } } } let p1 = Point { x: 1, y: 2 }; let p2 = p1.clone(); // Works because i32 implements Clone }
impl<T: Clone> Clone for Point<T> means "Point
Circling back on a question from Friday
Some traits are in the prelude (automatically available):
Clone,Copy,PartialEq,Drop,Iterator
Others we need to import:
#![allow(unused)] fn main() { use std::cmp::{PartialOrd, Ord, PartialEq, Eq}; use std::fmt::{Debug, Display}; use std::ops::{Add, Sub, Mul, Div}; }
No there's no easy way to include all of these at once out of the box. If you need them all you'd have to say
#![allow(unused)] fn main() { use std::ops::{Add, Sub, Mul, Div}; fn calculate<T>(a: T, b: T) -> T where T: Add<Output = T> + Sub<Output = T> + Mul<Output = T> + Div<Output = T> { // ... can use +, -, *, / on T } }
but there's an external library you can add that can do this:
#![allow(unused)] fn main() { use num_traits::Num; fn calculate<T: Num>(a: T, b: T, c: T, d: T) -> T { (a + b) * (c - d) // Can use +, -, *, / and more } // Works with any numeric type let result_int = calculate(1, 2, 3, 4); // i32 let result_float = calculate(1.5, 2.5, 3.0, 1.0); // f64 }
For your awareness: dynamic dispatch in Rust (TC 12:55)
Sometimes you need to store different types together. Rust supports this with trait objects:
#![allow(unused)] fn main() { let items: Vec<Box<dyn Person>> = vec![ Box::new(messi), Box::new(student), ]; for item in &items { println!("{}", item.description()); } }
How it works (simplified):
┌─ Box<dyn Person> pointing to a SoccerPlayer ─┐
│ │
│ Stack: Box contains two pointers │
│ ├─ data_ptr ──────────────┐ │
│ └─ vtable_ptr ────┐ │ │
└──────────────────────┼───────┼───────────────┘ (Heap)
│ │ ┌──────────────────────────┐
│ └──→│ SoccerPlayer { │
│ │ name: "Messi", │
│ │ age: 36, │
│ │ team: "Inter Miami" │
│ │ } │
│ └──────────────────────────┘
└─→ vtable for Person on SoccerPlayer (compiled binary):
┌────────────────────────────────┐
│ get_name: 0x1234 │
│ get_age: 0x5678 │
│ description: 0xABCD │
│ drop: 0xDEF0 │
└────────────────────────────────┘
When you call item.get_name():
- Follow the vtable pointer
- Look up the
get_nameentry - Call that function pointer with the data
That's why it's called dynamic dispatch - the decision of which method to call happens at runtime, not compile time. (And that's why it's slower than static dispatch / what we covered before!)
Trade-off:
- Static dispatch (generics): Fast, but all items must be the same type
- Dynamic dispatch (trait objects): Slightly slower, but can mix types
For this course: You'll mostly use static dispatch with generics. Just know dynamic dispatch exists.
Activity 23
We'll start by live-coding together and then you'll continue on gradescope / rust playground.
Lecture 24 - Lifetimes
Logistics
- This is the last lecture of new Rust material (systems talk on Friday)
- Midterm 2 review in lecture on Monday
- Joey's review in discussion on Tuesday (review topic survey)
- Midterm 2 on Wednesday (Nov 5)
Learning Objectives
By the end of today, you should be able to:
- Understand the problem lifetimes solve (dangling references)
- Read and interpret lifetime annotations in function signatures
- Know when lifetimes are automatic vs. when you need to write them
- Recognize lifetime elision rules in action
The Problem: Dangling References
In many languages, this compiles but causes bugs:
// C code - compiles but DANGEROUS!
char* get_name() {
char name[] = "Alice";
return name; // Returning pointer to local data!
} // name is freed when function returns!
int main() {
char* ptr = get_name();
printf("%s", ptr); // Reading freed memory - undefined behavior!
}
What happens: The string name is stored on the stack and freed when get_name() returns. The pointer now points to freed memory!
This is called a dangling reference - one of the most common bugs in C/C++
(As you know!) Rust prevents this at compile time
#![allow(unused)] fn main() { fn get_name() -> &str { let name = String::from("Alice"); &name[..] // Compiler error: cannot return reference to local data } }
(Try to run it)
Rust's solution: The compiler tracks how long data lives (its lifetime) and prevents references from outliving their data!
What are lifetimes?
Lifetime: How long a piece of data is valid in your program
#![allow(unused)] fn main() { { let x = 5; // ────┐ x's lifetime starts let r = &x; // │ println!("{}", r); // │ } // ────┘ x's lifetime ends, r becomes invalid }
Remember the borrow-checker rule: References can't live longer than the data they point to!
Most of the time, Rust figures this out automatically. But sometimes you need to help the compiler understand.
The Challenge: References crossing function boundaries
When references stay in one scope, lifetimes are obvious:
#![allow(unused)] fn main() { { let data = String::from("hello"); let reference = &data; println!("{}", reference); } // Both data and reference end here - clear! }
But what about functions that take and return references?
#![allow(unused)] fn main() { fn process(input: &str) -> &str { // Does the output reference come from input? // Or from something else? // How long will the returned reference be valid? input } }
The problem: The function signature doesn't tell us how the output lifetime relates to the input lifetime!
A key example
#![allow(unused)] fn main() { fn longest(x: &str, y: &str) -> &str { if x.len() > y.len() { x } else { y } } }
Questions the compiler can't answer without help:
- Does the returned reference come from
xory? - How long is the returned reference valid?
- What if
xandyhave different lifetimes?
This is why we need lifetime annotations - to tell the compiler how references relate to each other across function boundaries!
When lifetimes are automatic
Rust infers lifetimes in simple cases:
#![allow(unused)] fn main() { fn first_word(text: &str) -> &str { text.split_whitespace().next().unwrap_or("") } }
Why this works: There's only one input reference, so the output must come from that input. Rust assumes the returned reference has the same lifetime as text.
#![allow(unused)] fn main() { let sentence = String::from("Hello world"); let word = first_word(&sentence); println!("{}", word); // Works! }
Rust automatically knows: "word's lifetime is at most sentence's lifetime"
When you need to write lifetimes
The compiler needs help when there are multiple possible sources for a returned reference:
#![allow(unused)] fn main() { fn longest(x: &str, y: &str) -> &str { if x.len() > y.len() { x } else { y } } }
Compiler error
The problem: Rust doesn't know if the returned reference comes from x or y, so it can't check if the reference will be valid!
Lifetime annotation syntax
Lifetime annotations use a single quote followed by a lowercase name:
#![allow(unused)] fn main() { &i32 // a reference (lifetime inferred) &'a i32 // a reference with explicit lifetime 'a &'a mut i32 // a mutable reference with explicit lifetime 'a }
Common convention: Use 'a for the first lifetime, 'b for the second, etc.
The name 'a is pronounced "tick a" or "lifetime a"
Fixing our longest function
#![allow(unused)] fn main() { fn longest<'a>(x: &'a str, y: &'a str) -> &'a str { if x.len() > y.len() { x } else { y } } }
What this means:
<'a>declares a lifetime parameter named'ax: &'a strmeans "x is a reference that lives for lifetime 'a"y: &'a strmeans "y is a reference that lives for lifetime 'a"-> &'a strmeans "the return value lives for lifetime 'a"
In English: "For some lifetime 'a, both inputs live at least that long, and the output lives no longer than that."
Understanding the constraint
#![allow(unused)] fn main() { fn longest<'a>(x: &'a str, y: &'a str) -> &'a str { if x.len() > y.len() { x } else { y } } }
Think of 'a as the overlap of the two input lifetimes:
x's lifetime: |──────────────|
y's lifetime: |────────────|
'a (overlap): |─────────|
The returned reference can't live longer than the shorter of the two inputs!
Using longest: Case 1 (Works!)
fn longest<'a>(x: &'a str, y: &'a str) -> &'a str { if x.len() > y.len() { x } else { y } } fn main() { let string1 = String::from("long string"); let string2 = String::from("short"); let result = longest(&string1, &string2); println!("Longest: {}", result); // Works! }
Why it works: Both string1 and string2 live for the entire main function, so result is always valid.
Using longest: Case 2 (Fails!)
fn longest<'a>(x: &'a str, y: &'a str) -> &'a str { if x.len() > y.len() { x } else { y } } fn main() { let string1 = String::from("long string"); let result; { let string2 = String::from("short"); result = longest(&string1, &string2); // Compiler error! } // string2 is dropped here println!("{}", result); // Would use freed memory! }
Error: string2 doesn't live long enough. The compiler prevents the dangling reference!
Lifetime Rules Don't Change Behavior
Important: Lifetime annotations don't change how long data lives. They just help the compiler verify safety.
#![allow(unused)] fn main() { fn longest<'a>(x: &'a str, y: &'a str) -> &'a str { if x.len() > y.len() { x } else { y } } }
This doesn't make x or y live longer. It just tells the compiler: "I promise the return value won't outlive either input."
The compiler then checks: "Is that promise kept?"
Lifetimes in Structs
If a struct holds references, it needs lifetime annotations:
struct Excerpt<'a> { text: &'a str, } fn main() { let novel = String::from("Call me Ishmael. Some years ago..."); let first_sentence = novel.split('.').next().unwrap(); let excerpt = Excerpt { text: first_sentence, }; println!("{}", excerpt.text); // Works! } // novel dropped last, so excerpt is always valid
The 'a ensures: An Excerpt instance can't outlive the data it references.
Exactly when you need and don't need annotations
Simple rule: If there are multiple input references and you return a reference, you need annotations.
Automatic (No Annotations Needed):
1a. Function with input reference, returning a reference
#![allow(unused)] fn main() { fn first_word(s: &str) -> &str { // Compiler knows output comes from s s.split_whitespace().next().unwrap_or("") } }
1b. Method returning a reference
#![allow(unused)] fn main() { impl Excerpt { fn get_text(&self) -> &str { // Compiler knows output comes from self self.text } } }
For 1a and 1b, the output takes the input's lifetime
2. Multiple inputs but no output reference
#![allow(unused)] fn main() { fn print_both(x: &str, y: &str) -> String { // No reference returned, no problem! format!("{} {}", x, y) } }
Function returns nothing or owned values so there's no mystery
Need Annotations:
Multiple input references with reference output
#![allow(unused)] fn main() { fn longest(x: &str, y: &str) -> &str { // ✗ Error! // Compiler doesn't know if output is from x or y if x.len() > y.len() { x } else { y } } // Fix: Add lifetime annotations fn longest<'a>(x: &'a str, y: &'a str) -> &'a str { // ✓ Works! if x.len() > y.len() { x } else { y } } }
Methods and lifetimes (FYI)
#![allow(unused)] fn main() { struct Excerpt<'a> { text: &'a str, } impl<'a> Excerpt<'a> { fn get_text(&self) -> &str { self.text } } }
Note the syntax:
impl<'a>declares the lifetime parameterExcerpt<'a>uses itget_textdoesn't need annotations (it uses the lifetime from&self)
But honestly, just avoid references inside structs when you can
The 'static lifetime
One special lifetime you'll see occasionally:
#![allow(unused)] fn main() { let s: &'static str = "Hello world"; }
'static means the data lives for the entire program
Common sources of 'static data:
1. String literals
#![allow(unused)] fn main() { let s: &'static str = "Hello world"; // Stored in binary fn get_greeting() -> &'static str { "Hello!" // String literals are always 'static } }
2. Static constants
#![allow(unused)] fn main() { static MAX_SCORE: i32 = 100; // Lives for entire program static APP_NAME: &str = "DataAnalyzer"; // 'static reference fn get_max() -> &'static i32 { &MAX_SCORE // Can return reference to static } }
3. Leaked allocations (rare, but useful sometimes)
We won't cover it, but felt like I had to mention it for correctness
In practice...
... you'll rarely write lifetime annotations
The good news: The compiler tells you exactly when you need them, and how to write them when you do!
The only thing you're responsible for remembering is: you need explicit lifetime annotations when there is more than one reference input parameter and a reference output parameter because the compiler can't determine the output's lifetime on its own.
When you see a lifetime error:
- Read the error message carefully
- Add the annotations it suggests
- Let it check if you got it right
Activity - Stack-Heap practice
- Review HW4 stack-heap answers
- I'll do one on the board
- More practice problems on paper
- I'll review those on the board
Lecture 25 - Systems and Rust
Logistics
- Midterm 2 next Wednesday
- Review sessions in lecture Monday and discussion Tuesday
- HW5 due next Friday (if you signed up)
Learning objectives
Today we'll explicitly name some of the theoretical motivations underlying this past third of the course. You'll be able to:
- Explain what systems programming is and why it's different from application programming
- Identify common memory safety bugs (use-after-free, double-free, data races)
- Appreciate why Rust makes the design choices it does
What is systems programming? (TC 12:25)
Systems programming: Writing software that controls the machine directly
Examples of systems software:
- Operating systems
- Databases
- Game engines
- Web browsers
- Compilers and interpreters
- Embedded systems (IoT devices, cars)
- Network infrastructure (routers, load balancers)
Key characteristics:
- Direct control over memory
- Performance critical
- Runs for long periods (can't crash!)
- Often concurrent/parallel
- Small memory footprint matters
Contrast: Application programming (Python scripts, web apps) runs on top of systems software
The memory management spectrum
Different languages make different trade-offs:
Control/Performance <----------------------------> Safety/Ease
C/C++ Rust Java/Go Python/JS
│ │ │ │
Manual Ownership Garbage Garbage
Memory System Collection Collection
(predictable) (unpredictable)
│ │ │ │
Fast, Unsafe Fast, Safe Slower, Safe Slowest, Safe
Memory safety bugs: the problem Rust solves (TC 12:30)
The billion-dollar mistake
"I call it my billion-dollar mistake...the invention of the null reference." — Tony Hoare (invented null in 1965)
In C/C++: ~70% of security vulnerabilities are memory safety bugs (Microsoft/Google data)
We'll see five bugs that are common in languages like C/C++ but that Rust prevents:
- Use-after-free
- Double-free
- Dangling pointers
- Buffer overflow
- Data races
Bug #1: Use-after-free
What happens: You free memory, then try to use it
// C code - compiles but UNSAFE!
char* data = malloc(100);
strcpy(data, "hello");
free(data); // Memory returned to OS
// Later...
printf("%s", data); // Reading freed memory!
// Might work, might crash, might read garbage
Why it's dangerous:
- Memory might be reused by something else
- Could read sensitive data (passwords, credit cards)
- Could crash your program
- Unpredictable - might work in testing, fail in production
How Rust prevents this:
The compiler tracks ownership and won't let you use freed memory!
Bug #2: Double-free
What happens: You free the same memory twice
// C code - compiles but CRASHES!
char* ptr1 = malloc(100);
char* ptr2 = ptr1; // Two pointers to same memory
free(ptr1); // Free once
free(ptr2); // Free again! CRASH or worse
Why it's dangerous:
- Corrupts memory allocator's internal state
- Can lead to security exploits
- Unpredictable behavior
How Rust prevents this:
Since each value has exactly ONE owner, it can only be freed once
Bug #3: Dangling pointers
What happens: A reference outlives the data it points to
// C code - compiles but UNSAFE!
int* get_number() {
int x = 42;
return &x; // Returning pointer to local variable!
} // x is freed when function returns
int main() {
int* ptr = get_number();
printf("%d", *ptr); // Reading freed memory!
}
How Rust prevents this:
Lifetimes ensure references can't outlive the data they point to!
Bug #4: Buffer overflow
What happens: Writing past the end of an array
// C code - compiles but CRASHES!
int arr[5];
for (int i = 0; i <= 10; i++) { // Off by one!
arr[i] = i; // Writes past end of array
}
Why it's dangerous:
- Overwrites other variables
- Can overwrite return addresses (security exploits!)
- Famous vulnerabilities: Heartbleed, etc.
How Rust prevents this:
Rust checks array bounds at runtime if necessary (and crashes), and checks at compile time when possible!
Bug #5: Data races (TC 12:40)
What happens: Two threads access the same memory, at least one writes, no synchronization
// C code with threads - compiles but RACE CONDITION!
int counter = 0;
void* increment(void* arg) {
for (int i = 0; i < 1000000; i++) {
counter++; // Not thread-safe!
}
}
// Run two threads...
// Expected: counter = 2,000,000
// Actual: counter = ??? (unpredictable!)
Why it's dangerous:
- Unpredictable results
- Hard to reproduce bugs
- Can corrupt data structures
How Rust prevents this:
We'll see more about this later, but Rust prevents data races at compile time!
Memory safety: summary
| Bug Type | What It Is | How Rust Prevents |
|---|---|---|
| Use-after-free | Using freed memory | Borrow checker |
| Double-free | Freeing twice | Borrow checker |
| Dangling pointer | Reference outlives data | Lifetimes |
| Buffer overflow | Array out of bounds | Bounds checking |
| Data race | Concurrent unsynchronized access | (We'll see!) |
Key insight: All caught at compile time (except bounds, which panic safely)!
Feature, not a bug - "Zero-Cost Abstractions"
"What you don't use, you don't pay for. What you do use, you couldn't hand code any better." — Bjarne Stroustrup (C++ creator, but applies to Rust!)
Examples we've seen:
Vec<T>: As fast as manual array + size tracking- Iterators: Compile to same code as hand-written loops
- Option/Result: Zero runtime cost vs. manual null checks
- Traits: Static dispatch = direct function calls
The cost of memory bugs
Heartbleed (2014)
- Buffer over-read bug (C) in security software
- Leaked passwords, private keys, personal data
- Affected ~17% of all web servers
- Would not compile in Rust
Dropbox (2016) (not a bug but...)
- Dropbox's file-sync engine was written in Python
- Performance bottlenecks, high memory usage, concurrency bugs
- Dropbox rewrite the whole sync engine in Rust, leading to 10x reduction in memory usage, eliminated race condition bugs, improved performance, sped up development
WannaCry Ransomware (2017)
- Used Windows SMB (communications protocol) buffer overflow
- Infected 200,000+ computers
- $4 billion in damages
- Would not compile in Rust
Firefox 2019 (2019)
- Double-free vulnerability (C++)
- Could allow attackers to execute arbitrary code by exploiting the corrupted heap
- Bounty of $270,000 awarded to white hat hackers
- Would not compile in Rust
- Firefox has been gradually moving to Rust
Zoom Vulnerabilities (2020)
- Use-after-free bugs in video processing allowed for remote code execution
- Fortunately found by researchers / patched quickly
- Would not compile in Rust
- Zoom paid over $7 million in bug bounties from 2019-2023
If you get really into this stuff... https://www.hackerone.com/bug-bounty-programs
Legendary gaming bugs
The corrupted blood incident (World of Warcraft, 2005)
- Bug in debuff handling (use-after-free-like behavior)
- Disease spread uncontrollably, "killed" thousands of players
- CDC studied it as an epidemiology model!
- Rust's borrow checker would have caught the improper state handling
The nuclear Gandhi (Civilization, 1991)
- This example was removed because I apparently fell for a rumor and it never happened!
Pokémon item duplication glitch
- Buffer overflow in inventory management
- Players could duplicate rare items by exploiting memory corruption
- Rust's bounds checking would panic instead of corrupting memory
- (But this one is so much fun!)
Lecture 26 - Midterm 2 Review
Logistics
- Final review session in discussion with Joey tomorrow
- Exam on Wednesday
- No pre-work for Wednesday OR Friday
- HW5 due Friday
Quick reference: what you need to know for the exam
This midterm covers Lectures 14-25 (cumulative, but focus on later material):
- Stack/Heap (L14): Know rough characteristics of both (fast vs slow, small vs large, ordered vs unordered) Draw memory diagrams showing where String/Vec/Box data lives.
- Ownership (L15): Know when data moves vs. copies (simple types on the stack copy, complex types on the heap move, nothing tricky), apply the three ownership rules (don't need to list them)
- Borrowing (L16-17): Fill in
&or&mutcorrectly, identify borrow checker compiler errors in simple short programs - Strings and slices (L18): Explain why
text[0]fails, what is a slice / fat pointer, difference between &String and &str, what.collect()does - HashMap/HashSet (L19): Explain what is a hash function, advantage of HashSet over Vec, be able to read HashMap methods including
.entry().or_insert() - Structs (L20-21): Choose correct
selftype (&self, &mut self, or self) for methods, destructure structs/enums in match and let bindings, when you should use a struct vs an enum, why you would use a tuple struct - Generics and traits (L22-23): Write generic functions with trait bounds (T: Clone, T: PartialOrd), define traits (distinguish required methods from default implementations), know how to implement them, understand common traits (Debug, Clone, Copy, PartialOrd, PartialEq), know
#[derive(--)]is a macro that generates trait implementations - Lifetimes (L24): Know when annotations are needed (multiple reference inputs and reference output), read
'asyntax, know what'staticmeans - Systems Theory (L25): Give an example of a memory error that is prevented by Rust's ownership rules, know why generics are zero-cost, know string literals live in the binary,
- Hand-coding: Implement short functions combining multiple concepts
Problem types:
Similar to last time, but with stack-heap instead of git/shell:
- Short-answer (12 pts)
- Fill-ins (9 pts)
- What does this print (9 pts)
- Bug-fixing (8 pts)
- Two stack-heap diagrams (20 pts)
- Two hand-coding problems (22 pts) = 80 points total
Please look through the exam before you start and make a plan so you don't run out of time!
Let's summarize again
These slides list covers the types of questions and topics that are fair game for Midterm 2.
The exam will focus on material from Lectures 14-25, though it is cumulative so earlier material may also appear.
1. Stack and heap memory (Lecture 14)
You should be able to:
- Draw stack and heap diagrams showing where data lives
- Show how
String,Vec, andBoxstore data (pointer + metadata on stack, actual data on heap) - Draw multiple stack frames for function calls
- Indicate what happens when functions return (stack frames disappear)
You DON'T need to: Work with memory addresses, know precise heap allocation algorithms (eg Vec resizing)
Sample Problem: Draw the stack and heap when execution is inside the process function.
fn main() { let x = 42; let name = String::from("Alice"); let data = vec![1, 2, 3]; process(&name); } fn process(text: &str) { println!("{}", text); }
2. Ownership rules (Lecture 15)
You should be able to:
- Identify when data moves vs. copies (stack types copy, heap types move)
- Recognize what types implement
Copy(i32, bool, char, tuples of Copy types) - Predict when ownership transfers to a function and when you can't use a value afterward
- Use
.clone()to make explicit copies - Understand (not recite) the three ownership rules
You DON'T need to: List the three ownership rules verbatim
Sample Problem: Will this compile? Why or why not?
#![allow(unused)] fn main() { let s1 = String::from("hello"); let s2 = s1; let s3 = s1.clone(); println!("{}", s1); }
3. Borrowing and references (Lectures 16-17)
You should be able to:
- Fill in
&or&mutcorrectly in function signatures and calls - Apply borrowing rules: many immutable borrows OR one mutable borrow (not both)
- Use
*to dereference when modifying through&mut
You DON'T need to: Know when auto-dereferencing happens or doesn't
Sample Problem: Fill in the blanks to make this code work.
fn update_scores(scores: _____, bonus: i32) { for score in scores.iter_mut() { *score += bonus; } } fn main() { let mut data = vec![85, 90, 78]; update_scores(_____, 5); println!("{:?}", data); }
4. Borrow checker errors (Lecture 17)
You should be able to:
- Identify where borrow checker errors occur in short programs
- Explain why conflicts between
&and&mutcause errors - Fix simple borrow checker errors by reordering code
You DON'T need to: Debug complex multi-function borrow checker issues
Sample Problem: Where does the borrow checker error occur and why?
#![allow(unused)] fn main() { let mut x = vec![1, 2, 3]; let r1 = &x; x.push(4); println!("{:?}", r1); }
5. Strings and slices (Lecture 18)
You should be able to:
- Distinguish between
String(owned),&str(slice), and&String(reference to String) - Explain why
text[0]doesn't work (UTF-8 has variable-length characters) - Understand what a slice is (fat pointer: pointer + length)
- Recognize
.collect()can build strings from iterators
You DON'T need to: Implement complex string parsing, understand UTF-8 byte encoding details
Sample Problem: Explain why this code panics:
#![allow(unused)] fn main() { let text = "🦀Hello"; let slice = &text[0..2]; }
6. HashMap and HashSet (Lecture 19)
You should be able to:
- Explain what a hash function is and its characteristics (deterministic, fast, hard to invert, uniform spread)
- Choose HashMap for key-value pairs, HashSet for unique values only
- Understand
.get()returnsOption<&V>(key might not exist) - Read code using
.entry().or_insert()(insert if key missing) - Recognize that inserting moves values into the collection
You DON'T need to: Implement hash functions, explain how hashmaps use hashes, memorize HashMap/HashSet method syntax
Sample Problem: What does this print and why?
#![allow(unused)] fn main() { let mut scores = HashMap::new(); scores.insert("Alice", 90); scores.insert("Bob", 85); scores.insert("Alice", 95); println!("{:?}", scores.get("Alice")); }
7. Structs and methods (Lecture 20-21)
You should be able to:
- Define structs with named fields
- Implement methods in
implblocks - Choose
&self(read),&mut self(modify), orself(consume) - Destructure structs and enums with
matchandlet - Explain when to use struct vs. enum vs. tuple struct
You DON'T need to: Complex destructuring, .. default syntax
Sample Problem: Complete this implementation by filling in the input parameters appropriately.
#![allow(unused)] fn main() { struct Counter { value: i32, } impl Counter { fn new(___) -> Counter { /* ... */ } fn increment(___) { /* ... */ } fn get_value(___) -> i32 { /* ... */ } } }
8. Generics (Lecture 22)
You should be able to:
- Write generic functions using
<T>syntax - Add trait bounds like
T: PartialOrdorT: Clone - Use multiple bounds with
+(e.g.,T: Clone + PartialOrd) - Understand monomorphization (compiler generates separate code for each type)
You DON'T need to: Complex where clause syntax, lifetime bounds with generics
Sample Problem: Write a generic function that finds the minimum of two values and requires the type to be comparable.
9. Traits (Lecture 23)
You should be able to:
- Define traits with method signatures
- Implement traits for your own types
- Use traits as bounds (
T: Debug,a: &impl Display) - Recognize common traits:
Debug,Clone,Copy,PartialEq,PartialOrd - Use
#[derive(Debug, Clone)]to auto-generate implementations - Distinguish required methods from default implementations
You DON'T need to: Trait objects (dyn Trait), advanced trait features like associated types
Sample Problem: Define a trait Summarizable with a method summary(&self) -> String and implement it for a Book struct.
10. Lifetimes (Lecture 24)
You should be able to:
- Explain why lifetimes exist (prevent dangling references)
- Read lifetime syntax like
'ain function signatures - Identify when lifetime annotations are needed (multiple reference inputs, reference output)
- Use
&'static strfor returning string literals, and know'staticmeans "lives for entire program" and applies to string literals and constants
You DON'T need to: Write complex lifetime annotations, deal with lifetimes in traits or structs
Sample Problem: Which function needs explicit lifetime annotations and why?
#![allow(unused)] fn main() { fn first_word(text: &str) -> &str { /* ... */ } fn longest(x: &str, y: &str) -> &str { /* ... */ } }
11. Systems and theory (Lecture 25 + concepts throughout)
You should be able to:
- Name memory safety bugs Rust prevents (use-after-free, double-free, dangling pointers, data races)
- Give an example of how Rust prevents a specific memory bug (ownership prevents use-after-free, lifetimes prevent dangling references, etc.)
- Explain "zero-cost abstraction" (high-level features compile to fast low-level code)
You DON'T need to: Interpret C code, analyze glitch videos
Sample Problem: Explain how Rust's ownership system prevents use-after-free bugs.
Activity - Ask and Answer
Phase 1: Question Writing
- Tear off the last page of your notes from today
- Pick a codename (favorite Pokémon, secret agent name, whatever) - remember it!
Write one or two of of:
- A concept you don't fully understand ("I'm confused about...")
- A study strategy question ("What's the best way to review...")
- A practice test question (your own or one from these slides)
- Anything else you'd like to ask your peers ahead of the midterm
Phase 2: Round Robin Answering
- Pass papers around a few times
- Read the question, write a helpful response (2-3 min)
- Repeat 4-5 times (I'll let you know when)
You can answer questions, explain concepts, give tips / encouragement, draw diagrams, wish each other luck
Phase 3: Return & Review
- Submit on gradescope what codename you chose for yourself
- Return the papers at the end of class
- I'll scan and post all papers - you can see the responses you got and also all others
Lecture 27 - Packages, Crates, and Modules
Logistics - midterm recap
- Discussing distributions / Q&A
- Stack/Heap and Hand-coding redo opportunity in class on 11/14
- Corrections - proctored in discussion on 11/18
- If you would like to pursue either but have an immovable conflict please let me know ASAP
A note on code commenting
- Something the TAs have noticed:
Moving forward
- We're starting the final section of Rust: practical tools for real-world projects
- Next few lectures are lighter - focused on "how to actually use Rust"
- Very little new syntax for exams (mostly concepts)
- Examples can be a reference for future projects
Learning Objectives
By the end of today, you should be able to:
- Understand what packages, crates, and modules are and how they relate
- Organize code into modules using
modand control visibility withpub - Use external crates by adding them to
Cargo.toml - Navigate code using paths (
crate::,super::,use) - Know where to find crates and how to evaluate them for your projects
The big picture: why organization matters
At first, we created Rust programs in just one file (main.rs).
The homeworks added a few more but it's stayed simple and we haven't explained how all the files relate.
Without organization:
- Name conflicts
- Hard to find things or see the big picture
- Impossible to collaborate
Rust's solution: A three-level hierarchy
Rust's organization hierarchy
- Package (your project, ~ "your repo")
- Crate (compilation unit - binary or library, ~ "your program")
- Module (namespace inside a crate, ~ "a file")
Modules: organizing code within a file
Problem: Everything in one namespace gets messy
#![allow(unused)] fn main() { fn process_data() { /* ... */ } fn process_image() { /* ... */ } fn process_text() { /* ... */ } // Too many "process" things! }
Modules as Namespaces
Solution: Use mod to create "namespaces"
mod data { pub fn process() { println!("Processing data"); } } mod images { pub fn process() { println!("Processing images"); } } fn main() { data::process(); // Clear which one! images::process(); // No confusion! }
Modules are like folders for your code
Importantly, they're not scopes - just a tool for naming and organzing
The pub Keyword: Public vs. Private
By default, everything in a module is private - it can't be used outside the module
mod math { fn helper() { // Private! println!("Internal helper"); } pub fn add(a: i32, b: i32) -> i32 { // Public! helper(); // Can use private from inside a + b } } fn main() { math::add(2, 3); // Works! // math::helper(); // Error: private! }
Why is this useful?
- Hide implementation details for helper functions
- Change internal code without affecting users
pub works for everything you've seen
You can control visibility for all the types you've learned:
mod data_structures { // Public struct with private fields pub struct Person { pub name: String, age: i32, // Private! } // Public enum pub enum Status { Active, Inactive, } // Public function pub fn create_person(name: String, age: i32) -> Person { Person { name, age } } // Private helper function fn validate_age(age: i32) -> bool { age > 0 && age < 150 } } fn main() { let p = data_structures::create_person("Alice".to_string(), 25); println!("{}", p.name); // Works - name is public // println!("{}", p.age); // Error - age is private! }
Key insight: Just like modules, you choose what's part of your public interface!
Nested modules
You can nest modules to create hierarchy:
mod data_processing { pub mod cleaning { pub fn remove_nulls() { println!("Removing nulls"); } } pub mod analysis { pub fn compute_mean() { println!("Computing mean"); } } } fn main() { data_processing::cleaning::remove_nulls(); data_processing::analysis::compute_mean(); }
Note: If something is pub all its "parent" layers must also be pub to work (the exception is the outer mod if it's in the same file - it acts like it's pub for anything in the file.)
Paths: Navigating Your Module Tree
Three ways to refer to things:
1. Absolute paths (from crate root)
#![allow(unused)] fn main() { crate::data_processing::cleaning::remove_nulls(); }
2. Relative paths (from current location)
#![allow(unused)] fn main() { super::other_module::function(); // Go up one level (like cd .. ) }
3. use to bring things into scope
#![allow(unused)] fn main() { use data_processing::cleaning; cleaning::remove_nulls(); // Shorter! // Or even shorter (but less clear): use data_processing::cleaning::remove_nulls; remove_nulls(); }
Convention: Import the module, not the function
- Makes it clear where things come from
HashMap::new()is clearer than justnew()
Organizing modules across files
When modules get big, move them to separate files:
File structure:
src/
main.rs
data.rs
analysis.rs
In src/main.rs:
mod data; // Tells Rust to look for src/data.rs mod analysis; // Tells Rust to look for src/analysis.rs fn main() { data::process(); analysis::compute_stats(); }
In src/data.rs:
#![allow(unused)] fn main() { pub fn process() { println!("Processing data"); } }
Packages and crates: the bigger picture
Let's clarify some terms you'll hear:
Package = Your project folder (what cargo new creates)
- Has a
Cargo.tomlfile - Contains one or more crates
Crate = A single program or library that Rust compiles
- Think: "one thing that gets compiled"
Two types of crates:
Binary crate (a program you run)
my_program/
Cargo.toml
src/
main.rs <- Has main(), compiles to executable
When you run cargo new my_program, you get a package with one binary crate.
Library crate (code for others to use)
my_library/
Cargo.toml
src/
lib.rs <- No main(), compiles to library
When you run cargo new --lib my_library, you get a package with one library crate.
Real-world example:
randis a library crate (you add it to your project)- Your homework is a binary crate (you run it)
Most of the time: One package = one crate.
Using External Crates
This is where Rust gets powerful: reusing other people's code!
Where to find crates:
- https://crates.io - Official Rust package registry
- https://docs.rs - Documentation for all crates
Adding a crate to your project:
Method 1: Edit Cargo.toml
[dependencies]
rand = "0.8"
Method 2: Use cargo command
cargo add rand
Then use it in your code:
use rand::Rng; fn main() { let random_num = rand::thread_rng().gen_range(1..=100); println!("Random number: {}", random_num); }
Cargo automatically downloads and compiles it!
Popular crates you might use
For data science:
ndarray- NumPy-like arrays for numerical computingpolars- Fast DataFrame library (like pandas but faster)csv- Reading/writing CSV filesserde- Serializing/deserializing data (JSON, etc.)plotters- Creating plots and visualizationslinfa- Machine learning algorithmsstatrs- Statistical distributions and functions
General utilities:
rand- Random number generationchrono- Date/time handlingregex- Regular expressionsrayon- Easy data parallelismclap- Command-line argument parsing
You don't have to reinvent the wheel!
Semantic Versioning: Understanding Version Numbers
When you see rand = "0.8", what does it mean?
Version format: MAJOR.MINOR.PATCH
0.8means "0.8.anything" - compatible updates only=0.8.5means exactly version 0.8.5^0.8is same as0.8(default)
Why this matters:
- Your code won't randomly break when crates update
- Cargo lock file (
Cargo.lock) records exact versions - Teammates get same dependencies
Example: Building a small project with modules
Let's build a simple data analysis tool:
Project structure:
my_analyzer/
Cargo.toml
src/
main.rs
loading.rs
stats.rs
Cargo.toml:
[package]
name = "my_analyzer"
version = "0.1.0"
edition = "2021"
[dependencies]
src/loading.rs:
#![allow(unused)] fn main() { pub fn load_numbers(data: &str) -> Vec<i32> { data.split_whitespace() .filter_map(|s| s.parse().ok()) .collect() } }
src/stats.rs:
#![allow(unused)] fn main() { pub fn mean(numbers: &[i32]) -> f64 { let sum: i32 = numbers.iter().sum(); sum as f64 / numbers.len() as f64 } }
src/main.rs:
mod loading; mod stats; fn main() { let data = "10 20 30 40 50"; let numbers = loading::load_numbers(data); let average = stats::mean(&numbers); println!("Average: {}", average); }
Choosing External Crates: What to Look For
Not all crates are equal! Here's how to evaluate:
Green flags:
- High download count (millions)
- Recent updates (within last year)
- Good documentation
- Used by well-known projects
Red flags:
- Last updated 5 years ago
- No documentation
- Lots of open issues, no responses
- Only 100 downloads total
Example: rand has 200+ million downloads, maintained by Rust team -> safe choice
Remember: Every dependency is code you're trusting!
Summary: The Module System
| Level | What It Is | How You Use It |
|---|---|---|
| Module | Namespace within a file | mod name { } |
| Crate | Compilation unit (binary/library) | main.rs or lib.rs |
| Package | Project with Cargo.toml | cargo new |
| External Crate | Someone else's package | Add to Cargo.toml |
Navigation:
crate::path- absolute from rootsuper::path- relative (go up)use- bring into scopepub- make it public
Activity: Organize Modules (on paper)
Lecture 28 - Testing and Rust from Python
Logistics
- HW4 corrections are due Wednesday night
- Friday we'll have a stack/heap and hand-coding redo opportunity (NEW problems, no grade limit)
- NEXT Tuesday (11/18) corrections during discussion
Today:
- Two independent topics that are super useful
- Part 1: Writing tests in Rust (2/3 of lecture, part of HW6)
- Part 2: Calling Rust from Python (1/3 of lecture)
But first! Solutions to Friday's activity
Why Keep Things Private?
- Encapsulation: External code can't directly modify Person fields, preventing invalid states
- Validation:
validate_age()ensures age is always valid when creating a Person - Flexibility: Can change internal implementation without affecting code that uses these modules
- Clarity: The public API shows exactly what's intended to be used
- Safety: Prevents accidental misuse of helper functions
Learning Objectives
By the end of today, you should be able to:
- Write unit tests in Rust using
#[test]andassert!macros - Run tests with
cargo testand understand test output (though you've already been doing this!) - Understand why testing matters for data science and systems programming
- Know the basics of PyO3 and how to call Rust from Python
- Understand when you might want to use Rust from Python
Why Write Tests?
The reality: Everyone's code has bugs.
Not writing tests is like not wearing a seatbelt because you think you'll never get in an accident.
What everyone does at first:
- Write code
- Run it
- See if it works
- Fix bugs
- Hope you didn't break something else
Better approach:
- Write code
- Write tests
- Run tests automatically
- Fix bugs
- Tests catch if you broke something else!
EVEN BETTER:
- Write tests that capture your desired behavior
- Write code until it passes the tests
- Improve and clean ("refactor") the code
(This is called test-driven development, or TDD - and it's effectively how the homeworks work!)
The simplest test
Tests in Rust are just functions with #[test] attribute:
#![allow(unused)] fn main() { #[test] fn it_works() { assert_eq!(2 + 2, 4); } }
Run with:
cargo test
Output:
running 1 test
test it_works ... ok
test result: ok. 1 passed; 0 failed
Writing Your First Real Test
Let's test a simple function:
#![allow(unused)] fn main() { // Our code pub fn add(a: i32, b: i32) -> i32 { a + b } // Our test #[test] fn test_add() { assert_eq!(add(2, 3), 5); assert_eq!(add(-1, 1), 0); assert_eq!(add(0, 0), 0); } }
Three parts:
#[test]- tells Rust this is a test- Function name (usually starts with
test_) - Assertions (checking if things are true)
Assert Macros: Your Testing Tools
Rust provides several macros for testing:
assert!(condition)
Checks if something is true:
#![allow(unused)] fn main() { #[test] fn test_positive() { let x = 5; assert!(x > 0); } }
assert_eq!(left, right)
Checks if two things are equal:
#![allow(unused)] fn main() { #[test] fn test_length() { let v = vec![1, 2, 3]; assert_eq!(v.len(), 3); } }
assert_ne!(left, right)
Checks if two things are NOT equal:
#![allow(unused)] fn main() { #[test] fn test_different() { let a = String::from("hello"); let b = String::from("world"); assert_ne!(a, b); } }
All three panic if the assertion fails - that's how tests fail!
Adding Custom Error Messages
You can add custom messages to make test failures more helpful:
#![allow(unused)] fn main() { #[test] fn test_score_in_range() { let score = calculate_score(&data); assert!( score >= 0.0 && score <= 100.0, "Score should be between 0 and 100, but got: {}", score ); } #[test] fn test_parse_result() { let result = parse_data("invalid"); assert_eq!( result.len(), 0, "Expected empty result for invalid input, got {} items", result.len() ); } }
When the test fails, you'll see your custom message along with the values!
This is especially helpful when debugging complex data or explaining why a test should pass.
Testing in Modules: Where Tests Live
Convention: Tests (typically) live in a tests module at the bottom of your file:
#![allow(unused)] fn main() { pub fn is_even(n: i32) -> bool { n % 2 == 0 } pub fn is_positive(n: i32) -> bool { n > 0 } }
#![allow(unused)] fn main() { #[cfg(test)] mod tests { use super::*; // Import everything from parent module #[test] fn test_is_even() { assert!(is_even(2)); assert!(is_even(0)); assert!(!is_even(3)); } #[test] fn test_is_positive() { assert!(is_positive(1)); assert!(!is_positive(0)); assert!(!is_positive(-1)); } } }
Why #[cfg(test)]?
- Only compiles tests when running
cargo test - Keeps your final binary smaller
What Makes a Good Test?
1. Test one thing at a time
Bad:
#![allow(unused)] fn main() { #[test] fn test_everything() { assert_eq!(add(1, 2), 3); assert_eq!(multiply(2, 3), 6); assert_eq!(divide(10, 2), 5); } }
Good:
#![allow(unused)] fn main() { #[test] fn test_add() { assert_eq!(add(1, 2), 3); } #[test] fn test_multiply() { assert_eq!(multiply(2, 3), 6); } #[test] fn test_divide() { assert_eq!(divide(10, 2), 5); } }
Why? If one fails, you know exactly which function broke!
2. Use #[should_panic] for expected errors
Sometimes functions should panic:
#![allow(unused)] fn main() { pub fn get_first(v: &Vec<i32>) -> i32 { v[0] // Panics if empty } #[test] #[should_panic] fn test_empty_vec() { get_first(&vec![]); // Should panic! } }
Or even better, specify the panic message:
#![allow(unused)] fn main() { #[test] #[should_panic(expected = "index out of bounds")] fn test_empty_vec() { get_first(&vec![]); } }
3. Test edge cases
Don't just test the happy path!
#![allow(unused)] fn main() { pub fn average(numbers: &[i32]) -> f64 { let sum: i32 = numbers.iter().sum(); sum as f64 / numbers.len() as f64 } #[cfg(test)] mod tests { use super::*; #[test] fn test_average_normal() { assert_eq!(average(&[1, 2, 3]), 2.0); } #[test] fn test_average_single() { assert_eq!(average(&[42]), 42.0); } #[test] #[should_panic] // We expect this to panic! fn test_average_empty() { average(&[]); // Division by zero! } } }
Think about: What could go wrong? Test those cases!
More Testing Principles to Consider
4. Test behavior, not implementation
- Focus on what your function does, not how it does it
- If you refactor internal logic, tests shouldn't need to change
5. Don't test the language/library
- Don't test that
vec![]creates an empty vector - Test your logic, not Rust's or your imports' behavior
6. Keep tests independent
- Each test should work on its own, in any order
- Don't rely on one test running before another
Exception: Integration Tests
Unit tests (what we've been writing): Test individual functions in isolation
Integration tests: Test how multiple parts work together
In Rust, integration tests go in a separate tests/ directory:
my_project/
src/
lib.rs
tests/
integration_test.rs <- Integration tests here!
Example: Testing that multiple components work together:
#![allow(unused)] fn main() { // tests/integration_test.rs use my_project::*; #[test] fn test_full_pipeline() { let data = load_data("test.csv"); let cleaned = remove_outliers(&data, 2.0); let result = calculate_statistics(&cleaned); assert!(result.mean > 0.0); } }
Integration tests can depend on multiple functions working correctly - that's the point!
The car gap story.
For this class: Focus on unit tests. Integration tests are good to know about for larger projects.
Example: Testing Data Processing
Real-world example from data science - smoothing time series data:
#![allow(unused)] fn main() { pub fn moving_average(data: &[f64], window_size: usize) -> Vec<f64> { let mut result = Vec::new(); for i in 0..data.len() { let start = if i < window_size { 0 } else { i - window_size + 1 }; let window = &data[start..=i]; let avg = window.iter().sum::<f64>() / window.len() as f64; result.push(avg); } result } #[cfg(test)] mod tests { use super::*; #[test] fn test_moving_average_basic() { let data = vec![1.0, 2.0, 3.0, 4.0, 5.0]; let result = moving_average(&data, 3); assert_eq!(result[2], 2.0); // (1+2+3)/3 = 2.0 assert_eq!(result[4], 4.0); // (3+4+5)/3 = 4.0 } #[test] fn test_moving_average_window_one() { let data = vec![1.0, 2.0, 3.0]; let result = moving_average(&data, 1); assert_eq!(result, data); // Window of 1 = original data } #[test] fn test_moving_average_small_data() { let data = vec![5.0]; let result = moving_average(&data, 3); assert_eq!(result, vec![5.0]); // Works with single element } #[test] fn test_moving_average_window_larger_than_data() { let data = vec![2.0, 4.0, 6.0]; let result = moving_average(&data, 10); // Window larger than data: uses all available data assert_eq!(result[0], 2.0); // 2/1 = 2.0 assert_eq!(result[1], 3.0); // (2+4)/2 = 3.0 assert_eq!(result[2], 4.0); // (2+4+6)/3 = 4.0 } } }
Testing Best Practices: Quick Summary
- Write tests BEFORE or AS you code - don't wait until the end
- Test edge cases - empty inputs, negative numbers, zero, etc.
- One assertion (or at least one concept) per test (when possible) - easier to debug
- Use descriptive names -
test_average_with_negative_numbers - Test behavior, not implementation - catch bugs early!
In data science:
- Test your data cleaning functions
- Test statistical calculations with known results
- Test that your parsers handle bad data gracefully
Calling Rust from Python
Python is great for:
- Data exploration
- Quick prototyping
- Rich ecosystem (pandas, scikit-learn, pytorch, etc.)
- Easy to write
Rust is great for:
- Performance (100x faster than Python)
- Memory safety
- Parallel processing
Best of both worlds: Write slow parts in Rust, call from Python!
Use Cases for Rust + Python
Real examples:
- Polars: Fast DataFrame library (like pandas but Rust)
- Cryptography: Python's
cryptographylibrary has Rust internals - Tokenizers: Hugging Face uses Rust for fast NLP tokenization
You might use it for:
- Processing large datasets
- Heavy numerical computations
- Performance-critical parts of your pipeline
PyO3: The Bridge Between Rust and Python
PyO3 is a Rust library that lets you:
- Call Rust from Python
- Call Python from Rust
- Create Python modules in Rust
Installation:
cargo add pyo3 --features extension-module
Exporting your Rust function to Python:
Rust code (src/lib.rs):
#![allow(unused)] fn main() { use pyo3::prelude::*; #[pyfunction] fn add(a: i32, b: i32) -> i32 { a + b } #[pymodule] fn my_rust_module(m: &Bound<'_, PyModule>) -> PyResult<()> { m.add_function(wrap_pyfunction!(add, m)?)?; Ok(()) } }
Building and using: the maturin tool
maturin is a tool for building Python packages in Rust.
Step 1: Create a new Rust-Python project
pip install maturin
maturin new my_project
cd my_project
This creates:
my_project/
Cargo.toml <- Rust configuration
pyproject.toml <- Python configuration
src/
lib.rs <- Your Rust code goes here!
Step 2: Write your Rust code in src/lib.rs
Step 3: Build and install into Python
maturin develop
This compiles the Rust code and installs it as a Python module in your current Python environment.
Step 4: Use it in Python (anywhere on your machine)!
import my_project
result = my_project.add(2, 3)
print(result) # 5
How it works: maturin develop compiles src/lib.rs into a binary that Python can load, then installs it where Python can find it (like site-packages).
The maturin develop command compiles your Rust code and installs it into your Python environment!
A Practical Example: Fast String Processing
Rust side (src/lib.rs):
#![allow(unused)] fn main() { use pyo3::prelude::*; #[pyfunction] fn count_words(text: String) -> usize { text.split_whitespace().count() } #[pymodule] fn string_tools(m: &Bound<'_, PyModule>) -> PyResult<()> { m.add_function(wrap_pyfunction!(count_words, m)?)?; Ok(()) } }
Python side:
import string_tools
text = "The quick brown fox jumps over the lazy dog"
count = string_tools.count_words(text)
print(f"Word count: {count}") # Word count: 9
Simple, but imagine this with millions of strings!
Realistic example with mixed code
# Python file: main.py
# Use Rust for the slow parts
import my_fast_rust_module
# Use Python for the easy parts
import pandas as pd
import matplotlib.pyplot as plt
# Load data with pandas
df = pd.read_csv("data.csv")
# Process with Rust (fast!)
results = my_fast_rust_module.process_dataframe(df)
# Visualize with matplotlib (easy!)
plt.hist(results)
plt.show()
Summary: Testing + Python Integration
Testing:
- Use
#[test]andassert!macros - Run with
cargo test - Test edge cases and expected errors
- Write tests as you code!
Rust from Python:
- Use PyO3 + maturin
#[pyfunction]for functions#[pymodule]for modules- Build with
maturin develop - Use when you need performance
Both are about making Rust practical for real projects!
Activity: Writing tests for Friday's activity
Go to our site: https://trgardos.github.io/ds210-fa25-private/b1/activities/activity_28.html for code and instructions
Lecture 29 - Closures and Iterators
Logistics
- Almost done with new Rust material!
- Today: Three related topics that make Rust feel "functional"
- Next lecture (Lecture 30): File I/O, NDArray, and concurrency examples
- Then we switch to algorithms!
Take-aways from activity feedback
- Rust playground activities could be really useful, but sometimes you feel unprepared to start them / there's a gap between what we cover in lecture and what you need to get going. (I've felt this too - I'll try to be more careful about it today. I also think it helps when we pause mid-activity to go over some answers.)
- Folks want more hand-coding practice
- The live multiple-choice quiz was a (bit of a surprise) hit
- People enjoyed and benefitted from the "confidence-rating quiz" (I like it too) - we'll definitely do that again before the final
Learning objectives
By the end of today, you should be able to:
- Use iterator methods like
.map(),.filter(), and.collect() - Understand closures and the
|x|syntax (that thing that AI keeps telling you to do) - Chain iterator operations to process data functionally
- Understand references in iterators and when to use
.copied()or.cloned() - Write functional-style data processing instead of loops
Part 1: What are closures?
You've probably seen these already (I dropped them in last lecture, if you haven't seen them before... and AI suggests this a lot)
#![allow(unused)] fn main() { let numbers = vec![1, 2, 3, 4, 5]; let doubled: Vec<i32> = numbers.iter().map(|x| x * 2).collect(); }
That |x| x * 2 is a "closure"
Closures are:
- Anonymous functions (no name)
- Can be stored in variables (
let add_one = |x| x + 1;) - Can capture variables from their environment
Think of them as: Quick, throwaway functions for one-time use
Closure syntax
Basic syntax:
#![allow(unused)] fn main() { |parameters| expression }
Examples:
#![allow(unused)] fn main() { // No parameters let say_hi = || println!("Hi!"); say_hi(); // Prints "Hi!" // One parameter let double = |x| x * 2; println!("{}", double(5)); // Prints 10 // Multiple parameters let add = |x, y| x + y; println!("{}", add(3, 4)); // Prints 7 // Multiple statements (need curly braces) let complex = |x| { let doubled = x * 2; doubled + 1 }; println!("{}", complex(5)); // Prints 11 }
Compare to Python's lambda:
# Python
double = lambda x: x * 2
# Rust
let double = |x| x * 2;
Very similar!
Closures vs. functions
Functions are formal interfaces:
#![allow(unused)] fn main() { fn add(x: i32, y: i32) -> i32 { x + y } }
Closures are lightweight and flexible:
#![allow(unused)] fn main() { let add = |x, y| x + y; // Types inferred }
Closures capture their environment (TC 12:30)
This is the magic: Closures can use variables from outside!
#![allow(unused)] fn main() { let multiplier = 10; let multiply = |x| x * multiplier; // Uses 'multiplier' from outside! println!("{}", multiply(5)); // Prints 50 }
This wouldn't work with a regular function:
#![allow(unused)] fn main() { let multiplier = 10; fn multiply(x: i32) -> i32 { x * multiplier // Error! Functions can't capture environment } }
Why is this useful? You'll see in iterator examples!
Functions vs closures: When to use each
| Category | Functions | Closures |
|---|---|---|
| Scope | Can't capture variables from outside | Can capture surrounding variables |
| Reuse | Called from many places | Usually one-time use |
| Types | Explicit type annotations required | Types inferred from usage |
| Readability | Named, self-documenting | Concise for obvious operations |
| Best for | Public APIs, helper functions | Iterator chains, callbacks |
Part 2: Iterator methods
We've been using iterators since the beginning
#![allow(unused)] fn main() { let numbers = vec![1, 2, 3]; for num in numbers.iter() { // .iter() creates an iterator println!("{}", num); } }
Iterators:
- Provide values one at a time
- Lazy (don't do work until needed)
- Can be chained together
You can create iterators from:
- Vectors and arrays:
vec.iter(),arr.iter() - HashMaps:
map.iter(),map.keys(),map.values() - HashSets:
set.iter() - Strings:
s.chars(),s.split_whitespace(),s.split(',') - Ranges:
1..10 - Next lecture we'll see
reader.lines() - Anything that implements the
Iteratortrait!
The power of iterator methods
Instead of loops, we can use iterator methods
Traditional loop:
#![allow(unused)] fn main() { let numbers = vec![1, 2, 3, 4, 5]; let mut doubled = Vec::new(); for num in numbers.iter() { doubled.push(num * 2); } }
With .map():
#![allow(unused)] fn main() { let numbers = vec![1, 2, 3, 4, 5]; let doubled: Vec<i32> = numbers.iter() .map(|x| x * 2) .collect(); }
Compare to Python list comprehensions
# Python
numbers = [1, 2, 3, 4, 5]
doubled = [x * 2 for x in numbers]
# Rust equivalent
let numbers = vec![1, 2, 3, 4, 5];
let doubled: Vec<i32> = numbers.iter()
.map(|x| x * 2)
.collect();
The pattern is similar:
- Python:
[expression for item in iterable] - Rust:
iterable.iter().map(|item| expression).collect()
Iterator methods you'll use
.map() - transform each element
#![allow(unused)] fn main() { let numbers = vec![1, 2, 3]; let squared: Vec<i32> = numbers.iter() .map(|x| x * x) .collect(); // [1, 4, 9] }
.filter() - keep only some elements
#![allow(unused)] fn main() { let numbers = vec![1, 2, 3, 4, 5]; let evens: Vec<i32> = numbers.iter() .filter(|x| *x % 2 == 0) .copied() .collect(); // [2, 4] }
Compare filtering to Python:
# Python - list comprehension with condition
numbers = [1, 2, 3, 4, 5]
evens = [x for x in numbers if x % 2 == 0]
# Rust equivalent
let numbers = vec![1, 2, 3, 4, 5];
let evens: Vec<i32> = numbers.iter()
.filter(|x| *x % 2 == 0)
.copied()
.collect();
.collect() - turn iterator back into collection
#![allow(unused)] fn main() { let range: Vec<i32> = (1..=5).collect(); // [1, 2, 3, 4, 5] }
Understanding references in iterators
Let's break down what's happening with types in .map() and .filter():
Example 1: .map() with arithmetic
#![allow(unused)] fn main() { let numbers = vec![1, 2, 3]; let squared: Vec<i32> = numbers.iter() .map(|x| x * x) .collect(); }
Type breakdown:
numbers.iter()producesIterator<Item = &i32>.map(|x| x * x)takesx: &i32inx * xauto-dereferences&i32toi32for arithmetic, outputtingi32
Works without explicit dereferencing!
Example 2: .filter() with comparison
#![allow(unused)] fn main() { let numbers = vec![1, 2, 3, 4, 5]; let evens: Vec<i32> = numbers.iter() .filter(|x| *x % 2 == 0) .copied() .collect(); }
Type breakdown:
numbers.iter()→ producesIterator<Item = &i32>.filter()takesFn(&Item) -> bool, so it passes a reference to each item- Closure receives
x: &&i32(reference to the&i32iterator item) *xdereferences once:&&i32→&i32*x % 2auto-dereferences again:&i32→i32for the%operator.copied()convertsIterator<&i32>→Iterator<i32>
Alternative using pattern matching:
#![allow(unused)] fn main() { let evens: Vec<i32> = numbers.iter() .filter(|&&x| x % 2 == 0) // Destructure &&i32 to get i32 .copied() // Still need .copied() to convert Iterator<&i32> -> Iterator<i32> .collect(); }
Key differences
| Method | Closure receives | Why? |
|---|---|---|
.map(f) | Item directly | Signature: FnMut(Item) -> U |
.filter(f) | &Item (reference) | Signature: Fn(&Item) -> bool |
Why does .filter() pass a reference?
- It needs to inspect items without consuming them
- The iterator still owns the items
- Prevents accidentally moving/consuming items during filtering
The .copied() and .cloned() helpers
When working with Iterator<&T>, use these to convert to Iterator<T>:
For Copy types (i32, f64, char, etc.):
#![allow(unused)] fn main() { numbers.iter() // Iterator<&i32> .filter(|&&x| x > 2) // Still Iterator<&i32> .copied() // Now Iterator<i32> (bitwise copy, cheap!) .collect() // Vec<i32> }
For Clone types (String, Vec, etc.):
#![allow(unused)] fn main() { let words = vec!["hello".to_string(), "world".to_string()]; let filtered: Vec<String> = words.iter() // Iterator<&String> .filter(|s| s.len() > 4) // Still Iterator<&String> .cloned() // Now Iterator<String> (clones each) .collect(); // Vec<String> }
Chaining iterator operations (TC 12:35)
This is where it gets powerful:
#![allow(unused)] fn main() { let numbers = vec![1, 2, 3, 4, 5, 6, 7, 8, 9, 10]; let result: Vec<i32> = numbers.iter() .filter(|&&x| x % 2 == 0) // Keep evens .map(|&x| x * x) // Square them (&i32 -> i32) .filter(|&x| x > 10) // Keep if > 10 .collect(); println!("{:?}", result); // [16, 36, 64, 100] }
What happened:
- Start with [1, 2, 3, 4, 5, 6, 7, 8, 9, 10]
- Filter evens: [2, 4, 6, 8, 10]
- Square: [4, 16, 36, 64, 100]
- Keep > 10: [16, 36, 64, 100]
Compare to nested Python list comprehension:
numbers = [1, 2, 3, 4, 5, 6, 7, 8, 9, 10]
squared = [x*x for x in numbers if x % 2 == 0]
result = [x for x in squared if x > 10]
# or all at once:
result = [x*x for x in numbers if x % 2 == 0 if x*x > 10]
Rust's chained style is often clearer for multi-step transformations!
Consuming iterators: Final methods in the chain
These methods "consume" the iterator and produce a final result:
.collect() - Build a collection
#![allow(unused)] fn main() { let doubled: Vec<i32> = (1..=5).map(|x| x * 2).collect(); // Vec, HashSet, HashMap, etc. }
.sum() and .product() - Aggregate numbers
#![allow(unused)] fn main() { let total: i32 = vec![1, 2, 3, 4, 5].iter().sum(); // 15 let product: i32 = vec![2, 3, 4].iter().product(); // 24 }
The "turbofish" syntax ::<Type>:
Sometimes you need to tell Rust what type you want:
#![allow(unused)] fn main() { // If you don't annotate the variable, Rust doesn't know what type to sum to let total = vec![1, 2, 3].iter().sum::<i32>(); // Need turbofish! // Also useful when the type is truly ambiguous let result = (1..10).collect::<Vec<i32>>(); // Could be Vec, HashSet, etc. // If the variable type is annotated, turbofish is optional let values = vec![1.0, 2.5, 3.7]; let sum1: f64 = values.iter().sum(); // Type annotation on variable let sum2 = values.iter().sum::<f64>(); // Or use turbofish }
The ::<> is called "turbofish" because it looks like a fish
.max() and .min() - Find extremes
#![allow(unused)] fn main() { let numbers = vec![3, 7, 1, 9, 2]; let biggest = numbers.iter().max(); // Some(&9) let smallest = numbers.iter().min(); // Some(&1) // Returns Option because iterator might be empty! }
.count() - Count items
#![allow(unused)] fn main() { let evens = vec![1, 2, 3, 4, 5] .iter() .filter(|&&x| x % 2 == 0) .count(); // 2 }
.find() - Get first match
#![allow(unused)] fn main() { let numbers = vec![1, 2, 3, 4, 5]; let first_even = numbers.iter().find(|&&x| x % 2 == 0); // Some(&2) }
Key point: These methods consume the iterator - you can't use it after calling them!
Less common iterator methods
.fold() - Accumulate a result
#![allow(unused)] fn main() { let sum = (1..=5).fold(0, |acc, x| acc + x); // 0 + 1 + 2 + 3 + 4 + 5 = 15 }
.any() and .all() - Check conditions
#![allow(unused)] fn main() { let numbers = vec![2, 4, 6, 8]; let all_even = numbers.iter().all(|x| x % 2 == 0); // true let any_big = numbers.iter().any(|x| *x > 10); // false }
.take() and .skip() - Control how many
#![allow(unused)] fn main() { let first_three: Vec<i32> = (1..=10).take(3).collect(); // [1, 2, 3] // We saw this on the homework in the username problem! let skip_two: Vec<i32> = (1..=5).skip(2).collect(); // [3, 4, 5] }
What makes iterators "lazy"?
"Lazy" means iterators don't do work until consumed
1. Early termination - only process what you need
#![allow(unused)] fn main() { // Find first even number in a million items let first_even = (1..=1_000_000) .filter(|x| x % 2 == 0) .next(); // Stops after finding 2! Doesn't check all million items }
2. No intermediate collections
#![allow(unused)] fn main() { // Eager (bad - creates temp vectors): let temp1: Vec<i32> = numbers.iter().map(|x| x * 2).collect(); let temp2: Vec<i32> = temp1.iter().filter(|x| x > 5).collect(); let result: Vec<i32> = temp2.iter().map(|x| x + 1).collect(); // Lazy (good - one pass through, no temps): let result: Vec<i32> = numbers.iter() .map(|x| x * 2) .filter(|x| x > 5) .map(|x| x + 1) .collect(); // Only allocates final result! }
3. Works with infinite sequences
#![allow(unused)] fn main() { // This is fine - never actually creates infinite items! let first_10_evens: Vec<i32> = (0..) // Infinite range! .filter(|x| x % 2 == 0) .take(10) // Only generates 10 items .collect(); }
Iterator methods summary
Transforming iterators (return new iterators)
| Method | What it does | Example |
|---|---|---|
.map(f) | Transform each element | numbers.iter().map(\|x\| x * 2) |
.filter(f) | Keep elements that match | numbers.iter().filter(\|&&x\| x > 5) |
.take(n) | Take first n elements | (1..100).take(10) |
.skip(n) | Skip first n elements | (1..100).skip(10) |
.copied() | Copy &T to T (for Copy types) | .filter(...).copied() |
.cloned() | Clone &T to T (for Clone types) | .filter(...).cloned() |
Consuming iterators (produce final values)
| Method | What it does | Example |
|---|---|---|
.collect() | Build a collection | .collect::<Vec<i32>>() |
.sum() | Add all elements | numbers.iter().sum::<i32>() |
.product() | Multiply all elements | numbers.iter().product::<i32>() |
.count() | Count elements | .filter(...).count() |
.max() / .min() | Find largest/smallest | numbers.iter().max() |
.find(f) | First element matching | numbers.iter().find(\|&&x\| x > 5) |
.any(f) / .all(f) | Check if any/all match | numbers.iter().any(\|&x\| x > 10) |
Common pattern
#![allow(unused)] fn main() { collection.iter() // Create iterator .filter(...) // Transform/filter .map(...) // Transform/filter .collect() // Consume and produce output }
Demo: Converting a loop to iterators
Let's practice converting a loop to iterator methods together!
Given this loop:
#![allow(unused)] fn main() { let numbers = vec![1, 2, 3, 4, 5, 6, 7, 8, 9, 10]; let mut result = Vec::new(); for num in &numbers { if *num > 4 { result.push(num * 3); } } println!("result: {:?}", result); }
Step 1: What does this code do?
Step 2: Write iterator-pseudo-code
Step 3: Convert to iterators
Activity: From loops to iterators
See gradescope / our website for instructions
(Breaking at 5 of for some solutions)
Lecture 30 - File I/O and Concurrency
Logistics
- This is the last lecture on Rust implementation!
- Next we switch to algorithm theory and graph algorithms
- No handouts today - notes are posted online already though.
Key dates:
- Stack/heap and hand-coding redo later today
- Corrections in discussion on Tuesday
- HW6 due in a week
Learning objectives
By the end of today, you should be able to (with a reference):
- Read and write files in Rust for data processing
- Use NDArray for numerical computing (like NumPy)
- Have working examples you can adapt for your own projects
And without a reference:
- Understand basic concepts of concurrency
- Know when concurrency might help
- Use
par_iterto add concurrency easily in Rust
Part 1: File I/O
Why file I/O matters
In data science, you're always:
- Loading datasets (CSV, JSON, text files)
- Saving results
- Processing log files
- Reading configurations
Rust makes file I/O safe - no reading freed memory, no forgetting to close files, fewer surprise type parsing issues
Read a whole file to a string
use std::fs; fn main() { // Read entire file into a String let contents = fs::read_to_string("data.txt") // takes relative path .expect("Could not read file"); println!("File contents:\n{}", contents); }
That's it! File is automatically closed when contents goes out of scope.
Error handling: .expect() panics if file doesn't exist. For real code, use match or ?:
#![allow(unused)] fn main() { use std::fs; use std::io; fn read_file(path: &str) -> io::Result<String> { let contents = fs::read_to_string(path)?; Ok(contents) } }
Writing to a File
use std::fs; fn main() { let data = "Results:\n42\n100\n256\n"; fs::write("output.txt", data) .expect("Could not write file"); println!("Data written!"); }
Simple! Overwrites file if it exists, creates if it doesn't.
Processing files line by line
For large files, don't load everything into memory:
use std::fs::File; use std::io::{BufRead, BufReader}; fn main() { let file = File::open("data.txt").expect("Could not open file"); let reader = BufReader::new(file); // Buffer reads chunks efficiently for line in reader.lines() { // creates an iterator! let line = line.expect("Could not read line"); println!("Line: {}", line); } }
So... what is a buffer?
A buffer is temporary storage in memory for data being transferred
In Computer Systems Generally:
Think of a buffer as a "waiting area" for data:
- Video streaming: Buffer loads upcoming seconds of video so playback is smooth
- Printing: Print buffer holds documents waiting to print
- Copy/paste: Clipboard is a buffer holding your copied data
So... what is a buffer?
In File I/O:
Without buffering (slow):
Program asks: "Give me byte 1" -> Disk reads byte 1
Program asks: "Give me byte 2" -> Disk reads byte 2
Program asks: "Give me byte 3" -> Disk reads byte 3
Each disk read takes ~5-10 milliseconds!
With buffering (fast):
Program asks: "Give me byte 1" -> Disk reads bytes 1-8192 into buffer
Program asks: "Give me byte 2" -> Already in buffer! (instant)
Program asks: "Give me byte 3" -> Already in buffer! (instant)
...
Program asks: "Give me byte 8193" → Disk reads next 8192 bytes
Key insight: Disk I/O is ~100,000x slower than RAM access. Buffers reduce disk reads dramatically!
BufReader in Rust
#![allow(unused)] fn main() { let file = File::open("data.txt")?; let reader = BufReader::new(file); // Wraps file with 8KB buffer }
BufReader reads chunks from disk and serves your program from RAM.
Practical example: Parse a data file
use std::fs::File; use std::io::BufReader; fn parse_numbers(filename: &str) -> Vec<i32> { let file = File::open(filename).expect("Could not open file"); let reader = BufReader::new(file); let mut numbers = Vec::new(); for line in reader.lines() { // First, check if we can read the line let text = match line { Ok(text) => text, Err(_) => continue, // Skip lines with read errors }; // Now try to parse the text as a number let parse_result = text.trim().parse::<i32>(); match parse_result { Ok(num) => numbers.push(num), Err(_) => {} // Skip lines that aren't valid numbers } } numbers } fn main() { let data = parse_numbers("numbers.txt"); println!("Read {} numbers", data.len()); println!("Sum: {}", data.iter().sum::<i32>()); }
Writing results to CSV
use std::fs::File; use std::io::Write; fn save_results(filename: &str, data: &[(String, i32)]) -> std::io::Result<()> { let mut file = File::create(filename)?; writeln!(file, "name,score")?; // Header for (name, score) in data { writeln!(file, "{},{}", name, score)?; } Ok(()) } fn main() { let results = vec![ ("Alice".to_string(), 95), ("Bob".to_string(), 87), ("Charlie".to_string(), 92), ]; save_results("results.csv", &results) .expect("Could not save results"); }
For real CSV parsing, use the csv crate - much more robust!
Part 2: NDArray - NumPy for Rust
If you need NumPy-like functionality in Rust:
[dependencies]
ndarray = "0.15"
Quick example:
#![allow(unused)] fn main() { use ndarray::prelude::*; let a = array![1.0, 2.0, 3.0, 4.0]; let b = array![5.0, 6.0, 7.0, 8.0]; // Element-wise operations let sum = &a + &b; // [6, 8, 10, 12] let product = &a * &b; // [5, 12, 21, 32] // Aggregations println!("Mean: {}", a.mean().unwrap()); }
When to use:
- Multi-dimensional arrays (matrices, tensors)
- Linear algebra and statistics
- Scientific computing
Not on homework or exam - just for your reference if you need it!
Part 3: Concurrency concepts (TC 12:35)
Cores and threads
Your computer has multiple cores:
- Core: A physical processing unit in your CPU that can execute instructions
- Thread: A sequence of instructions that can run independently
- Think of cores as workers, threads as tasks they can do
How many cores do you have?
- Laptop: 4-16 cores
- Server: 32-128 cores
- GPU: thousands of cores!
To use them all, you need concurrent programming
- One thread = one core doing work
- Multiple threads = multiple cores working in parallel
Example: Processing 1 million images
- Single thread (1 core working): 1 hour
- 8 threads (8 cores working): ~7.5 minutes
Reality check: Limits and challenges
Amdahl's Law: Parallelism has limits
Not all code can be parallelized! If 50% of your program must run sequentially:
- 1 core: 100 seconds total
- 2 cores: 50 seconds parallel + 50 sequential = 75 seconds (1.33x speedup, not 2x!)
- ∞ cores: 0 seconds parallel + 50 sequential = 50 seconds (2x speedup maximum)
Key insight: The sequential portion limits your speedup, no matter how many cores you add.
Why parallel code is hard to write:
- Race conditions: Multiple threads accessing shared data can interfere with each other
- Deadlocks: Threads waiting for each other can freeze the program
- Difficult debugging: Bugs may only appear sometimes (non-deterministic)
- Overhead: Creating/coordinating threads takes time and memory
- Not all problems parallelize well: Some tasks are inherently sequential
Bottom line: Concurrency is powerful but requires careful design!
Visualizing a data race
#![allow(unused)] fn main() { // BROKEN CODE (doesn't compile in Rust, thank goodness!) let mut counter = 0; thread 1: counter = counter + 1; thread 2: counter = counter + 1; }
What happens:
Time Thread 1 Thread 2 Counter
---- -------- -------- -------
t0 0
t1 Read: 0
t2 Read: 0 0
t3 Add 1: 1
t4 Add 1: 1 0
t5 Write: 1 1
t6 Write: 1 1 ← Should be 2!
Result: Lost update! This is a data race.
Other concurrency bugs
Deadlock
Thread 1 Thread 2
-------- --------
Lock A Lock B
Lock B (wait...) Lock A (wait...)
Both stuck forever!
Use-After-Free (in unsafe languages)
Thread 1 Thread 2
-------- --------
Use data
Free data
Use data again <- Crash!
These bugs are:
- Hard to reproduce (timing-dependent)
- Hard to debug (non-deterministic)
- Cause production failures
How Rust prevents concurrency bugs
Remember the borrow checker?
It prevents concurrency bugs at compile time!
Rules that help:
- Ownership: Can't have two owners (can't have unsynchronized access)
- Borrowing: Can't have
&mutwhile&exists (prevents races) - Lifetimes: References can't outlive data (prevents use-after-free)
The same rules that made single-threaded code safe make concurrent code safe!
Concurrency patterns
Rust supports three main approaches to concurrent programming:
1. Message Passing
When to use: Background tasks that produce results
Example scenario: Download a file while the main program continues
Main thread: "Hey worker, download this URL"
... continues doing other work ...
Worker thread: ... downloads file ...
Worker thread: "Done! Here's the file data"
Main thread: Receives the data and processes it
Safe because: Threads don't share data - they pass ownership through messages
2. Shared State with Locks (Mutex)
When to use: Multiple threads need to update the same counter or shared resource
Example scenario: Web server counting requests
Thread 1: Lock counter -> Read: 100 -> Increment -> Write: 101 -> Unlock
Thread 2: (waiting for lock...)
Thread 2: Lock counter -> Read: 101 -> Increment -> Write: 102 -> Unlock
Thread 3: (waiting for lock...)
Safe because: Only one thread can access the data at a time
3. Data Parallelism
When to use: Processing large amounts of independent data
Example scenario: Apply a filter to 1 million images
Thread 1: Process images 1-250,000
Thread 2: Process images 250,001-500,000
Thread 3: Process images 500,001-750,000
Thread 4: Process images 750,001-1,000,000
-> 4x faster! Each thread works on different data
Safe because: Each thread works on separate chunks, no sharing
All safe because of Rust's type system!
Manual concurrency tools (advanced) (TC 12:45)
If you need fine-grained control over threads, Rust provides:
Manual thread creation
std::thread::spawnto create
Message Passing:
std::sync::mpsc
Shared State:
Arc<Mutex<T>>
BUT: These are complex and easy to get wrong!
Better option for most cases: Use the rayon crate (next slide)
- Automatic parallelism
- Much simpler to use
- Handles threading for you
The Rayon crate: Easy parallelism
For simple cases, use the rayon crate:
[dependencies]
rayon = "1.7"
use rayon::prelude::*; fn main() { let data: Vec<i32> = (1..=1000).collect(); // Parallel iterator - automatically uses all cores! let sum: i32 = data.par_iter() .map(|x| x * x) .sum(); println!("Sum: {}", sum); }
Just change .iter() to .par_iter() to get automatic parallelism!
Summary
File I/O:
- Use
fs::read_to_string()for simple file reading - Use
BufReaderfor efficient line-by-line processing - Buffers reduce disk I/O by reading chunks into memory
- Always handle errors with
Resultand?
Concurrency:
- Multiple cores can work in parallel for speedup
- Amdahl's Law: Sequential portions limit maximum speedup
- Rust prevents data races and concurrency bugs at compile time
- Use
rayonandpar_iter()for easy parallelism
When to use concurrency:
- Processing independent data items (images, records)
- Long-running computations that can be split
- NOT worth it for small tasks (overhead > benefit)
"Activity" - Stack-heap and hand-coding retest
Lecture 31 - Big O Notation & Algorithmic Complexity
Logistics
- Welcome to the algorithms & data structures unit!
- Retest scores out, corrections tomorrow in discussion
- HW6 due Friday / HW7 released Friday (maybe Saturday)
- HW5 grades will be released tomorrow / corrections due a week from tomorrow
- Readings shift focus: Python DS book + videos (concepts, not syntax!)
- DECKS OF CARDS?
Learning objectives
By the end of today, you should be able to:
- Use Big O notation to describe time and space complexity
- Analyze code to determine its Big O complexity (loops, nested loops, logarithmic patterns)
- Recognize common complexity classes: O(1), O(log n), O(n), O(n^2), O(2^n)
- Apply key rules: drop constants, keep dominant terms
Part 1: Big O notation - The math of "about how fast?"
Motivation: When does speed matter?
Think about:
- Sorting 10 items vs. sorting 1 million items
- Searching through 100 names vs. searching Facebook's 3 billion users
- A game processing 60 frames per second
Our intuition is usually that a task that's twice as big should take twice as long
It's often not that simple - it depends on the algorithm
Think-pair-share: Counting operations
Part 1: Given this code:
#![allow(unused)] fn main() { fn sum_array(arr: &[i32]) -> i32 { let mut total = 0; for &num in arr { total += num; } total } }
Question: If the array has n elements, how many addition operations happen?
Part 2: Now consider this code:
#![allow(unused)] fn main() { fn count_pairs(n: usize) -> usize { let mut count = 0; for i in 1..n { for j in i..n { count += 1; } } count } }
Question: If we call count_pairs(n), how many times does the inner loop execute in total?
- Try with a small value like n=4 to trace through it
- Can you find a pattern or formula?
What is Big O?
Big O notation describes how runtime/memory grows as input size grows.
Key idea: We ignore:
- Exact number of operations
- Constants and performance on small inputs
- Hardware / OS dependent values
We focus on: The growth rate as n goes to infinity
Example: Linear growth
#![allow(unused)] fn main() { fn print_all(arr: &[i32]) { for &item in arr { // n iterations println!("{}", item); } } }
- Array of size 10: ~10 operations
- Array of size 100: ~100 operations
- Array of size n: ~n operations
This is O(n) - "linear time"
Example: Quadratic growth
#![allow(unused)] fn main() { fn print_all_pairs(arr: &[i32]) { for &i in arr { // n iterations for &j in arr { // n iterations for EACH i println!("{}, {}", i, j); } } } }
- Array of size 10: ~100 operations (10 × 10)
- Array of size 100: ~10,000 operations (100 × 100)
- Array of size n: ~n^2 operations
This is O(n^2) - "quadratic time"
Example: Logarithmic growth
#![allow(unused)] fn main() { fn binary_search(arr: &[i32], target: i32) -> Option<usize> { let mut low = 0; let mut high = arr.len(); while low < high { let mid = (low + high) / 2; if arr[mid] == target { return Some(mid); } else if arr[mid] < target { low = mid + 1; } else { high = mid; } } None } }
- Array of size 10: ~3-4 operations (log_2 10 ≈ 3.3)
- Array of size 100: ~6-7 operations (log_2 100 ≈ 6.6)
- Array of size 1,000,000: ~20 operations! (log_2 1,000,000 ≈ 20)
This is O(log n) - "logarithmic time" (very fast!)
Example: Exponential growth
#![allow(unused)] fn main() { fn print_all_subsets(arr: &[i32], index: usize, current: &mut Vec<i32>) { if index == arr.len() { println!("{:?}", current); // Print one subset return; } // Don't include arr[index] print_all_subsets(arr, index + 1, current); // Include arr[index] current.push(arr[index]); print_all_subsets(arr, index + 1, current); current.pop(); } }
- Array of size 3: 8 subsets (2³)
- Array of size 10: 1,024 subsets (2¹⁰)
- Array of size 20: 1,048,576 subsets (2²⁰)
- Array of size n: 2^n subsets
This is O(2^n) - "exponential time" (explodes quickly!)
Example: Constant time
#![allow(unused)] fn main() { fn get_first(arr: &[i32]) -> Option<i32> { arr.first().copied() } }
- Array of size 10: 1 operation
- Array of size 1000: 1 operation
- Array of size n: still 1 operation!
This is O(1) - "constant time" (doesn't depend on n)
Think about: What's the complexity?
#![allow(unused)] fn main() { fn find_range(arr: &[i32]) -> Option<i32> { let mut min = arr.first()?; for &item in arr { if item < min { min = item; } } let mut max = arr.first()?; for &item in arr { if item > max { max = item; } } Some(max - min) } }
[PAUSE - think-pair-share]
Common complexity classes (from best to worst)
| Notation | Name | Example |
|---|---|---|
| O(1) | Constant | Array access by index |
| O(log n) | Logarithmic | Binary search |
| O(n) | Linear | Loop through array once |
| O(n log n) | Linearithmic | Good sorting algorithms |
| O(n^2) | Quadratic | Nested loops |
| O(2^n) | Exponential | Trying all subsets |
| O(n!) | Factorial | Trying all permutations |
Rule of thumb: Each step down this list is MUCH slower!
Rules for analyzing code
-
Loops: Multiply complexity by number of iterations
- Loop n times doing O(1) work = O(n)
- Loop n times doing O(n) work = O(n^2)
- Outer loop n times, inner loop m times = O(n m)
-
Drop constants and lower-order terms:
- O(3n) -> O(n)
- O(n^2 + n) -> O(n^2)
- O(5) -> O(1)
Let's do this one together
#![allow(unused)] fn main() { fn mystery_function(arr: &[i32]) -> i32 { let n = arr.len(); let mut count = 0; for i in 0..n { count += arr[i]; } for i in 0..10 { count += 1; } for i in 0..n { for j in 0..n { if arr[i] == arr[j] { count += 1; } } } count } }
Space complexity too!
Big O also applies to memory usage.
#![allow(unused)] fn main() { fn make_doubles(arr: &[i32]) -> Vec<i32> { let mut result = Vec::new(); for &item in arr { result.push(item * 2); } result } }
- Time complexity: O(n) - one loop
- Space complexity: O(n) - create new vector of size n
Best case vs. worst case vs. average case
Example: Linear search
#![allow(unused)] fn main() { fn find_position(arr: &[i32], target: i32) -> Option<usize> { for (i, &item) in arr.iter().enumerate() { if item == target { return Some(i); } } None } }
- Best case: O(1) - target is first element
- Worst case: O(n) - target not in array (must check all)
- Average case: O(n) - on average, check half the array
Usually we care most about worst case!
Complexity of Rust Operations
Vec operations: What's the complexity?
Let's think about standard Vec operations:
| Operation | Big O | Why |
|---|---|---|
vec[i] (indexing) | O(1) | Direct memory access |
vec.push(x) | O(1)* | Usually just increment (amortized*) |
vec.pop() | O(1) | Just decrement |
vec.insert(0, x) | O(n) | Must shift all elements |
vec.remove(i) | O(n) | Must shift elements after i |
vec.contains(&x) | O(n) | Must check each element |
How Vec.push() is clever
Problem: Vec has fixed capacity. What if it fills up?
Solution: When full, allocate double the space and copy everything over.
Example growth: capacity goes 4 -> 8 -> 16 -> 32 -> 64...
Cost analysis:
- Most pushes: O(1) - just add to end
- Occasional push: O(n) - must copy everything
- Amortized over many operations: O(1)!
Example: Implementing a simple dynamic array
Here's a simplified version showing the core idea:
struct SimpleVec { data: Vec<i32>, len: usize, capacity: usize, } impl SimpleVec { fn new() -> Self { SimpleVec { data: Vec::new(), len: 0, capacity: 0, } } fn push(&mut self, value: i32) { // Check if we need to grow if self.len == self.capacity { // Double capacity (or start with 4) let new_capacity = if self.capacity == 0 { 4 } else { self.capacity * 2 }; // Allocate new space and copy let mut new_data = Vec::with_capacity(new_capacity); for i in 0..self.len { new_data.push(self.data[i]); } self.data = new_data; self.capacity = new_capacity; println!("Resized! New capacity: {}", new_capacity); } // Add the new element self.data.push(value); self.len += 1; } } fn main() { let mut v = SimpleVec::new(); for i in 0..10 { println!("Pushing {}", i); v.push(i); } }
What you'll see:
Pushing 0
Resized! New capacity: 4
Pushing 1
Pushing 2
Pushing 3
Pushing 4
Resized! New capacity: 8
Pushing 5
...
Key insight: Most pushes don't resize. The occasional expensive resize is amortized across many cheap pushes!
Bonus: Why "Big-O"? The notation family
You might wonder: Is there a "little-o"? Why "Big"?
Big-O is part of a family of asymptotic notations:
Big-O (O): Upper bound - "at most this fast"
- Both O(n) and O(n^2) algorithms are O(n³)
- Most common - used for worst-case analysis
Big-Theta (Θ): Tight bound - "exactly this fast"
- More precise than Big-O
Big-Omega (Ω): Lower bound - "at least this fast"
- Eg. Any sorting algorithm is Ω(n) because you must look at all elements
- Used for best-case or impossibility results
Little-o (o): Strict upper bound - "strictly slower than"
- Example: n is o(n^2), but n is not o(n)
- Rarely used in practice
When you'll see the others:
- Θ: Advanced algorithms courses, research papers
- Ω: Proving lower bounds, impossibility results
- o: Theoretical CS, mathematical proofs
Bonus - P vs NP and computational complexity
What is P?
P = Problems solvable in Polynomial time
Polynomial time means O(n^k) for some constant k:
- O(n), O(n^2), O(n^3), O(n^10) are all polynomial
- O(2^n), O(n!), O(n^n) are NOT polynomial
Examples of P problems:
- Sorting: O(n log n)
- Finding max: O(n)
- Matrix multiplication (in the activity!)
- Shortest path (Dijkstra): O(E log V)
Key idea: Problems in P are considered "efficiently solvable"
What is NP?
NP = Nondeterministic Polynomial time
Definition: Problems where:
- Solutions can be verified in polynomial time
- But finding solutions might be harder
Example: Sudoku
- Verifying a solution: O(n^2) - just check rows, columns, boxes
- Finding a solution: Unknown - might need to try many possibilities
All P problems are in NP:
- If you can solve it fast, you can verify it fast too
- P is a subset of NP
The million-dollar question: P vs NP
Question: Does P = NP?
In other words: If we can quickly verify a solution, can we quickly find it too?
Most believe: P != NP (there are problems where verifying is easier than solving)
Why it matters:
- If P = NP: Many "hard" problems become easy (cryptography breaks!)
- If P != NP: Some problems are fundamentally hard
Prize: Solve this and win $1 million (Clay Mathematics Institute)
NP-complete problems
NP-Complete: The "hardest" problems in NP
Examples:
- Traveling Salesman Problem (TSP)
- Boolean satisfiability (SAT)
- Knapsack problem
- Graph coloring
- Sudoku solving
Special property: If you can solve ANY NP-complete problem in polynomial time, then P = NP!
Why should you care?
In practice:
- Recognize when a problem is NP-complete
- Don't waste time looking for fast exact solutions
- Use approximations or heuristics instead
Example:
- Finding THE best route (TSP): NP-complete, use approximations
- Finding A good route (Dijkstra): P, can solve exactly
Remember: Not all hard-looking problems are NP-complete!
- Some can be solved efficiently with clever algorithms
- Learning algorithms helps you recognize which is which
Complexity cheat sheet
Fast to Slow:
- O(1) - Instant, no matter the size
- O(log n) - Doubles the size, adds one step
- O(n) - Proportional to size
- O(n log n) - The best we can do for sorting
- O(n^2) - Nested loops, gets bad quickly
- O(2^n) - Explodes! Avoid if possible
Remember: The difference between O(n) and O(n^2) can be seconds vs. hours!
Activity Time (on paper, then gradescope)
Lecture 32 - Sorting Algorithms
Logistics
- HW6 due Friday / HW7 released shortly after
- HW5 grades out soon, corrections regraded in < a week
Quick note - clarifying space complexity
Learning objectives
By the end of today, you should be able to:
- Describe how different sorting algorithms work (bubble, insertion, merge, quick)
- Analyze the time complexity of each sorting algorithm
- Explain the merge sort and quicksort algorithms in detail
Motivation: Why do we care about sorting?
Sorting is everywhere:
- Search results (Google, Amazon)
- Leaderboards and rankings
- File systems (sort by date, name, size)
- Finding median, percentiles
- Preparing data for efficient search
Many problems become easier with sorted data
Think-pair-share: What makes a sorting algorithm good?
Question: If you have two sorting algorithms with the same time-complexity, why might you prefer one to the other?
Bubble Sort: The simplest (and slowest!)
Idea: Repeatedly swap adjacent elements if they're in wrong order
Demo on the board
Algorithm:
- Compare arr[0] and arr[1], swap if needed
- Compare arr[1] and arr[2], swap if needed
- Continue to end of array
- Repeat until no swaps needed
Example: Sort [5, 2, 8, 1, 9]
Pass 1: [5,2,8,1,9] -> [2,5,8,1,9] -> [2,5,8,1,9] -> [2,5,1,8,9] -> [2,5,1,8,9]
Pass 2: [2,5,1,8,9] -> [2,1,5,8,9] -> [2,1,5,8,9]
Pass 3: [1,2,5,8,9] -> Done!
Bubble sort complexity
#![allow(unused)] fn main() { fn bubble_sort(arr: &mut [i32]) { let n = arr.len(); for i in 0..n { // Outer loop: n times for j in 0..n-i-1 { // Inner loop: ~n times (average) if arr[j] > arr[j+1] { arr.swap(j, j+1); // O(1) } } } } }
Analysis:
- Time complexity: O(n^2) - nested loops
- Space complexity: O(1) - sorts in place
- Stable: Yes - equal elements stay in order
- Best case: O(n) if already sorted (with optimization)
Verdict: Simple but too slow for large data!
Insertion Sort: Like sorting playing cards
Idea: Build sorted portion one element at a time
How you'd sort cards:
- Pick up first card - sorted!
- Pick up second card, insert in right place
- Pick up third card, insert in right place
- Continue...
Example: Sort [5, 2, 8, 1, 9]
[5] | 2, 8, 1, 9 Sorted portion: [5]
[2, 5] | 8, 1, 9 Insert 2: shift 5 right
[2, 5, 8] | 1, 9 Insert 8: already in place
[1, 2, 5, 8] | 9 Insert 1: shift everything
[1, 2, 5, 8, 9] Insert 9: done!
Insertion sort complexity
#![allow(unused)] fn main() { fn insertion_sort(arr: &mut [i32]) { for i in 1..arr.len() { // n-1 times let key = arr[i]; let mut j = i; while j > 0 && arr[j-1] > key { // Up to i times (worst case) arr[j] = arr[j-1]; j -= 1; } arr[j] = key; } } }
Analysis:
- Time complexity: O(n^2) worst case, O(n) best case
- Space complexity: O(1)
- Stable: Yes
- Adaptive: Fast on nearly-sorted data!
Verdict: Good for small or nearly-sorted arrays!
Mini-activity: The sound of sorting
We're going to watch a video comparing different sorting algorithms working on the same data.
Your task: Fill in this table as you watch. You'll see:
- Bubble Sort
- Insertion Sort
- Merge Sort
- Quick Sort
For each algorithm, note:
- What pattern/strategy do you see?
- How fast/slow does it seem?
- Any advantages or disadvantages you notice?
| Algorithm | What's the strategy? ........... | Speed | Pros/Cons |
|---|---|---|---|
| Selection Sort | |||
| Insertion Sort | |||
| Quick Sort | |||
| Merge Sort | |||
| Heap Sort | |||
| Radix Sort (LSD) | |||
| Radix Sort (MSD) | |||
| std::sort | |||
| std::stable_sort | |||
| Shell sort | |||
| Bubble sort | |||
| Cocktail shaker | |||
| Gnome sort | |||
| Bitonic sort | |||
| Bogo sort |
After watching: What patterns did you notice? Which algorithms seem most efficient?
Takeaways
- Practical algorithms: Quick, Merge, Heap (all O(n log n))
- Special cases: Insertion for nearly-sorted, Radix for integers
- Avoid: Bubble, Selection, Bogo
- Real world: Use language built-ins (introsort, timsort)
Divide-and-conquer for Mergesort
Key idea: Break problem into smaller subproblems, solve recursively, combine results
Merge Sort approach:
- Divide: Split array in half
- Conquer: Sort each half recursively
- Combine: Merge the two sorted halves
Base case: Array of size 1 is already sorted!
Merge sort example
Sort [38, 27, 43, 3, 9, 82, 10]
[38, 27, 43, 3, 9, 82, 10] Split
/ \
[38, 27, 43, 3] [9, 82, 10] Split again
/ \ / \
[38, 27] [43, 3] [9, 82] [10] Split again
/ \ / \ / \ |
[38] [27] [43] [3] [9] [82] [10] Base case - size 1!
Now merge back up:
[27, 38] [3, 43] [9, 82] [10] Merge pairs
[3, 27, 38, 43] [9, 10, 82] Merge pairs
[3, 9, 10, 27, 38, 43, 82] Final merge!
Merging example
Merge [2, 5, 8] and [1, 3, 9]
Left: [2, 5, 8] Right: [1, 3, 9] Result: []
^ ^
Compare 2 vs 1 -> take 1
Left: [2, 5, 8] Right: [1, 3, 9] Result: [1]
^ ^
Compare 2 vs 3 -> take 2
Left: [2, 5, 8] Right: [1, 3, 9] Result: [1, 2]
^ ^
Compare 5 vs 3 -> take 3
... continue until Result: [1, 2, 3, 5, 8, 9]
Time: One comparison per element added = O(n)
Merge sort: Full implementation (skippable)
#![allow(unused)] fn main() { fn merge(left: &[i32], right: &[i32]) -> Vec<i32> { let mut result = Vec::new(); let mut i = 0; let mut j = 0; // Compare elements from left and right, take smaller while i < left.len() && j < right.len() { if left[i] <= right[j] { result.push(left[i]); i += 1; } else { result.push(right[j]); j += 1; } } // Add remaining elements result.extend_from_slice(&left[i..]); result.extend_from_slice(&right[j..]); result } fn merge_sort(arr: &[i32]) -> Vec<i32> { // Base case if arr.len() <= 1 { return arr.to_vec(); } // Divide let mid = arr.len() / 2; let left = merge_sort(&arr[..mid]); // Recursive! let right = merge_sort(&arr[mid..]); // Recursive! // Conquer: merge sorted halves merge(&left, &right) } }
Merge sort complexity analysis
Time complexity:
- Each level of recursion processes all n elements: O(n)
- How many levels? log_2(n) - we halve the array each time
- Total: O(n log n)
Visual: Binary tree of recursive calls
n Level 0: n work
/ \
n/2 n/2 Level 1: n work total
/ \ / \
n/4 n/4 n/4 n/4 Level 2: n work total
...
Height = log n, each level = n work = O(n log n)
Space complexity: O(n) - need extra arrays for merging
Properties:
- Stable
- Predictable (always O(n log n))
- NOT in-place (higher space complexity)
Quicksort - another divide-and-conquer!
Idea: Pick a "pivot", partition array so:
- All elements < pivot are on the left
- All elements > pivot are on the right
- Recursively sort left and right portions
Difference from merge sort:
- Merge sort: Easy divide, hard combine
- Quicksort: Hard divide (partition), easy combine (nothing!)
Quicksort example
Sort [38, 27, 43, 3, 9, 82, 10] - pick last element as pivot
[38, 27, 43, 3, 9, 82, 10] Pivot = 10
Partition: move elements < 10 to left, > 10 to right
[3, 9, 10, 38, 27, 43, 82]
^
Left | Right
Recursively sort left: [3, 9]
Recursively sort right: [38, 27, 43, 82]
Continue until done!
The partition operation
Goal: Rearrange array so pivot is in correct position
High-level algorithm:
- Choose pivot (often last element)
- Scan array, putting small elements left, large elements right
- Put pivot in the middle
- Return pivot's final position
Example partition: Array [38, 27, 43, 3, 9, 82, 10], pivot = 10
Start: [38, 27, 43, 3, 9, 82, 10]
i p
Scan: 38 > 10, skip
27 > 10, skip
43 > 10, skip
3 < 10, found small element!
Swap: [3, 27, 43, 38, 9, 82, 10]
i p
Continue: 9 < 10, swap with 27
[3, 9, 43, 38, 27, 82, 10]
i p
All remaining > 10. Place pivot:
[3, 9, 10, 38, 27, 82, 43]
^
Pivot position = 2
Quicksort complexity
Time complexity:
- Best/Average case: O(n log n)
- Good pivot splits array roughly in half
- log n levels, n work per level
- Worst case: O(n^2)
- Bad pivot (smallest/largest every time)
- Happens when array already sorted and we pick first/last as pivot!
Space complexity: O(log n) - recursion stack
Properties:
- Not stable (elements can jump over equal elements)
- In-place (sorts in original array)
- Often fastest in practice
Improving quicksort: Choosing a better pivot
Problem: Always picking last element can lead to O(n^2)
Solutions:
- Random pivot: Pick random element (most common)
- Median-of-three: Take median of first, middle, last
- Median-of-medians: More complex, guarantees O(n log n)
In practice: Random pivot makes worst case extremely unlikely!
Rust's built-in sorting (For your reference)
You don't usually implement sorting from scratch!
#![allow(unused)] fn main() { let mut numbers = vec![5, 2, 8, 1, 9]; // Sort in place numbers.sort(); // Uses a hybrid algorithm (typically driftsort) println!("{:?}", numbers); // [1, 2, 5, 8, 9] // Sort with custom comparison numbers.sort_by(|a, b| b.cmp(a)); // Reverse order println!("{:?}", numbers); // [9, 8, 5, 2, 1] }
What Rust uses:
sort(): Stable sort, O(n log n), based on merge sortsort_unstable(): Faster, O(n log n), based on quicksort (egipnsort)
When to use which sort?
| Algorithm | When to use |
|---|---|
| Bubble/Insertion | Small arrays (< 50 items), nearly sorted data |
| Merge Sort | Need stable sort, predictable performance, external sorting (too big for memory) |
| Quicksort | General purpose, in-place sorting, average case matters more than worst |
Rust's sort() | Need stability, default choice |
Rust's sort_unstable() | Don't need stability, want maximum speed |
Rule of thumb: Use Rust's built-in sort() or sort_unstable() unless you have specific needs
Activity time!
Appendix - sorting custom types in Rust
#![allow(unused)] fn main() { #[derive(Debug)] struct Student { name: String, gpa: f64, } let mut students = vec![ Student { name: "Alice".to_string(), gpa: 3.8 }, Student { name: "Bob".to_string(), gpa: 3.9 }, Student { name: "Charlie".to_string(), gpa: 3.7 }, ]; // Sort by GPA students.sort_by(|a, b| a.gpa.partial_cmp(&b.gpa).unwrap()); // Or better NaN handling students.sort_by(|a, b| { a.gpa.partial_cmp(&b.gpa) .unwrap_or(std::cmp::Ordering::Equal) // Treat NaN as equal }); // Sort by name students.sort_by(|a, b| a.name.cmp(&b.name)); }
Lecture 33 - Linear data structures
Logistics
- HW6 due tonight, HW7 will be released this weekend
Learning objectives
By the end of today, you should be able to:
- Understand the LIFO (stack) and FIFO (queue) principles
- Identify when to use stacks vs. queues vs. deques
- Use Rust's
Vec,VecDequefor implementing these structures - Analyze the time complexity of operations on each structure
- Recognize real-world applications of these data structures
Motivation: Different access patterns
We've mostly used Vec<T> for resizable lists so far:
#![allow(unused)] fn main() { let mut v = vec![1, 2, 3, 4, 5]; v.push(6); // Add to end v.pop(); // Remove from end v[2]; // Access by index }
But what if we need:
- Add to one end and remove from the other? (Queue at a store)
- Only add/remove from the top? (Stack of plates)
- Efficiently add/remove from BOTH ends?
Today's question: What structures support these patterns efficiently?
What is a stack?
Think of: A stack of plates, stack of books, stack of variables in Rust
Operations:
- Push: Add item to the top
- Pop: Remove item from the top
- Peek/Top: Look at top item without removing
Key property: LIFO - Last thing you put in is the first thing you take out
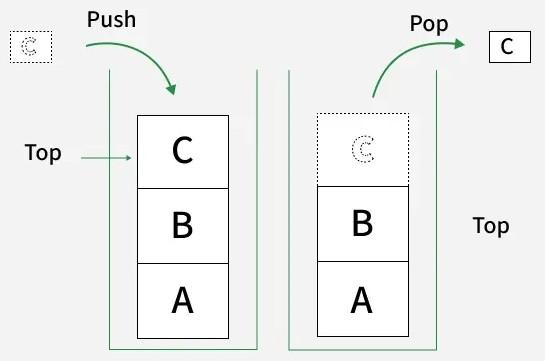
Stack memory vs stack data structure
Stack memory: Memory region where local variables live
Stack data structure: Abstract data type with LIFO behavior
- Can be implemented with any underlying storage
What they have in common: Both follow LIFO principle
- Function call stack: Last function called is first to return
- Stack data structure: Last item pushed is first to pop
Stack example: Reversing a word
fn reverse_string(s: &str) -> String { let mut stack = Vec::new(); // Push all characters onto stack for ch in s.chars() { stack.push(ch); } // Pop all characters off stack let mut result = String::new(); while let Some(ch) = stack.pop() { result.push(ch); } result } fn main() { println!("{}", reverse_string("hello")); }
Real-world stack applications
1. Function call stack:
#![allow(unused)] fn main() { fn a() { println!("A starts"); b(); println!("A ends"); } fn b() { println!("B starts"); c(); println!("B ends"); } fn c() { println!("C starts"); println!("C ends"); } // Output: // A starts // B starts // C starts // C ends // B ends // A ends }
Call stack: a() calls b() calls c() → c() finishes, b() finishes, a() finishes (LIFO!)
2. Undo/Redo:
- Each action pushed onto undo stack
- "Undo" pops from undo stack, pushes to redo stack
- "Redo" pops from redo stack, pushes to undo stack
3. Balancing parentheses:
- Push open brackets:
(,[,{ - Pop when you see close brackets:
),],} - Balanced if stack is empty at end!
Implementing a stack in Rust
Good news: Vec<T> already works perfectly as a stack
fn main() { let mut stack: Vec<i32> = Vec::new(); // Push operations stack.push(10); stack.push(20); stack.push(30); println!("Stack: {:?}", stack); // Pop operations if let Some(top) = stack.pop() { println!("Popped: {}", top); } println!("Stack: {:?}", stack); // Peek at top without removing if let Some(&top) = stack.last() { println!("Top: {}", top); } }
Stack complexity analysis
Using Vec<T> as a stack:
| Operation | Time Complexity | Why |
|---|---|---|
push(x) | O(1)* | Add to end (*amortized) |
pop() | O(1) | Remove from end |
last() (peek) | O(1) | Just read last element |
is_empty() | O(1) | Check if len == 0 |
Space: O(n) where n = number of elements
Perfect for stack! All operations are constant time.
Our next data structure: What is a queue?
Think of: Line at a store, print queue, airport security
Operations:
- Enqueue: Add item to the back
- Dequeue: Remove item from the front
- Front/Peek: Look at front item
Key property: FIFO - First thing in is the first thing out
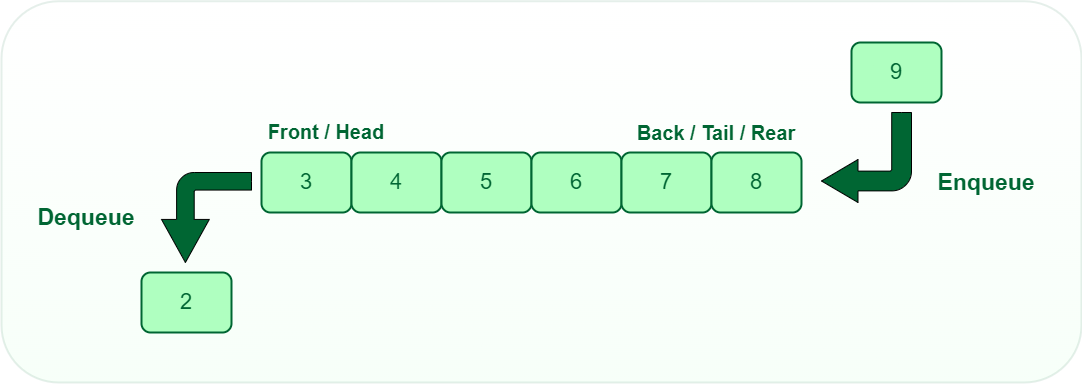
Real-world queue applications
Simulations:
- Customers arriving at a bank
- Cars at a traffic light
- Hospital emergency room triage
Task scheduling:
- Operating system process scheduling
- Printer job queues
Buffering:
- Keyboard input buffer
- Video/audio streaming
Breadth-First Search (BFS) (coming in Lecture 36!)
- Explore graph level by level
- Use queue to track which nodes to visit next
Problem: Using Vec as a queue is slow!
Naive approach:
#![allow(unused)] fn main() { let mut queue = Vec::new(); queue.push(1); // Add to back - O(1) queue.push(2); queue.push(3); let first = queue.remove(0); // Remove from front - O(n) }
Question: Why is removing the first value O(n)?
We need a better structure!
Enter VecDeque: Double-ended queue
VecDeque = "Vec Deque" = Double-ended queue (pronounced "vec-deck")
Key idea: Circular buffer - can efficiently add/remove from BOTH ends!
use std::collections::VecDeque; fn main() { let mut queue: VecDeque<i32> = VecDeque::new(); // Enqueue (add to back) queue.push_back(1); queue.push_back(2); queue.push_back(3); println!("Queue: {:?}", queue); // [1, 2, 3] // Dequeue (remove from front) if let Some(front) = queue.pop_front() { println!("Dequeued: {}", front); // 1 } println!("Queue: {:?}", queue); // [2, 3] }
How VecDeque works: Circular buffer / "growable ring buffer"
Conceptual model: Array with front and back pointers that wrap around
Capacity 8 buffer:
[_, _, 1, 2, 3, _, _, _]
^ ^
front back
After push_back(4):
[_, _, 1, 2, 3, 4, _, _]
^ ^
front back
After pop_front():
[_, _, _, 2, 3, 4, _, _]
^ ^
front back
After push_back(5), push_back(6):
[_, _, _, 2, 3, 4, 5, 6]
^ ^
back front
After push_back(7) - wraps around!
[7, _, _, 2, 3, 4, 5, 6]
^ ^
back front
After push_back(8):
[7, 8, _, 2, 3, 4, 5, 6]
^ ^
back front
Clever! Both ends can grow/shrink in O(1) time without shifting elements.
VecDeque complexity analysis
| Operation | Time Complexity | Why |
|---|---|---|
push_back(x) | O(1)* | Add to back |
push_front(x) | O(1)* | Add to front |
pop_back() | O(1) | Remove from back |
pop_front() | O(1) | Remove from front |
get(i) | O(1) | Random access (translated index) |
*Amortized - occasionally needs to resize
Perfect for queues! Efficient operations on both ends.
Think about: Vec vs VecDeque
When to use Vec:
- Only adding/removing from end (stack)
- Slightly faster access
When to use VecDeque:
- Adding/removing from front (queue)
- Adding/removing from both ends (deque)
- Don't mind slightly more complex memory layout
What is a deque?
Deque = Double-Ended Queue (pronounced "deck")
Operations: Can add/remove from BOTH front and back
push_front(x),push_back(x)pop_front(),pop_back()front(),back()to view
More general than stack or queue
- Use as stack: only use back operations
- Use as queue: push_back, pop_front
- Use as deque: use any combination
Rust doesn't have a separate queue type you just use VecDeques for both queues and deques
Deque applications
1. Undo/Redo with limits:
- Can remove oldest undo if stack gets too large
2. Palindrome checking:
- Compare elements from both ends moving inward
- Efficient with deque: pop_front and pop_back
3. Sliding window algorithms:
- Maintain elements in a window that slides across data
- Add to back, remove from front (queue)
- Sometimes remove from back too (deque)
Think-pair-share: Matching problems to structures
Which data structure would you use?
- Browser history (forward/back button)
- Drownloading a bunch of dropbox files
- Undo/redo keyboard shortcuts
- Recent files list
Another linear structure: Linked lists
So far we've seen:
Vec<T>- contiguous array, great for stack operationsVecDeque<T>- circular buffer, great for queue/deque operations
Another option: Linked lists
What is a linked list?
- Each element (node) contains data + pointer to next element
- Elements can be anywhere in memory (not contiguous)
- Singly linked: pointer to next only
- Doubly linked: pointers to both next and previous
Singly linked list:
[data|next] → [data|next] → [data|next] → None
Doubly linked list:
None ← [prev|data|next] ↔ [prev|data|next] ↔ [prev|data|next] → None
When to use:
- O(1) insertion/deletion in middle (if you have a pointer there)
- Don't need random access by index
- Memory fragmentation is okay
In Rust:
- Rust has
std::collections::LinkedList(doubly-linked) - Rarely used in practice! Why?
- Ownership makes linked lists complex to implement
- Losing get-by-index is a high price to pay
Bottom line: Know linked lists exist, but prefer Vec or VecDeque in Rust (and most other modern languages)!
Summary: Stacks vs queues vs deques
| Structure | Access Pattern | Rust Type | Use When |
|---|---|---|---|
| Stack | LIFO (Last In, First Out) | Vec<T> | Undo, function calls, DFS, parsing |
| Queue | FIFO (First In, First Out) | VecDeque<T> | Task scheduling, BFS, buffering |
| Deque | Both ends | VecDeque<T> | Sliding window, flexible use |
| Operation | Vec | VecDeque | LinkedList |
|---|---|---|---|
| Push back | O(1)* | O(1)* | O(1) |
| Pop back | O(1) | O(1) | O(1) |
| Push front | O(n) | O(1) | O(1) |
| Pop front | O(n) | O(1) | O(1) |
| Insert middle | O(n) | O(n) | O(1)** |
| Random access | O(1) | O(1) | O(n) |
*Amortized
**Given a pointer
Rule: If you need front operations, use VecDeque. Otherwise, Vec is simpler.
Comparison: Sequential vs Hash-based Collections
Sequential (Vec/VecDeque):
- Elements stored in order
- Access by position/index
Hash-based (HashMap/HashSet):
- Elements stored by hash value
- Access by key/value equality
Sequential vs Hash: Operation comparison
| Operation | Vec/VecDeque | HashMap/HashSet |
|---|---|---|
| Check contains | O(n) - must search | O(1)* - hash lookup |
| Remove/Insert element | O(n) - must shift | O(1)* |
| Access by index | O(1) - vec[i] | N/A |
| Iterate in consistent order | Yes | No (and slower) |
| Can Sort | Yes | No |
| Can Have Duplicates | Yes | No |
| Storage Complexity | 1x | ~1.5-2x |
| Type compatibility | All | Hashable (no floats) |
*Amortized, assuming good hash function
Activity time
See gradescope / our website / Rust Playground
Lecture 34 - Priority queues & binary heaps
Logistics
- HW6 is being graded
- HW7 was released (due Dec 5 - no corrections)
- Discussion tomorrow will go over HW7
- After Thanksgiving, 4 lectures + 1 review (Dec 10)
- Final on Dec 17, 12-2
Learning objectives
By the end of today, you should be able to:
- Explain what a priority queue is and how binary heaps implement them
- Analyze heap operations (insert, extract-max, peek) and their O(log n) complexity
- Use Rust's
BinaryHeapfor priority-based problems - Understand heapsort and why it achieves O(n log n)
Motivation: Not all tasks are equal
Regular queue (FIFO): First come, first served
But what if tasks have different importance?
Hospital emergency room:
- Patient A: Broken finger (can wait)
- Patient B: Heart attack (urgent!)
- Patient C: Flu symptoms (can wait)
Question: Should we serve in arrival order, or by urgency?
What is a priority queue?
Priority Queue: A data structure where each element has a priority
- Insert: Add element with a priority
- Extract-max (or extract-min): Remove element with highest (or lowest) priority
Not FIFO! Order depends on priority, not insertion time.
Example:
Insert (Task A, priority=5)
Insert (Task B, priority=10)
Insert (Task C, priority=3)
Extract-max -> Task B (priority 10)
Extract-max -> Task A (priority 5)
Extract-max -> Task C (priority 3)
Naive implementations
Approach 1: Unsorted Vec
- Insert: O(1) - just push
- Extract-max: O(n) - must scan all elements
Approach 2: Sorted Vec
- Insert: O(n) - must find position and shift
- Extract-max: O(1) - just pop last element
Can we do better? Yes! O(log n) for both operations using a binary heap!
What is a binary heap?
Trees
A Root (top node, no parent)
/ \
B C Children of A, Parents of D/E/F
/ / \
D E F Leaves (no children)
More definitions
- Height of a tree - how many "rows" or generations
- Binary tree - at most 2 children per parent
- A complete binary tree - all levels filled except possibly the last, which fills left-to-right
- A binary heap is a complete binary tree that satisfies the heap property:
- Parent >= both children everywhere
- A binary heap is a complete binary tree that satisfies the heap property:
- A complete binary tree - all levels filled except possibly the last, which fills left-to-right
Today we'll focus on max-heaps (Rust's BinaryHeap is a max-heap)
Important: Two different "heaps"!
Just like with "stack", "heap" means TWO completely different things:
Heap memory:
- Region of memory where dynamically allocated data lives
String,Vec,Boxstore their data on the heap- Accessed via pointers from the stack
- Memory management concept
Heap data structure (today):
- Binary tree with the heap property
- Used to implement priority queues
- Has nothing to do with memory layout!
Same word, completely different concepts! Context tells you which one.
Example: Max-heap
42 Root is largest
/ \
30 25 Parents >= children
/ \ / \
10 20 15 8
/
5
Parent >= children everywhere:
42 >= 30, 25
30 >= 10, 20
25 >= 15, 8
10 >= 5
Complete binary tree (all levels filled except the last, which is filled from the left)
Not a heap:
20 Violates heap property!
/ \
30 25 30 > 20 (parent)
Complete binary tree?
Complete: All levels filled except possibly the last, which fills left to right
Complete (valid heap structure):
42
/ \
30 25
/ \ /
10 20 15 Last level fills left to right
Not complete:
42
/ \
30 25
\ /
20 15 Gap on left!
Why complete? Allows efficient array representation!
A clever trick for array representation
Store heap in an array, level by level:
Tree:
42
/ \
30 25
/ \ / \
10 20 15 8
Array: [42, 30, 25, 10, 20, 15, 8]
Index: 0 1 2 3 4 5 6
Parent-child relationships:
- Parent of node at index
i:(i - 1) / 2 - Left child of node at index
i:2*i + 1 - Right child of node at index
i:2*i + 2
Example:
- Node at index 1 (30): parent = (1-1)/2 = 0 (42)
- Node at index 0 (42): left child = 2*0+1 = 1 (30)
- Node at index 0 (42): right child = 2*0+2 = 2 (25)
No pointers needed! Just arithmetic
Practice question
Array: [50, 40, 35, 25, 30, 30, 15]
Questions:
- What are the children of the element at index 1 (value 40)?
- What is the parent of the element at index 4 (value 30)?
- Is this a max heap?
Heap Operation 1: Insert (push) (TC 12:35)
Goal: Add new element while maintaining heap property
Algorithm:
- Add element to the end (bottom-right of tree)
- "Bubble up" (or "sift up"): Swap with parent if larger
- Repeat until heap property restored
Example: Insert 35 into heap [42, 30, 25, 10, 20, 15, 8]
Step 0: Existing heap
42
/ \
30 25
/ \ / \
10 20 15 8
Step 1: Add to end
42
/ \
30 25
/ \ / \
10 20 15 8
/
35
Step 2: 35 > parent (10), swap
42
/ \
30 25
/ \ / \
35 20 15 8
/
10
Step 3: 35 > parent (30), swap
42
/ \
35 25
/ \ / \
30 20 15 8
/
10
Step 4: 35 < parent (42), done!
Array: [42, 35, 25, 30, 20, 15, 8, 10]
Time complexity: O(log n) - at most height of tree (log n levels)
Operation 2: Extract-max (pop)
Goal: Remove root (max element) while maintaining heap property
Algorithm:
- Replace root with last element
- "Bubble down" (or "sift down"): Swap with larger child if smaller
- Repeat until heap property restored
Example: Extract-max from [42, 35, 25, 30, 20, 15, 8, 10]
Step 0: Start here:
42
/ \
35 25
/ \ / \
30 20 15 8
/
10
Step 1: Remove root (42), replace with last element (10)
10
/ \
35 25
/ \ / \
30 20 15 8
Step 2: 10 < both children (35, 25), swap with larger (35)
35
/ \
10 25
/ \ / \
30 20 15 8
Step 3: 10 < both children (30, 20), swap with larger (30)
35
/ \
30 25
/ \ / \
10 20 15 8
Step 4: 10 has no children, done!
Array: [35, 30, 25, 10, 20, 15, 8]
Time complexity: O(log n) - at most height of tree
Operation 3: Heapify
Goal: Creating a heap from an array
Naive approach: Insert n elements one by one
- Each insert is O(log n)
- Total: O(n log n)
Here's a better idea:
- Start with a complete binary heap, unsorted
- Starting from the second-to-last row, "sift down"
Total work = n/2 * 0 + n/4 * 1 + n/8 * 2 + n/16 * 3 + ...
= n * (1/4 + 2/8 + 3/16 + 4/32 + ...)
= n
= O(n)
Why this is faster: We do less work on most nodes because we start from the bottom where most nodes live!
Rust's BinaryHeap::from(vec) uses this O(n) algorithm internally.
Complexity summary
| Operation | Time Complexity | Why |
|---|---|---|
| Insert (push) | O(log n) | Bubble up at most log n levels |
| Extract-max (pop) | O(log n) | Bubble down at most log n levels |
| Peek (top) | O(1) | Just read first element |
| Build heap (naive) | O(n log n) | Insert n times |
| Build heap (heapify) | O(n) | See the last slide! |
Heapsort: Why heaps make a great sorting algorithm
Key insight: A max-heap gives us elements in descending order when we repeatedly pop!
Heapsort algorithm:
- Build a heap from the array - O(n) time with special algorithm
- Repeatedly extract max and place at end - O(n log n) time
Total complexity: O(n log n)
Example:
#![allow(unused)] fn main() { fn heapsort(mut nums: Vec<i32>) -> Vec<i32> { let mut heap = BinaryHeap::from(nums); // Build heap: O(n) let mut sorted = Vec::new(); loop { // n times, each O(log n) match heap.pop() { Some(max) => sorted.push(max), None => break, } } sorted.reverse(); // We got descending, reverse for ascending sorted } }
Total: O(n) + O(n log n) + O(n) = O(n log n)
Using BinaryHeap in Rust
Good news: Rust provides BinaryHeap<T> in the standard library!
We can use debug printing to see the array view:
use std::collections::BinaryHeap; fn main() { let mut heap = BinaryHeap::new(); // Insert elements heap.push(10); heap.push(30); heap.push(20); heap.push(5); println!("Heap: {:?}", heap); // Order not guaranteed println!("Max: {:?}", heap.peek()); // Extract max elements loop { match heap.pop() { Some(max) => println!("Popped: {}", max), None => break, } } }
Application Analysis 1: Top K elements (TC 12:45)
Problem: Find the k largest elements in a list
use std::collections::BinaryHeap; fn top_k(nums: Vec<i32>, k: usize) -> Vec<i32> { let mut heap = BinaryHeap::from(nums); // O(n) let mut result = Vec::new(); for _ in 0..k { // k times match heap.pop() { Some(max) => result.push(max), // O (log n) _ => {}, }; } result } fn main() { let nums = vec![3, 1, 4, 1, 5, 9, 2, 6]; let top_3 = top_k(nums, 3); println!("Top 3: {:?}", top_3); }
Complexity: O(n + k log n) = O(n) for small k
Application Analysis 2: Merge K sorted lists
Problem: You have K sorted lists, merge into one sorted list
List 1: [1, 4, 7]
List 2: [2, 5, 8]
List 3: [3, 6, 9]
Result: [1, 2, 3, 4, 5, 6, 7, 8, 9]
Algorithm with min-heap:
- Put first element of each list in min-heap (with list index)
- Extract min, add next element from that list
- Repeat until heap empty
Complexity: O(N log K) where N = total elements, K = number of lists
Much better than repeatedly merging pairs: O(NK)!
Question: Why don't we use this for MergeSort?
Application Analysis 3: Running median
Demo at the board
Key takeaways
- Priority Queue: Extract elements by priority, not insertion order
- Binary Heap: Complete binary tree with heap property (parent ≥ children)
- Array representation: Parent at
(i-1)/2, children at2i+1and2i+2 - Operations: Insert and extract-max both O(log n)
- Rust's BinaryHeap: Max-heap, use
Reversefor min-heap (see appendix) - Applications: Top K, task scheduling, graph algorithms
| Need | Use |
|---|---|
| Pop by priority | BinaryHeap |
| Pop oldest first | Queue (VecDeque) |
| Pop newest first | Stack (Vec) |
Binary Heap (Implementation):
42 Max at root
/ \
30 25 All parents >= children
/ \ / \
10 20 15 8
Array: [42, 30, 25, 10, 20, 15, 8]
Operations: O(log n) insert/extract, O(1) peek
Activity time!
Joey swaps in.
Appendix: Implementing Ord to define priority
use std::collections::BinaryHeap; use std::cmp::Ordering; #[derive(Eq, PartialEq)] struct Task { name: String, priority: u32, } impl Ord for Task { fn cmp(&self, other: &Self) -> Ordering { self.priority.cmp(&other.priority) } } impl PartialOrd for Task { fn partial_cmp(&self, other: &Self) -> Option<Ordering> { Some(self.cmp(other)) } } fn main() { let mut tasks = BinaryHeap::new(); tasks.push(Task { name: "Low priority".to_string(), priority: 1 }); tasks.push(Task { name: "High priority".to_string(), priority: 10 }); tasks.push(Task { name: "Medium priority".to_string(), priority: 5 }); while let Some(task) = tasks.pop() { println!("{} (priority {})", task.name, task.priority); } // Output: // High priority (priority 10) // Medium priority (priority 5) // Low priority (priority 1) }
Appendix: Min-heap using Reverse
Problem: Rust's BinaryHeap is max-heap, but we want min-heap
Solution: Use Reverse wrapper to flip comparisons
use std::collections::BinaryHeap; use std::cmp::Reverse; fn main() { let mut min_heap = BinaryHeap::new(); // Wrap values in Reverse min_heap.push(Reverse(10)); min_heap.push(Reverse(30)); min_heap.push(Reverse(20)); min_heap.push(Reverse(5)); // Extract minimum elements while let Some(Reverse(min)) = min_heap.pop() { println!("Popped: {}", min); } // Output: 5, 10, 20, 30 (ascending!) }
Reverse flips the ordering: Smallest is now "largest" in heap
Lecture 35 - Binary search trees
Logistics
- HW6 has been graded, corrections due in a week (Dec 8)
- HW7 due Friday Dec 5 (no corrections)
- Discussion tomorrow will go over data structures so far
Learning objectives
By the end of today, you should be able to:
- Explain what makes a binary search tree (BST) special
- Analyze time complexity of BST operations
- Trace BST operations (search, insert, delete)
- Recognize when BSTs are useful vs other data structures
- Understand the impact of balance on BST performance
Quick review: Tree basics
A Root (top node, no parent)
/ \
B C Children of A, Parents of D/E/F
/ / \
D E F Leaves (no children)
Key terms:
- Root, parent, child, leaf
- Height: longest path from root to leaf
- Depth: distance from root to a node
- Binary tree: at most 2 children per node
Last lecture (L34): Binary heaps used complete binary trees for priority queues
Today: Binary Search Trees - use trees for fast search
Types of binary trees
Full binary tree: Every node has 0 or 2 children (no nodes with 1 child)
5
/ \
3 8
/ \
1 4
Complete binary tree: All levels filled except possibly last, which fills left to right
5
/ \
3 8
/
1
Perfect binary tree: All internal nodes have 2 children, all leaves at same depth
5
/ \
3 8
/ \ / \
1 4 7 9
The BST (binary search tree) property
Binary Search Tree: A binary tree with a special ordering property:
For every node:
- All values in left subtree are < node value
- All values in right subtree are > node value
Example BST:
8
/ \
3 10
/ \ \
1 6 14
/ \ /
4 7 13
Check:
- 8: left subtree (3,1,6,4,7) all < 8, right subtree (10,14,13) all > 8
- 3: left subtree (1) < 3, right subtree (6,4,7) > 3
- And so on...
Not a BST:
8
/ \
3 10
/ \
1 12 b/c 12 > 8, shouldn't be in left subtree!
Why is this useful?
The BST property enables binary search!
Search for 6:
8 Compare with 8: 6 < 8, go left
/ \
3 10 Compare with 3: 6 > 3, go right
/ \ \
1 6 14 Compare with 6: found it!
/ \ /
4 7 13
Time complexity: O(height) - at most one comparison per level
If tree is balanced: height = O(log n), so search is O(log n)!
Key difference: BST vs Binary Heap representation
Binary Heap (L34): Complete binary tree
42
/ \
30 25
/ \ /
10 20 15
Array: [42, 30, 25, 10, 20, 15]
Easy arithmetic to find parent/children!
BST: NOT necessarily complete - can have gaps
8
/ \
3 10
/ \
1 14
/
13
Can't use an array! Need pointers/references
Why this matters:
- Heap: Store in
Vec, use index arithmetic, great cache locality - BST: Need struct with pointers to left/right children, recursive structure
#![allow(unused)] fn main() { // BST node representation (conceptual) struct Node { value: i32, left: Option<Box<Node>>, // Pointer to left child right: Option<Box<Node>>, // Pointer to right child } }
BST operations are naturally recursive (traverse left or right subtree)
BST vs sorted array
Search in sorted array: Binary search is also O(log n)
So why use BST?
| Operation | Sorted Array | Balanced BST |
|---|---|---|
| Search | O(log n) | O(log n) |
| Insert | O(n) - must shift elements | O(log n) |
| Delete | O(n) - must shift elements | O(log n) |
| Find min/max | O(1) | O(log n) - but still fast! |
BST wins when you need frequent insertions/deletions!
Think/Pair/Share: Is this a BST?
Tree 1: Tree 2: Tree 3:
5 5 5
/ \ / \ / \
3 7 2 8 3 7
/ \ / \ / \
1 4 1 3 4 6
BST Operation 1: Search
Algorithm:
- Start at root
- If value equals current node, found it!
- If value < current node, search left subtree
- If value > current node, search right subtree
- If reach Empty, value not in tree
Example: Search for 6 in BST
8 6 < 8, go left
/ \
3 10 6 > 3, go right
/ \ \
1 6 14 6 == 6, found!
/ \ /
4 7 13
Time complexity: O(height) = O(log n) for balanced tree
Operation 2: Insert
Algorithm:
- If tree is empty, create new node
- If value < current node, insert into left subtree
- If value > current node, insert into right subtree
- (If value equals current, either skip or allow duplicates)
Example: Insert 5 into BST
Original: After insert 5:
8 8
/ \ / \
3 10 3 10
/ \ \ / \ \
1 6 14 1 6 14
/ \ / / \ /
4 7 13 4 7 13
\
5
Steps:
1. 5 < 8, go left
2. 5 > 3, go right
3. 5 < 6, go left
4. 5 > 4, go right
5. Right of 4 is empty, insert 5 there!
Time complexity: O(height) = O(log n) for balanced tree
Operation 3: Find min/max
Finding minimum: Keep going left until you can't
8
/ \
3 10 min is leftmost node
/ \ \
1 6 14 min is 1!
/ \ /
4 7 13
Finding maximum: Keep going right until you can't
Max is rightmost node = 14
Time complexity: O(height)
Operation 4: Delete (the tricky one!)
Three cases:
Case 1: Node has no children
- Just remove it!
Delete 13:
8 8
/ \ / \
3 10 3 10
/ / \ / / \
1 6 14 -> 1 6 14
/ /
13 (removed)
Case 2: Node has one child
- Replace node with its child (with anything below it)
Delete 10:
7 7
/ \ / \
3 10 3 9
/ -> /
9 8
/
8
Case 3: Node has two children (hard!)
- Find in-order successor (smallest value in right subtree)
- ie go right, then left, left, left...
- Replace node's value with successor's value
- Delete successor from right subtree
Delete 3:
8 8
/ \ / \
3 10 4 10
/ \ \ -> / \ \
1 6 14 1 6 14
/ \ / / \ /
4 7 13 (rem.) 7 13
Why? This ensures the BST property is maintained!
Time complexity: O(height) = O(log n) for balanced tree
Think/Pair/Share: Trace a deletion
Delete 8 from this BST:
8
/ \
3 10
/ \ \
1 6 14
/ \ /
4 7 13
BST performance and balance
Best case (balanced):
4
/ \
2 6 Height = 2
/ \ / \ O(log n) operations
1 3 5 7
Worst case (degenerate - like a linked list!):
1
\
2 Height = 6
\ O(n) operations
3
\
4
\
5
\
6
\
7
How does this happen? Insert sorted data: 1, 2, 3, 4, 5, 6, 7
Impact on performance
| Tree Type | Height | Search | Insert | Delete |
|---|---|---|---|---|
| Balanced | O(log n) | O(log n) | O(log n) | O(log n) |
| Degenerate | O(n) | O(n) | O(n) | O(n) |
With 1000 nodes:
- Balanced: ~10 operations
- Degenerate: ~1000 operations
Solution: Self-balancing trees
Problem: Ordinary BST can become unbalanced
Solutions (advanced topics, FYI):
- AVL trees: Maintain strict balance (height difference ≤ 1)
- Red-Black trees: Relax balance slightly for faster insertions
- B-trees: Nodes with many children, used in databases
Rust's BTreeMap and BTreeSet: Use B-trees for guaranteed O(log n) operations
For now: Understand that balance matters, real-world implementations maintain it
When to use BST?
Good for:
- Dynamic data (frequent insertions/deletions)
- Need to maintain sorted order
- Range queries (find all values between x and y)
- Fast search, insert, delete (when balanced)
Not ideal for:
- Mostly static data (use sorted array)
- Need constant-time operations (use hash map)
- Very small datasets (overhead not worth it)
Use BST when: You need both dynamic updates AND sorted order
Rust's BTree collections
BTreeSet - for unique values in sorted order:
use std::collections::BTreeSet; fn main() { let mut set = BTreeSet::new(); set.insert(5); set.insert(2); set.insert(8); set.insert(1); // Iterate in sorted order for val in &set { println!("{}", val); } // Search if set.contains(&5) { println!("Found 5"); } // Range query for val in set.range(2..=5) { println!("{}", val); } }
BTreeMap - for key-value pairs in sorted order:
use std::collections::BTreeMap; fn main() { let mut grades = BTreeMap::new(); grades.insert("Charlie", 85); grades.insert("Alice", 92); grades.insert("Bob", 88); // Iterate in sorted key order for (name, grade) in &grades { println!("{}: {}", name, grade); } // Lookup if let Some(&grade) = grades.get("Alice") { println!("Alice's grade: {}", grade); } // Range query by keys for (name, grade) in grades.range("B".."D") { println!("{}: {}", name, grade); } }
Guaranteed O(log n) for all operations!
Summary
Key takeaways
- Trees: Hierarchical data structures (root, children, leaves)
- Binary trees: At most 2 children per node
- BST property: Left < Root < Right (enables binary search)
- BST operations: Search, insert, delete all O(height)
- Balance matters: Balanced = O(log n), Unbalanced = O(n)
- Real implementations: Use self-balancing trees (BTreeMap, BTreeSet)
Tree structure comparison: All the trees we've seen
General Tree: Binary Tree: Complete Binary:
A 5 42
/ | \ / \ / \
B C D 3 8 30 25
/| /\ / \ /
E F 1 4 10 20 15
Any # children <=2 children <=2 children + filled left-right
Binary Heap: BST:
42 8
/ \ / \
30 25 3 10
/ \ / \ / \ \
10 20 15 8 1 5 14
Complete binary and Binary and
parent >= children left < root < right
Activity time (see below / on paper and reporting on gradescope)
Lecture 36 - Graph representation & traversals
Logistics
- HW7 due Friday Dec 5 (no corrections)
- HW6 still being graded
- Last three lectures: Graph algorithms
Learning objectives
By the end of today, you should be able to:
- Represent graphs using adjacency lists and adjacency matrices
- Explain BFS and DFS algorithms
- Analyze the time and space complexity of graph algorithms
- Recognize applications of BFS and DFS
What is a graph?
Graph: A collection of nodes (vertices) connected by edges
Unlike trees:
- No root
- Can have cycles
- Can have multiple paths between nodes
- Edges can be directed OR undirected
Graph terminology
Basic terms:
A --- B
| |
C --- D --- E
- Vertex/Node: A, B, C, D, E (the circles)
- Edge: Connection between vertices (the lines)
- Neighbors/Adjacent: B is adjacent to A and D
- Degree: Number of edges connected to vertex
- Degree of A = 2 (connected to B and C)
- Degree of D = 3 (connected to B, C, E)
- Path: Sequence of vertices connected by edges
- A → B → D → E is a path from A to E
- Cycle: Path that starts and ends at same vertex
- A → B → D → C → A is a cycle
Directed vs Undirected graphs
Undirected graph: Edges have no direction (two-way streets)
A --- B A can reach B, B can reach A
| |
C --- D
Directed graph (digraph): Edges have direction (one-way streets)
A --> B A can reach B, but B cannot reach A
^ |
| v
C <-- D C and D have two edges, one going each way
-->
Example: Twitter follows are directed (you can follow someone who doesn't follow back)
(If you're in 122, you've been seeing a lot of these with Markov Chains!)
When there are no cycles (paths back to a node once you leave) we call this a Directed Acyclic Graph or DAG
Weighted vs Unweighted graphs
Unweighted: All edges are equal
A --- B
Weighted: Edges have costs/weights
A --5-- B Distance, cost, time, etc.
Example: Road network with distances, flight routes with costs, Markov Chains with probabilities
Think-pair-share: Graph examples
Which of these are naturally modeled as
- Weighted/unweighted
- Directed/undirected
- Cyclic/acyclic
- Social network (Facebook, LinkedIn)
- Road map
- Course prerequisites
- Web pages with links
- Family tree
- Chess game states
Challenge: How to store a graph?
Need to answer:
- What vertices exist?
- Which vertices are connected?
- (For weighted graphs) What are the edge weights?
Two main approaches:
- Adjacency List
- Adjacency Matrix
Adjacency list
Idea: For each vertex, store a list of its neighbors
Example graph:
0 --- 1
| |
2 --- 3
Adjacency list representation:
0: [1, 2]
1: [0, 3]
2: [0, 3]
3: [1, 2]
In Rust (using Vec of Vecs):
fn main() { // Graph with 4 vertices (0, 1, 2, 3) let graph: Vec<Vec<usize>> = vec![ vec![1, 2], vec![0, 3], vec![0, 3], vec![1, 2], ]; // Check if edge exists: 0 -- 1? if graph[0].contains(&1) { println!("Edge 0-1 exists"); } // Iterate over neighbors of vertex 2 for &neighbor in &graph[2] { println!("2 is connected to {}", neighbor); } }
With HashMap (when vertices aren't 0..n):
use std::collections::HashMap; fn main() { let mut graph: HashMap<&str, Vec<&str>> = HashMap::new(); graph.insert("Alice", vec!["Bob", "Charlie"]); graph.insert("Bob", vec!["Alice", "David"]); graph.insert("Charlie", vec!["Alice", "David"]); graph.insert("David", vec!["Bob", "Charlie"]); // Neighbors of Alice if let Some(neighbors) = graph.get("Alice") { println!("Alice's friends: {:?}", neighbors); } }
Adjacency matrix
Idea: 2D array where matrix[i][j] = 1 if edge from i to j exists
(Yep, we're in "row-stochastic world" here... sorry)
Example graph (same as before):
0 --- 1
| |
2 --- 3
Adjacency matrix:
0 1 2 3
0 [0, 1, 1, 0] Row 0: edges from vertex 0
1 [1, 0, 0, 1] Row 1: edges from vertex 1
2 [1, 0, 0, 1] Row 2: edges from vertex 2
3 [0, 1, 1, 0] Row 3: edges from vertex 3
In Rust:
fn main() { // Graph with 4 vertices let graph: Vec<Vec<usize>> = vec![ vec![0, 1, 1, 0], vec![1, 0, 0, 1], vec![1, 0, 0, 1], vec![0, 1, 1, 0], ]; // Check if edge exists: 0 -- 1? if graph[0][1] == 1 { println!("Edge 0-1 exists"); } // Find all neighbors of vertex 2 for j in 0..graph[2].len() { if graph[2][j] == 1 { println!("2 is connected to {}", j); } } }
For weighted graphs: Store weight instead of 1, use 0 or ∞ for no edge
Adjacency list vs adjacency matrix
Graph with V vertices, E edges:
| Operation | Adjacency List | Adjacency Matrix |
|---|---|---|
| Space | O(V + E) | O(V^2) |
| Check if edge (u,v) exists | O(degree of u) | O(1) |
| Find all neighbors of u | O(degree of u) | O(V) |
| Add edge | O(1) | O(1) |
| Remove edge | O(degree of u) | O(1) |
Rule of thumb: Use adjacency list unless you have a good reason not to!
They are especially useful for sparse graphs - and most real-world graphs are sparse!
The challenge of exploring a graph
Given a graph and starting vertex, we want to visit all reachable vertices
Two main strategies:
- BFS: Explore level by level (breadth-first)
- DFS: Explore as far as possible, then backtrack (depth-first)
BFS vs DFS in ten seconds: https://www.youtube.com/shorts/L1vGm2_cPU0
BFS: The idea
Breadth-First Search: Explore vertices in order of their distance from start
- Like ripples in a pond
- Or the weird image that works for me, like pinching the graph at a point and "picking it up" and letting the rest fall down by gravity...
Example graph (before "picking up"):
E---C
\ \
\ A---B
\ / /
D---/
\
F
"Picked up" by A:
A
/ \
B C
\ / \
D E
\
F
BFS traversal starting at A:
Level 0: A
Level 1: B, C (neighbors of A)
Level 2: D, E (neighbors of B and C)
Level 3: F (neighbor of E)
BFS Algorithm
High-level:
- Start with source vertex in a queue
- Mark source as visited
- While queue not empty:
- Pop a vertex
- For each unvisited neighbor:
- Mark as visited
- Push onto the queue
Notice that: Queue ensures we explore level by level
BFS Example
Graph:
0 --- 1 --- 4
| |
2 --- 3
BFS from vertex 0:
Step 1: Queue = [0], Visited = {0}
Pop 0, Push neighbors 1, 2
Queue = [1, 2], Visited = {0, 1, 2}
Step 2: Pop 1, Push unvisited neighbors 3, 4
Queue = [2, 3, 4], Visited = {0, 1, 2, 3, 4}
Step 3: Pop 2, no new neighbors (0 and 3 already visited)
Queue = [3, 4], Visited = {0, 1, 2, 3, 4}
Step 4: Pop 3, no new neighbors
Queue = [4], Visited = {0, 1, 2, 3, 4}
Step 5: Pop 4, no new neighbors
Queue = [], Done!
Order visited: 0, 1, 2, 3, 4
BFS Implementation in Rust
#![allow(unused)] fn main() { use std::collections::{VecDeque, HashSet}; fn bfs(graph: &Vec<Vec<usize>>, start: usize) { let mut queue = VecDeque::new(); let mut visited = HashSet::new(); queue.push_back(start); visited.insert(start); while let Some(vertex) = queue.pop_front() { println!("Visiting: {}", vertex); for &neighbor in &graph[vertex] { if !visited.contains(&neighbor) { visited.insert(neighbor); queue.push_back(neighbor); } } } } }
Output: Visiting: 0, 1, 2, 3, 4
BFS Applications
1. Shortest path in unweighted graph
- BFS finds shortest path from source to all vertices!
- Distance = level in BFS tree
2. Connected components
- Run BFS from each unvisited vertex
- Each BFS finds one connected component
3. Bipartite testing
- Can graph be 2-colored? (vertices colored so no edge connects same color)
- Use BFS to assign colors
4. Social networks
- Find degrees of separation (Kevin Bacon number, Erdős number, Erdős-Bacon number...)
BFS Complexity
Time complexity:
- Visit each vertex once: O(V)
- Check each edge at most twice (once from each endpoint): O(E)
- Total: O(V + E)
Space complexity:
- Queue: O(V) in worst case
- Visited set: O(V)
- Total: O(V)
Overall linear in graph size
Depth-first search (DFS)
Depth-First Search: Explore as far as possible along each branch before backtracking
Like maze exploration - keep going until you hit a dead end, then backtrack
Example graph:
A
/ \
B C
| |
D F
|
E
Use a stack for this one! Explore deeply before exploring breadth
DFS vs BFS
BFS (Queue - FIFO):
0
/ \
1 2
/ \
3 4
Order: 0, 1, 2, 3, 4 (level by level)
DFS (Stack/Recursion - LIFO):
0
/ \
1 2
/ \
3 4
Order: 0, 1, 3, 4, 2 (go deep first)
DFS Algorithm
High-level
- Start with source vertex in a stack
- While stack not empty:
- Pop a vertex
- Mark as visited
- For each unvisited neighbor:
- Push onto the queue
Notice two differences from BFS:
- Stack instead of queue
- Mark as visited after pop instead of after push
DFS Example
Graph:
0 --- 1 --- 4
| |
2 --- 3
DFS from vertex 0:
Step 1: Stack = [0], Visited = {}
Pop 0, mark as visited, push neighbors 2, 1
Stack = [2, 1], Visited = {0}
Step 2: Pop 1, mark as visited, push unvisited neighbors 4, 3
Stack = [2, 4, 3], Visited = {0, 1}
Step 3: Pop 3, mark as visited, push unvisited neighbors 2
Stack = [2, 4, 2], Visited = {0, 1, 3}
Step 4: Pop 2, mark as visited (no new neighbors - 0 and 3 already visited)
Stack = [2, 4], Visited = {0, 1, 2, 3}
Step 5: Pop 2, already visited, skip
Stack = [4], Visited = {0, 1, 2, 3}
Step 6: Pop 4, mark as visited, no new neighbors
Stack = [], Done!
Order visited: 0, 1, 3, 2, 4
Different from BFS order!
DFS Implementation
#![allow(unused)] fn main() { use std::collections::{HashSet}; fn dfs_iterative(graph: &Vec<Vec<usize>>, start: usize) { let mut stack = vec![start]; let mut visited = HashSet::new(); while !stack.is_empty() { let vertex = stack.pop().unwrap(); if visited.contains(&vertex) { continue; } visited.insert(vertex); println!("Visiting: {}", vertex); for &neighbor in &graph[vertex] { if !visited.contains(&neighbor) { stack.push(neighbor); } } } } }
Note: Order might differ slightly from recursive version depending on how neighbors are added
DFS Applications
1. Pathfinding
- Find any path between two vertices
- Not necessarily shortest (unlike BFS)
2. Cycle detection
- If we encounter a visited vertex that's not the parent, there's a cycle
3. Topological sorting (next lecture!)
- Order vertices in directed acyclic graph
4. Solving puzzles
- Sudoku, N-queens (try solutions, backtrack if invalid)
DFS Complexity
Time complexity:
- Visit each vertex once: O(V)
- Explore each edge at most twice: O(E)
- Total: O(V + E)
Space complexity (recursive):
- Recursion stack: O(V) in worst case (if graph is a long chain)
- Visited set: O(V)
- Total: O(V)
Same as BFS!
Think about: BFS vs DFS
When to use BFS:
- Find shortest path (unweighted)
- Find closest/nearest items
- Level-order traversal
When to use DFS:
- Explore all paths
- Detect cycles
- Topological sort
- Solve mazes/puzzles (with backtracking)
Both work for: Connected components, reachability
Summary
BFS (Queue): DFS (Stack):
0 0
/ \ / \
1 2 1 2
/ \ / \
3 4 3 4
Visit: 0,1,2,3,4 Visit: 0,1,3,4,2
(breadth-first) (depth-first)
| Property | BFS | DFS |
|---|---|---|
| Data structure | Queue | Stack/Recursion |
| Time | O(V + E) | O(V + E) |
| Space | O(V) | O(V) |
| Shortest path | Yes | No |
| Memory | More (queue can be large) | Less (stack depth = path length) |
| Applications | Shortest path, level-order | Cycle detection, topological sort |
Activity time
See website / gradescope
Lecture 37 - Topological sort & minimum spanning trees
Logistics
- HW7 due tonight
- HW6 graded - corrections due in a week
- Monday is the last class with new material (shortest path algorithms)
- Tuesday discussion and Wednesday lecture will be review
- Final exam is 12pm-2 on Wed, 12/17
Learning objectives
We're covering two problems and three algorithms today -
Problems:
- Topological sorting
- Minimum spanning trees
Algorithms:
- Topological sorting using DFS
- Kruskal's for MST
- Prim's for MST
You'll learn:
- The motivations for each problem
- The high-level algorithm for each problem
- The time complexity of these algorithms
First, a formal definition of DAG
DAG = Directed Acyclic Graph
Directed: Edges have direction (one-way) Acyclic: No cycles (can't loop back to yourself)
Example DAG:
A → B → D
↓ ↓
C → E
Not a DAG (has cycle):
A → B → D
↑ ↓
C ← E
Why DAGs matter
DAGs model dependencies!
Real-world examples:
-
Course prerequisites
- DS110 must come before DS210
- Can't have circular prerequisites
-
Build systems
- File A depends on B and C
- Compile in correct order
-
Project scheduling
- Task B can't start until Task A finishes
-
Spreadsheet calculations
- Cell D1 = A1 + B1
- Calculate in dependency order
Topological sorting
Problem: Given a DAG, find an ordering of vertices such that for every edge u → v, u comes before v in the ordering.
Example: Course prerequisites
CS101 → CS201 → CS301
↓ ↓
CS102 → CS202
Valid topological orderings:
- CS101, CS102, CS201, CS202, CS301
- CS101, CS201, CS102, CS202, CS301
- CS101, CS102, CS202, CS201, CS301
This is only possible for DAGs!
- If there's a cycle, no valid ordering exists
Intuition: "What order should I do tasks that have dependencies?"
Topological sort examples
Graph (build dependencies):
libA → app
↓ ↑
libB
Meaning:
- app depends on libA and libB
- libB depends on libA
Topological order: libA, libB, app
- Build libA first (no dependencies)
- Then libB (depends on libA)
- Then app (depends on both)
Topological sort examples
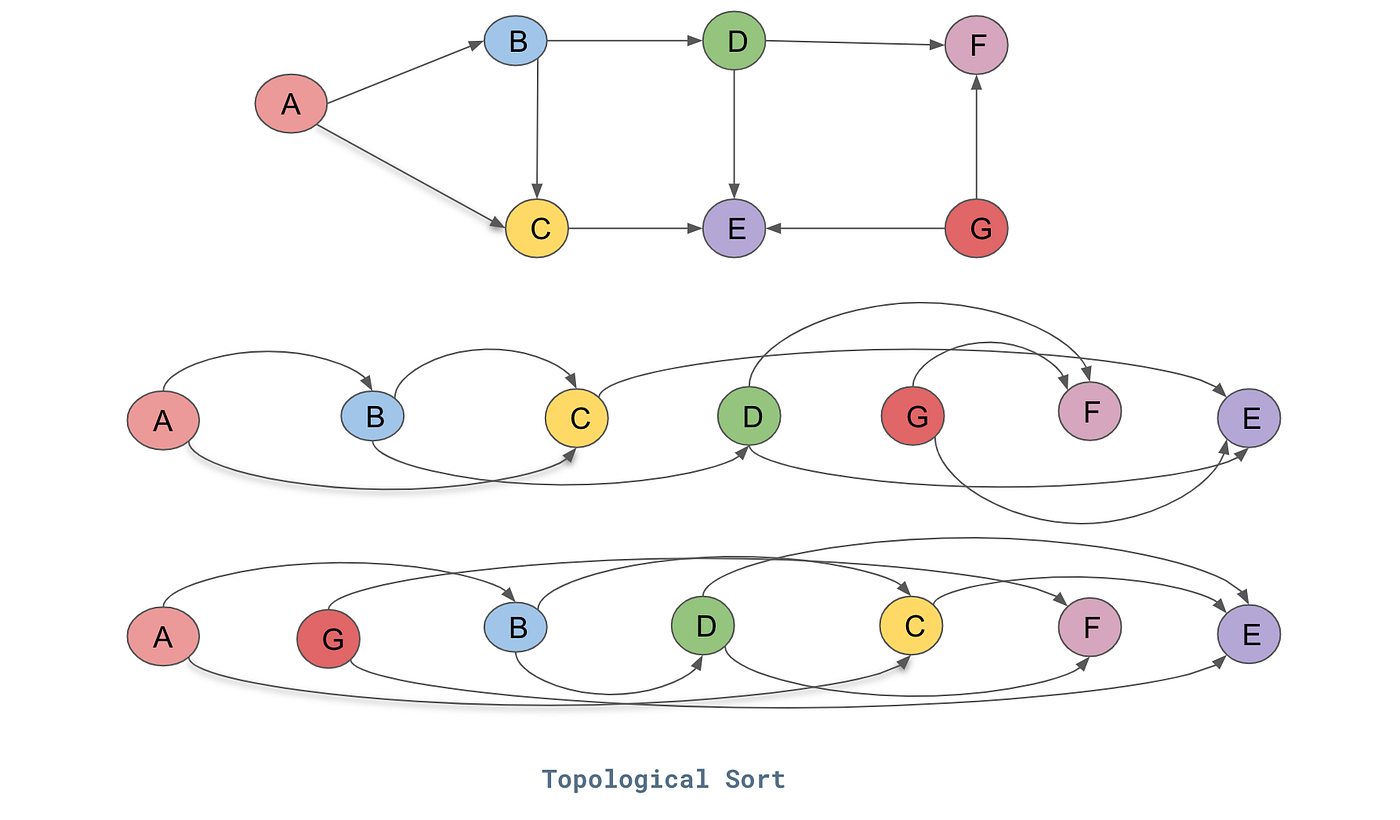
Algorithm: DFS-based topological sort
Main idea: Use DFS, add vertex to result AFTER exploring all descendants
Algorithm:
- Run DFS from each unvisited vertex
- When finishing a vertex (after visiting all descendants), add to result
- Reverse the result
Why reverse? We add vertices as we finish them (deepest first), but want dependencies first
Topological sort example trace
Graph:
A → B → D
↓ ↓
C → E
DFS from A:
Visit A:
Visit B:
Visit D:
D has no neighbors, finish D → add D to list [D]
Visit E:
E has no neighbors, finish E → add E to list [D, E]
Finish B → add B to list [D, E, B]
Visit C:
E already visited
Finish C → add C to list [D, E, B, C]
Finish A → add A to list [D, E, B, C, A]
Reverse: [A, C, B, E, D]
Check:
A → B: A comes before B
A → C: A comes before C
B → D: B comes before D
B → E: B comes before E
C → E: C comes before E
Implementation in Rust
use std::collections::HashSet; fn dfs_topo( graph: &Vec<Vec<usize>>, vertex: usize, visited: &mut HashSet<usize>, result: &mut Vec<usize> ) { visited.insert(vertex); for &neighbor in &graph[vertex] { if !visited.contains(&neighbor) { dfs_topo(graph, neighbor, visited, result); } } // Add to result AFTER visiting all descendants result.push(vertex); } fn topological_sort(graph: &Vec<Vec<usize>>) -> Vec<usize> { let mut visited = HashSet::new(); let mut result = Vec::new(); // Try starting from each unvisited vertex for vertex in 0..graph.len() { if !visited.contains(&vertex) { dfs_topo(graph, vertex, &mut visited, &mut result); } } // Reverse because we added in finish order result.reverse(); result } fn main() { // Graph: 0 → 1 → 3 // ↓ ↓ // 2 → 4 let graph = vec![ vec![1, 2], // 0 → 1, 2 vec![3, 4], // 1 → 3, 4 vec![4], // 2 → 4 vec![], // 3 → nothing vec![], // 4 → nothing ]; let order = topological_sort(&graph); println!("Topological order: {:?}", order); // Possible output: [0, 2, 1, 4, 3] or [0, 1, 2, 3, 4], etc. }
Detecting cycles with topological sort
What if graph has a cycle?
Modified algorithm: Track vertices in current DFS path
- If we visit a vertex already in current path, there's a cycle!
#![allow(unused)] fn main() { fn has_cycle_dfs( graph: &Vec<Vec<usize>>, vertex: usize, visited: &mut HashSet<usize>, in_path: &mut HashSet<usize> ) -> bool { visited.insert(vertex); in_path.insert(vertex); for &neighbor in &graph[vertex] { if in_path.contains(&neighbor) { return true; // Cycle detected! } if !visited.contains(&neighbor) { if has_cycle_dfs(graph, neighbor, visited, in_path) { return true; } } } in_path.remove(&vertex); // Done with this path false } }
Topological sort complexity
Time complexity:
- DFS visits each vertex once: O(V)
- DFS explores each edge once: O(E)
- Reversing result: O(V)
- Total: O(V + E)
Space complexity:
- Visited set: O(V)
- Result list: O(V)
- Recursion stack: O(V)
- Total: O(V)
Efficient! Same as regular DFS
Applications of topological sort
1. Task scheduling
- Schedule tasks respecting dependencies
- Critical path analysis
2. Build systems
- Compile files in correct order (Make, Cargo)
3. Package dependency resolution
- Install packages in order (npm, pip, cargo)
4. Spreadsheet evaluation
- Calculate cells in dependency order
Think-pair-share: Review quiz 1
Question 1: What is the time complexity of searching for a specific value in a balanced BST with n nodes?
- A) O(1)
- B) O(log n)
- C) O(n)
- D) O(n log n)
Question 2: Which data structure would be most efficient for implementing a priority queue?
- A) Vec
- B) VecDeque
- C) BinaryHeap
- D) HashMap
Question 3: In a max-heap, what is the relationship between a parent and its children?
- A) Parent < both children
- B) Parent > both children
- C) Parent = both children
- D) Parent < one child and > the other child
Minimum spanning trees: Connecting everything cheaply
Problem: Given a weighted, undirected graph, find a subset of edges that:
- Connects all vertices (spanning)
- Forms a tree (no cycles)
- Has minimum total weight
Example: Build road network connecting cities with minimum total cost
Spanning trees
A Spanning Tree is a subgraph that:
- Includes all vertices
- Is connected (can reach any vertex from any other)
- Has no cycles (is a tree)
- Has exactly V-1 edges (property of trees)
Example graph with 4 vertices:
Original graph (weights):
A --2-- B
| \ |
5 3 4
| \ |
C --1-- D
Possible spanning trees:
Tree 1: Tree 2: Tree 3:
A--2--B A--2--B A B
| | | | 3/ |
5 4 5 5 \ 4
| | | | |
C--1--D C--1--D C--1--D
Weight: 12 Weight: 8 Weight: 13
↑ MST!
Minimum spanning tree (MST)
MST: The spanning tree with minimum total edge weight
Properties:
- Not unique (multiple MSTs can exist with same weight)
- Always has V-1 edges
- Connects all vertices
- Total weight is minimized
Applications:
- Network design (minimize cable length)
- Approximation algorithms (TSP)
- Clustering (cut MST edges to create clusters)
Think about: How to find MST?
Greedy approaches:
- Start with cheapest edge, keep adding cheapest edge that doesn't create cycle?
- Start from a vertex, keep adding cheapest edge to new vertex?
Both work! These are Kruskal's and Prim's algorithms.
Kruskal's algorithm idea
Strategy: Add edges in order of increasing weight, skip edges that create cycles
High-level:
- Sort all edges by weight
- Start with empty graph (just vertices)
- For each edge (in order):
- If adding it doesn't create a cycle, add it
- Otherwise, skip it
- Stop when we have V-1 edges
Graph:
A --2-- B
| \ |
5 3 4
| \ |
C --1-- D
Edges sorted by weight: (C-D, 1), (A-B, 2), (A-D, 3), (B-D, 4), (A-C, 5)
Steps:
Step 1: Add (C-D, 1) - no cycle
C--1--D
Step 2: Add (A-B, 2) - no cycle
A--2--B
C--1--D
Step 3: Add (A-D, 3) - no cycle
A--2--B
|
3
|
C--1--D
Step 4: Skip (B-D, 4) - would create cycle A-B-D-A
Step 5: Skip (A-C, 5) - would create cycle A-D-C-A
Done! MST weight = 1 + 2 + 3 = 6
How to detect cycles efficiently?
Challenge: Need to quickly check if adding an edge creates a cycle
Solution: Union-Find (Disjoint Set Union)
Idea: Track which vertices are in the same connected component
- Find(v): Which component is v in?
- Union(u, v): Merge components containing u and v
- Cycle check: If u and v in same component, edge creates cycle!
Complexity: Near constant time
Kruskal's implementation (conceptual)
#![allow(unused)] fn main() { // Pseudocode - Union-Find implementation omitted for clarity fn kruskal(vertices: usize, edges: Vec<(usize, usize, i32)>) -> Vec<(usize, usize, i32)> { let mut mst = Vec::new(); let mut uf = UnionFind::new(vertices); // Sort edges by weight let mut edges = edges; edges.sort_by_key(|&(_, _, weight)| weight); for (u, v, weight) in edges { // If u and v not in same component, add edge if uf.find(u) != uf.find(v) { mst.push((u, v, weight)); uf.union(u, v); if mst.len() == vertices - 1 { break; // Have V-1 edges, done! } } } mst } }
Kruskal's complexity
Time complexity:
- Sort edges: O(E log E)
- Union-Find operations: O(E × a(V)) ≈ O(E) where a is inverse Ackermann (nearly constant)
- Total: O(E log E)
Space complexity:
- Union-Find structure: O(V)
- Edge list: O(E)
- Total: O(V + E)
Note: O(E log E) = O(E log V) since E ≤ V^2 → log E ≤ 2 log V
Prim's algorithm idea
Strategy: Grow MST from a starting vertex, always adding the cheapest edge to a new vertex
High-level:
- Start with arbitrary vertex in MST
- Repeat:
- Find the cheapest edge connecting MST to a non-MST vertex
- Add that edge and vertex to MST
- Stop when all vertices in MST
Greedy! Always expand MST with cheapest available edge.
Prim's example
Graph:
A --2-- B
| \ |
5 3 4
| \ |
C --1-- D
Start at A:
Step 1: MST = {A}
Edges from MST: (A-B, 2), (A-D, 3), (A-C, 5)
Add cheapest: (A-B, 2)
MST = {A, B}
Step 2: MST = {A, B}
Edges from MST: (A-D, 3), (B-D, 4), (A-C, 5)
Add cheapest: (A-D, 3)
MST = {A, B, D}
Step 3: MST = {A, B, D}
Edges from MST: (D-C, 1), (B-D, skip - both in MST), (A-C, 5)
Add cheapest: (D-C, 1)
MST = {A, B, D, C}
Done! All vertices in MST.
Total weight = 2 + 3 + 1 = 6
Prim's implementation strategy
Use a priority queue (min-heap)!
Algorithm:
- Start with arbitrary vertex, add its edges to priority queue
- While priority queue not empty:
- Extract minimum edge
- If it connects to new vertex:
- Add vertex to MST
- Add its edges to priority queue
- Continue until all vertices in MST
Similar to Dijkstra's (next lecture!), but choosing edges instead of paths
Prim's complexity
Time complexity:
- Each vertex added to MST once: O(V)
- Each edge considered once: O(E)
- Each edge added/removed from heap: O(log E) = O(log V)
- Total: O(E log V) with binary heap
Space complexity:
- Priority queue: O(E)
- MST tracking: O(V)
- Total: O(E)
Note: Can be improved to O(E + V log V) with Fibonacci heap (advanced!)
Think-pair-share: Review quiz 2
Question 4: Which data structure should you use if you need to frequently add/remove elements from both ends?
- A) Vec
- B) VecDeque
- C) LinkedList
- D) HashMap
Question 5: What is the difference between BFS and DFS traversal of a graph?
- A) BFS uses a queue, DFS uses a stack
- B) BFS uses a stack, DFS uses a queue
- C) BFS is always faster than DFS
- D) DFS always finds the shortest path
Question 6: In an adjacency list representation of a graph with V vertices and E edges, what is the space complexity?
- A) O(V)
- B) O(E)
- C) O(V + E)
- D) O(V²)
Kruskal vs Prim
| Property | Kruskal | Prim |
|---|---|---|
| Strategy | Add cheapest edge globally | Grow from starting vertex |
| Data structure | Union-Find | Priority Queue |
| Time | O(E log E) | O(E log V) |
| Works on | Disconnected graphs too | Connected graphs |
| Good for | Sparse graphs | Dense graphs |
Both produce correct MST! Choice is mostly implementation preference.
MST applications
1. Network design
- Minimize cable length connecting buildings
- Design low-cost communication networks
2. Approximation algorithms
- 2-approximation for TSP (traveling salesman)
3. Clustering
- Remove longest edges from MST to create clusters
4. Image segmentation
- Pixels as vertices, similarity as weights
Activity time
Lecture 38 - Shortest Paths
Logistics
- Last topic lecture of the semester!
- HW6 corrections due Friday (there are no HW7 corrections)
- Tuesday discussion and Wednesday lecture will be review
- Final exam is 12pm-2 on Wed, 12/17
Heads-up about the final
Exam draft as I have it now (subject to change):
Part 1: Rust Fundamentals Fill-ins (23 pts, 1 point per blank) Part 2: What Does This Do? (8 pts, 2 points each, mix of old and new) Part 3: Shell and Git Commands (12 pts, 2 points each) Part 4: Stack and Heap Diagram (10 points) Part 5: Hand-Coding Problems (18 points, 6 points each)
- 5.1 - Write a basic function (old content)
- 5.2 - Write a function with closures (new content)
- 5.3 - Write two tests (new content)
Part 6: Computational Complexity Analysis (12 points)
- 3x "What's the computational complexity of this code" - 2 points each
- A table of algorithms asking time complexity and key data structure - 6 points Part 7: Algorithms Tracing (~ 25 points, 5 problems with 5 points each)
- BST, max-heap, BFS/DFS, Topological sort and MST, Dijkstra's Part 8: Data Structures and Algorithms Fill-ins (21 pts, 1 point per blank)
So total:
- Old ~ 42%, New ~ 58%
Learning objectives
By the end of today, you should be able to:
- Explain how Dijkstra's algorithm solves the single-source shortest path problem
- Trace Dijkstra's algorithm by hand
- Analyze the time complexity of Dijkstra's algorithm
- Know Dijkstra's algorithm uses a priority queue
Motivation for the shortest path problem
Everyday problem: Find the fastest/shortest route from A to B
Examples:
- GPS navigation (minimize time or distance or cost)
- Network routing (minimize latency)
- Flight planning (minimize cost or time)
- Many, many others
Why BFS doesn't work for weighted graphs
BFS finds shortest path in UNWEIGHTED graphs
Example where BFS fails:
A --100-- B
| |
1 1
| |
C ---1--- D
BFS from A: visits B first (fewer edges)
Path A → B = 100
But better path exists:
Path A → C → D → B = 1 + 1 + 1 = 3
BFS considers number of edges, not total weight!
Think-pair-share: Shortest path intuition
Graph:
A
3/ \4
B C
3| 1/|3
| / |
D E
4| |2
F G
Question: What's the shortest path from A to F?
Dijkstra's algorithm - The idea
Dijkstra's Algorithm (1959): Greedy algorithm for finding shortest paths
Key idea: Repeatedly pick the closest unvisited vertex, update distances to its neighbors
Intuition: If you know the shortest way to get somewhere, you can use that to find shortest ways to places nearby
The algorithm (informal)
Maintain:
- Distance to each vertex (initially ∞, except source = 0)
- Visited set (vertices with finalized shortest distance)
- Priority queue of (vertex, distance) pairs
Repeat:
- Pick unvisited vertex with smallest distance
- Mark it as visited (distance is now finalized)
- Update distances to neighbors: if going through this vertex is shorter, update!
Continue until all vertices visited
Visual intuition: Expanding frontier
Like water spreading from source:
https://www.youtube.com/shorts/X7EMDd82ZmI
Dijkstra systematically explores by increasing distance
Example: Dijkstra's algorithm trace
Graph:
A
2/ \5
B C
1| 1/|3
| / |
D E
Find shortest paths from A:
Initial:
Distances: A=0, B=∞, C=∞, D=∞, E=∞
Visited: {}
Priority Queue: [(A, 0)]
Step 1: Process A (distance 0)
Visit A
Update neighbors:
A → B: 0 + 2 = 2 (update B from ∞ to 2)
A → C: 0 + 5 = 5 (update C from ∞ to 5)
Distances: A=0, B=2, C=5, D=∞, E=∞
Visited: {A}
Priority Queue: [(B, 2), (C, 5)]
Step 2: Process B (distance 2)
Visit B
Update neighbors:
B → D: 2 + 1 = 3 (update D from ∞ to 3)
Distances: A=0, B=2, C=5, D=3, E=∞
Visited: {A, B}
Priority Queue: [(D, 3), (C, 5)]
Step 3: Process D (distance 3)
Visit D
Update neighbors:
D → C: 3 + 1 = 4 < 5 (update C from 5 to 4!)
Distances: A=0, B=2, C=4, D=3, E=∞
Visited: {A, B, D}
Priority Queue: [(C, 4), (C, 5-old)] # Will extract 4
Step 4: Process C (distance 4)
Visit C
Update neighbors:
C → E: 4 + 3 = 7 (update E from ∞ to 7)
Distances: A=0, B=2, C=4, D=3, E=7
Visited: {A, B, D, C}
Priority Queue: [(E, 7)]
Step 5: Process E (distance 7)
Visit E
No unvisited neighbors
Distances: A=0, B=2, C=4, D=3, E=7
Visited: {A, B, D, C, E}
Done!
Final shortest distances from A:
- A: 0
- B: 2 (path: A → B)
- C: 4 (path: A → B → D → C)
- D: 3 (path: A → B → D)
- E: 7 (path: A → B → D → C → E)
Another demo
https://www.cs.usfca.edu/~galles/visualization/Dijkstra.html
Why does it work?
Greedy choice: Always process the closest unvisited vertex
Correctness argument:
- When we visit a vertex v with distance d, d is the shortest distance to v
- Why? Any other path to v must go through an unvisited vertex u
- But u has distance ≥ d (we chose v as closest!)
- So path through u has length ≥ d
Key assumption: All edge weights are non-negative!
- Negative weights can break the algorithm (need Bellman-Ford instead)
Think about: Negative weights
What goes wrong with negative weights?
Drawing on the board
Dijkstra assumes: No benefit to detouring through other vertices
- True with non-negative weights
- False with negative weights
Implementation in Rust (for your reference)
#![allow(unused)] fn main() { use std::collections::{BinaryHeap, HashMap}; use std::cmp::{Ordering, Reverse}; fn dijkstra( graph: &HashMap<usize, Vec<(usize, i32)>>, // vertex = [(neighbor, weight)] source: usize, num_vertices: usize ) -> Vec<Option<i32>> { let mut distances = vec![None; num_vertices]; distances[source] = Some(0); let mut pq = BinaryHeap::new(); pq.push(Reverse((0, source))); // (distance, vertex) - min-heap }
#![allow(unused)] fn main() { while !pq.is_empty() { let Reverse((dist, u)) = pq.pop().unwrap(); // Skip if we found a better path already if let Some(current_dist) = distances[u] { if dist > current_dist { continue; } } // Process neighbors if graph.contains_key(&u) { let neighbors = graph.get(&u).unwrap(); for &(v, weight) in neighbors { let alt = dist + weight; // Update if shorter path found if distances[v].is_none() || alt < distances[v].unwrap() { distances[v] = Some(alt); pq.push(Reverse((alt, v))); } } } } distances } }
Dijkstra's complexity analysis
Time complexity:
- Each vertex added to priority queue once: O(V)
- Each edge causes at most one priority queue update: O(E)
- Each priority queue operation: O(log V)
- Total: O((V + E) log V) = O(E log V) (assuming connected graph)
Space complexity:
- Distance array: O(V)
- Priority queue: O(V) vertices at once in worst case
- Total: O(V)
Efficient! Much better than trying all paths (exponential!)
Complexity comparison
Finding shortest paths in a graph with V vertices, E edges:
| Algorithm | Problem | Time |
|---|---|---|
| BFS | Unweighted | O(V + E) |
| Dijkstra | Non-negative weights | O(E log V) |
| Bellman-Ford | Any weights (detects negative cycles) | O(VE) |
(You're not responsible for anything about Bellman-Ford)
Trade-off: More general algorithms are slower
Dijkstra's algorithm summary
Key steps:
- Initialize distances (source=0, others=∞)
- Use priority queue (min-heap) of (distance, vertex)
- Extract minimum, mark visited
- Update neighbors if shorter path found
- Repeat until all visited
Why it works:
- Greedy: always process closest vertex first
- Optimal substructure: shortest path consists of shortest paths
- Non-negative weights ensure no benefit to detouring
Activity - Dijkstra's practice and confidence quiz
Lecture 39 - Final Exam Review
Welcome to Final Review Day!
You've learned an enormous amount this semester! Today we'll:
- Name (and sometimes review) ALL key concepts from the entire term
- Practice with quiz questions
- Focus on post-Midterm 2 material (algorithms & data structures)
- Build confidence for the final
Reminders about the final exam
- Tuesday December 17, 12:00-2:00pm
Exam format as it stands (subject to change):
- Fill-in questions: 40 pts (half Rust, half DS&A)
- Code tracing: 10 pts
- Shell/git: 8 pts
- Stack-heap: 10 pts
- Hand-coding: 18 pts (3 short problems)
- Complexity analysis: 16 pts
- Algorithm tracing: 28 pts
Total: 110 points
Tools & Basics (L2-12)
This material was covered on Midterms 1 and 2. We'll do a condensed review.
Shell commands you should know:
pwd,ls,ls -la,cd,mkdir,rm
Git workflow:
git clone,git status,git log,git add .,git commit -m "...",git push,git pull
Cargo commands:
cargo new,cargo run,cargo test,cargo check
Rust basics:
- Variables:
let x = 5(immutable),let mut x = 5(mutable) - Types:
i32,f64,bool,char,&str,String - Function signatures and return types
- Expressions vs statements
- Control flow:
if/else,for,while,loop - Enums and pattern matching:
match,Option<T>,Result<T, E> - Error handling with
panic!,?, andOption/Result
Memory & Ownership (L14-18)
Stack vs Heap:
- Stack: fixed size, fast, local variables
- Heap: dynamic size, slower, for
String,Vec,Box
Ownership rules:
- Each value has one owner
- When owner goes out of scope, value is dropped
- Stack types copy, heap types move by default (generally)
Borrowing:
&T- immutable reference (many allowed)&mut T- mutable reference (only one, no other borrows)
Strings:
String- owned, growable&str- borrowed slice, eg.let y = &text[0..3]- UTF-8 encoding (can't index with
text[0])
Collections & Advanced Rust (L19-26)
HashMap and HashSet:
- HashMap for key-value pairs (keys must implement
HashandEqtraits) - HashSet for unique values
- Hash functions: deterministic, fast, uniform distribution, hard to invert
Structs:
- Define custom types with named fields
- Methods:
&self(read),&mut self(modify),self(consume)
Generics & Traits:
<T>for generic types- Trait bounds:
T: Clone,T: PartialOrd - Common traits:
Debug,Clone,Copy,PartialEq,PartialOrd,Ord #[derive(...)]auto-generates trait implementations
Lifetimes:
'asyntax for lifetime annotations- Needed when multiple reference inputs and reference output
'staticmeans "lives for entire program"
Quick Questions: Rust Fundamentals
Question 1
You've made changes to several files and want to commit them. What's the correct sequence of git commands?
- A)
git commit -m "message"togit add .togit push - B)
git add .togit commit -m "message"togit push - C)
git pushtogit add .togit commit -m "message" - D)
git commit -m "message"togit pushtogit add .
Question 2
Will this compile? Why or why not?
#![allow(unused)] fn main() { let mut v = vec![1, 2, 3]; let r = &v; v.push(4); println!("{:?}", r); }
Question 3
What trait do you need to derive to print a struct with {:?}?
- A) Display
- B) Debug
- C) Print
- D) Clone
Packages & Testing (L27-28)
Modules & Packages:
modkeyword declares modulespubmakes items publicusebrings items into scope- Cargo workspace for multi-package projects
Testing:
#[test]marks test functionsassert!,assert_eq!,assert_ne!for testingcargo testruns tests#[should_panic]for tests that should panic
You don't need to know the finicky details of pub etc. in nested structures
Iterators & Closures (L29)
Iterators:
.iter()- borrows elements.into_iter()- takes ownership.iter_mut()- mutably borrows- Iterator methods:
map,filter,collect,sum,count,enumerate
Closures:
- Anonymous functions:
|x| x + 1 - Can capture environment
- Used with iterator methods
Concurrency - not on the exam!
Quick Questions: Advanced Rust
Question 4
What does this iterator chain return?
#![allow(unused)] fn main() { vec![1, 2, 3, 4, 5] .iter() .filter(|&x| x % 2 == 0) .map(|x| x * 2) .collect::<Vec<_>>() }
- A)
[2, 6, 10] - B)
[4, 8] - C)
[2, 4] - D)
[4]
Question 5
Fill in the blanks with the correct Rust keywords (mod, pub, use):
#![allow(unused)] fn main() { // Declare a new module called 'utils' _____ utils; // Make this function accessible from outside the module _____ fn helper() { } // Bring HashMap into scope _____ std::collections::HashMap; }
Big O Notation (L31)
Common complexities:
- O(1) - Constant time (array access, hash lookup)
- O(log n) - Logarithmic (binary search, balanced tree operations)
- O(n) - Linear (loop through array once)
- O(n log n) - Linearithmic (merge sort, good general-purpose sorting)
- O(n^2) - Quadratic (nested loops, bubble sort)
- O(2^n) - Exponential (recursive Fibonacci, bad!)
Rules:
- Drop constants:
2n->O(n) - Take worst term:
n^2 + n->O(n^2) - Analyze worst case (unless we say otherwise)
- Complexity of nested loops gets multiplied - sequential gets added
Space complexity:
- How much extra memory does algorithm use?
- Same notation: O(1), O(n), O(log n), etc.
Sorting Algorithms (L32)
| Algorithm | Best | Average | Worst | Space | Stable? |
|---|---|---|---|---|---|
| Selection Sort | O(n^2) | O(n^2) | O(n^2) | O(1) | No |
| Bubble Sort | O(n) | O(n^2) | O(n^2) | O(1) | Yes |
| Insertion Sort | O(n) | O(n^2) | O(n^2) | O(1) | Yes |
| Merge Sort | O(n log n) | O(n log n) | O(n log n) | O(n) | Yes |
| Quick Sort | O(n log n) | O(n log n) | O(n^2) | O(n) | No |
Stability: If two elements are equal, do they stay in original order?
When to use what:
- Small data or nearly sorted: Insertion sort
- Need guaranteed O(n log n): Merge sort
- Average case and in-place: Quick sort
Quick Questions: Big O & Sorting
Question 6
What's the time complexity of merge sort on an array that's already sorted of size n?
- A) O(1)
- B) O(log n)
- C) O(n)
- D) O(n log n)
Question 7
Which sorting algorithm has O(n^2) worst case but O(n log n) average case?
- A) Merge sort
- B) Quick sort
- C) Insertion sort
- D) Bubble sort
Question 7.5
What's the time complexity of this code?
#![allow(unused)] fn main() { fn process(data: &Vec<i32>) { for i in 0..data.len() { for j in i+1..data.len() { println!("{} {}", data[i], data[j]); } } } }
- A) O(1)
- B) O(n)
- C) O(n log n)
- D) O(n^2)
Stack, Queue, Deque (L33)
Stack (LIFO - Last In, First Out):
- Operations:
push(add to top),pop(remove from top),peek(look at top) - In Rust:
Vec<T> - Use cases: Function call stack, undo/redo, DFS, parsing
- All operations: O(1)
Queue (FIFO - First In, First Out):
- Operations:
enqueue(add to back),dequeue(remove from front) - In Rust:
VecDeque<T>(circular buffer) - Use cases: Task scheduling, BFS, buffering
- All operations: O(1)
Deque (Double-Ended Queue):
- Can add/remove from both ends
- In Rust:
VecDeque<T> - Use cases: Sliding window, palindrome checking
Why not Vec for queue?
vec.remove(0)is O(n) - must shift all elements!VecDequeuses circular buffer for O(1) front operations
LinkedList:
- Rarely used in Rust (ownership makes it complex)
- O(1) insert/delete at known position, O(n) random access
Quick Questions: Linear Structures
Question 8
Which data structure should you use for BFS (breadth-first search)?
- A) Stack (Vec)
- B) Queue (VecDeque)
- C) HashMap
- D) LinkedList
Question 9
Why is VecDeque better than Vec for implementing a queue?
- A) It uses less memory
- B) It can remove from front in O(1) instead of O(n)
- C) It's faster to create
- D) It can store more elements
Priority Queues & Heaps (L34)
Priority Queue: Get element with highest (or lowest) priority
- Not FIFO! Order by priority, not insertion time
Binary Heap: Complete binary tree with heap property
- Max-heap: Parent e both children (everywhere)
- Complete: All levels filled except possibly last (fills left-to-right)
Array representation:
- Store level-by-level in array
- Parent of
i:(i-1)/2 - Left child of
i:2*i + 1 - Right child of
i:2*i + 2
(don't memorize these - just remember they're in "reading order")
Operations:
push(insert): Add to end, bubble up - O(log n)pop(extract max/min): Remove root, replace with last, bubble down - O(log n)peek: Look at root - O(1)- Build heap from array: O(n) using special "heapify" algorithm (you don't need to know how it works)
Heap Sort:
- Build max-heap: O(n)
- Repeatedly extract max: O(n log n)
- Total: O(n log n) guaranteed, O(1) space
In Rust: BinaryHeap<T> (max-heap by default)
Quick Questions: Heaps
Question 10
In a max-heap array [42, 30, 25, 10, 20, 15], what are the children of element at index 1 (value 30)?
- A) 25 and 10
- B) 10 and 20
- C) 42 and 25
- D) 20 and 15
Question 11
Which operation is a binary heap optimized for?
- A) Finding any element by value
- B) Getting the max/min element
- C) Sorting all elements
- D) Finding the median
Binary Search Trees (L35)
Binary Search Tree (BST): Binary tree where:
- All values in left subtree < node value
- All values in right subtree > node value
This enables binary search!
Operations (balanced BST):
- Search: Compare and go left/right - O(log n)
- Insert: Search for position, add - O(log n)
- Delete: Three cases:
- No children: just remove
- One child: replace with child
- Two children: replace with in-order successor (smallest in right subtree)
- Time: O(log n)
- Find min/max: Go all the way left/right - O(log n)
BST vs Heap representation:
- Heap: Complete tree, use array, index arithmetic
- BST: NOT complete (has gaps), need pointers, recursive structure
Balance matters!
- Balanced: Height = O(log n), operations are O(log n)
- Degenerate Height = O(n), operations are O(n)
- Real implementations use more complex, self-balancing trees
Rust's BTreeMap and BTreeSet: Guaranteed O(log n) operations
BST vs Other Structures
| Operation | Sorted Array | BST (balanced) | Binary Heap |
|---|---|---|---|
| Search for value | O(log n) | O(log n) | O(n) |
| Insert | O(n) | O(log n) | O(log n) |
| Delete | O(n) | O(log n) | O(log n) |
| Find min/max | O(1) | O(log n) | O(1) |
| Get all sorted | O(1) | O(n) | O(n log n) |
![]() (I really forgot to include these after some point...) Don't memorize this whole thing! In each case just think through what's going on and you don't have to memorize or guess.
(I really forgot to include these after some point...) Don't memorize this whole thing! In each case just think through what's going on and you don't have to memorize or guess.
Quick Questions: BST
Question 12
In this BST, if 3 gets deleted, what gets put in its place?
8
/ \
3 10
/ \ \
1 6 14
/ \
4 7
- A) 1
- B) 4
- C) 6
- D) 8
Question 13
What happens to BST operations if the tree becomes degenerate ?
- A) They become O(1)
- B) They stay O(log n)
- C) They become O(n)
- D) They become O(n^2)
Graph Basics & Traversal (L36)
Graph: Vertices (nodes) connected by edges
Types:
- Directed: Edges have direction (A -> B)
- Undirected: Edges are bidirectional (A <-> B)
- Weighted: Edges have costs/distances
- Unweighted: All edges equal
Representations:
- Adjacency matrix: 2D array,
matrix[i][j]= edge from i to j- Space: O(V^2), Good for dense graphs
- Adjacency list: Each vertex has list of neighbors
- Space: O(V + E), Good for sparse graphs (most real-world graphs)
BFS - Breadth-First Search
Uses a Queue (FIFO)
Algorithm:
- Start at source, mark visited, add to queue
- While queue not empty:
- Dequeue vertex
- For each unvisited neighbor:
- Mark visited, add to queue
Properties:
- Explores level by level
- Finds shortest path in unweighted graphs
- Time: O(V + E) (visit each vertex and edge once)
- Space: O(V) (queue and visited set)
Key use cases:
- Shortest path in unweighted graph
DFS - Depth-First Search
Uses a Stack (LIFO) - can be recursive or explicit stack
Algorithm:
- Start at source, mark visited
- For each unvisited neighbor:
- Recursively DFS from neighbor
- (Or use explicit stack: push start, while stack not empty, pop and explore)
Properties:
- Explores as deep as possible before backtracking
- Does NOT find shortest paths
- Time: O(V + E)
- Space: O(V) (recursion stack or explicit stack)
Key use cases:
- Topological sort
Quick Questions: Graphs
Question 14
What data structure does BFS use?
- A) Stack
- B) Queue
- C) Heap
- D) BST
Question 15
If you need to find the shortest path in an unweighted graph, which algorithm should you use?
- A) DFS
- B) BFS
- C) Dijkstra's
- D) Prim's
DAGs and Topological Sort (L37)
DAG (Directed Acyclic Graph): Directed graph with NO cycles
Examples:
- Course prerequisites
- Task dependencies
- Spreadsheet cell dependencies
Topological Sort: Linear ordering where all edges go left to right
- Only possible on DAGs!
- Multiple valid orderings may exist
Algorithm (DFS-based):
- Run DFS from all unvisited vertices
- Track finish times
- Reverse the finish order
- Time: O(V + E)
Use cases: Scheduling tasks with dependencies
Minimum Spanning Tree (MST)
Goal: Connect all vertices with minimum total edge weight
- Input: Undirected, weighted, connected graph
- Output: Tree (V-1 edges) connecting all V vertices with minimum sum of weights
Kruskal's Algorithm
Greedy approach: Sort edges, add cheapest that doesn't create cycle
Algorithm:
- Sort all edges by weight (increasing)
- For each edge (u, v):
- If adding it doesn't create cycle: add to MST
- Use Union-Find to detect cycles
- Stop when have V-1 edges
Time complexity: O(E log E) (dominated by sorting)
Prim's Algorithm
Greedy approach: Grow MST from starting vertex
Algorithm:
- Start from any vertex, add to MST
- Repeat until all vertices in MST:
- Find cheapest edge connecting MST to non-MST vertex
- Add that edge and vertex to MST
- Use priority queue (min-heap)
Time complexity: O(E log V) with binary heap
Quick Questions: Topological Sort and MST
Question 16
Which graph property is required for topological sort to exist?
- A) Connected
- B) Weighted
- C) Undirected
- D) Acyclic
Question 17
What's the output of an MST algorithm?
- A) Shortest path from source to all vertices
- B) A subgraph connecting all V vertices with minimum weight
- C) Topological ordering of vertices
- D) All cycles in the graph
Shortest Paths / Dijkstra's (L38)
Goal: Find shortest path from source to all vertices in weighted graph with non-negative edges
Greedy approach: Always process closest unvisited vertex
Algorithm:
- Initialize distances: source = 0, all others =
- Use min-heap (priority queue) of (distance, vertex)
- While heap not empty:
- Extract vertex u with minimum distance
- For each neighbor v:
- If
dist[u] + weight(u,v) < dist[v]:- Update
dist[v] - Add v to heap with new distance
- Track parent for path reconstruction
- Update
- If
Time complexity: O((V + E) log V) with binary heap
Key insight: Once a vertex is processed, we've found its shortest path (greedy choice is safe)
Limitations:
- Cannot handle negative edge weights! (Bellman-Ford can)
- Doesn't detect negative cycles
Path reconstruction:
- Track parent pointers while running
- Follow parents backward from destination to source
- Reverse to get forward path
Dijkstra vs BFS vs DFS
- Unweighted shortest path: BFS
- Weighted shortest path (non-negative): Dijkstra
- Negative weights: Bellman-Ford (not covered, but you should know Dijkstra can't handle it)
- Topological sort: DFS
- Exploring/iterating over the graph: DFS or BFS
Quick Questions: Shortest Paths
Question 18
What's the key requirement for Dijkstra's algorithm to work correctly?
- A) Graph must be directed
- B) Graph must be connected
- C) All edge weights must be non-negative
- D) Graph must be a DAG
Question 19
What data structure does Dijkstra's algorithm use to efficiently get the next closest vertex?
- A) Stack
- B) Queue
- C) Min-heap (priority queue)
- D) BST
Question 20
If you need to find the shortest path in an unweighted graph, which is most efficient?
- A) BFS
- B) DFS
- C) Dijkstra's
- D) Kruskal's
Summary Tables
(Includes amortized values where applicable)
| Structure | Access | Insert | Delete | Use Case |
|---|---|---|---|---|
| Vec | O(1) | O(1) back | O(1) back | Stack, random access |
| VecDeque | O(1) | O(1) both ends | O(1) both ends | Queue, deque |
| HashMap | O(1) | O(1) | O(1) | Key-value lookup |
| BinaryHeap | O(1) peek | O(log n) | O(log n) | Priority queue |
| BTreeMap | O(log n) | O(log n) | O(log n) | Sorted key-value |
| Algorithm | Type | Time | Data Structure | Use Case |
|---|---|---|---|---|
| Merge Sort | Sorting | O(n log n) | - | General-purpose, stable |
| Quick Sort | Sorting | O(n log n) avg | - | In-place, fast average |
| Heap Sort | Sorting | O(n log n) | Max heap / priority queue | Guaranteed, in-place |
| BFS | Graph traversal | O(V+E) | Queue | Shortest path (unweighted) |
| DFS | Graph traversal | O(V+E) | Stack (or recursion) | Exploration, topological sort |
| Topological Sort | Graph ordering | O(V+E) | Stack (via DFS) | DAG task scheduling |
| Kruskal's MST | Graph | O(E log E) | Union-Find | Minimum spanning tree |
| Prim's MST | Graph | O(E log V) | Min heap / priority queue | Minimum spanning tree |
| Dijkstra's | Shortest path | O(E log V) | Min heap / priority queue | Weighted shortest path |
![]() Don't freak out and try to memorize it! See how many you can recall by reasoning through it.
Don't freak out and try to memorize it! See how many you can recall by reasoning through it.
Note - you are fine if you say O(E) instead of O(V+E) since E dominates V generally. Similarly for O(E log V) vs O((E+V) log V) for Dijkstra's... it's the rough scaling that matters here.
Tips for Hand-Coding Problems
Before you start:
- Read the problem carefully - what is the input type? What should be returned?
- Identify any required methods or constraints (e.g., "use
.filter(),.map(), and.collect()") - Consider edge cases (empty input, single element, etc.)
While coding:
- Write clean, readable code - you want partial credit even if it's not perfect
- Use descriptive variable names when possible
- Remember Rust syntax details:
&for references,mutfor mutability, type annotations - Don't panic if you forget exact syntax - show your logic clearly
Common patterns to remember:
- Iterator chain:
.iter()to.filter()/.map()to.collect() - Finding min/max: iterate and track current min/max or use
.min()and.max()with an iterator - Building new collections: create empty, then push/insert in a loop
Hand-Coding practice problem ideas
Basic:
- Given a vec, return a new vec with every-other element of the original vec starting with the second element. If the vec has fewer than two elements return None.
- Given two integers, divide a by b but returna n error if b is zero.
Closures and iterators:
- Given a vector of integers, count the number of times
5occcurs. - Given a vector of strings, make a vector of the lengths of those strings
Tests
- Given solutions to one of the two basic problems, write two tests for that function, one that tests the "happy path" and one that tests an edge case
Tips for Stack-Heap Diagrams
What to include:
- Stack frames: One for
main, one for each function call - Variables: Show name, type, and value/pointer for each variable
- Heap data: Separate heap-allocated data (String, Vec, Box, etc.) to the right
Practice Stack-Heap Diagram
fn sum_first_two(dat: &Vec<i32>) -> i32 { let first_two = &dat[0..2]; let sum = first_two.iter().sum(); // DRAW HERE sum } fn main() { let dat = vec![1,2,3,4]; let result = sum_first_two(&dat); }
Final tips
Sources for practice:
- Review the confidence quiz (last lecture and online) and quesitons from this lecture
- Redo hand-coding and stack-heap problems from previous exams
- Have AI generate random graphs to practice graph algorithms on (though it may or may not be accurate in evaluting your answer)
- The activity from the iterators and closures lecture is a good source for practicing hand-coding (try Rust Playground)
- "Rubber duck" it - can you explain how these algorithms work to soemone else?
Activity L39: Ask and Answer II
Phase 1: Question Writing
- Tear off the last page of your notes from today
- Pick a codename (favorite Pokémon, secret agent name, whatever) - remember it!
Write one or two of of:
- A concept you don't fully understand ("I'm confused about...")
- A study strategy question ("What's the best way to review...")
- A practice test question
- Anything else you'd like to ask your peers ahead of the midterm
Phase 2: Round Robin Answering
- Pass papers around a few times
- Read the question, write a helpful response
- When you're done, raise you paper up and find someone to swap with
You can answer questions, explain concepts, give tips / encouragement, draw diagrams, wish each other luck
Phase 3: Return & Review
- Submit on gradescope what codename you chose for yourself
- Return the papers at the end of class
- I'll scan and post all papers - you can see the responses you got and also all others
Activity L1 - DS210 B1 Lecture 1 Syllabus Review Worksheet
Group members:
Concrete questions:
-
How are homeworks submitted?
-
What happens if you submit work a day late?
-
If you get stuck on an assignment and your friend explains how to do it, what should you do?
-
What would it take to get full credit for attendance and participation?
-
If you have accommodations for exams, how soon should you request them?
-
When and how long are discussion sections?
Open-ended questions:
-
What parts of the course policies seem standard and what parts seem unique?
Standard Unique
-
Identify 2-3 things in the syllabus that concern you
-
What strategies could you use to address these concerns?
-
Identify 2-3 things on the syllabus that you're glad to see
-
List three questions you have about the course that aren't answered in the syllabus
Activity L2 - Shell Challenge
In Class Activity Part 1: Access/Install Terminal Shell
Directions for MacOS Users and Windows Users.
macOS Users:
Your Mac already has a terminal! Here's how to access it:
-
Open Terminal:
- Press
Cmd + Spaceto open Spotlight - Type "Terminal" and press Enter
- Or: Applications → Utilities → Terminal
- Press
-
Check Your Shell:
echo $SHELL # Modern Macs use zsh, older ones use bash -
Optional: Install Better Tools:
Install Homebrew (package manager for macOS)
/bin/bash -c "$(curl -fsSL https://raw.githubusercontent.com/Homebrew/install/HEAD/install.sh)"
Install useful tools
brew install tree # Visual directory structure
brew install ripgrep # Fast text search
Windows Users:
Windows has several terminal options. For this exercise we recommend Option 1, Git bash.
When you have more time, you might want to explore Windows Subsystem for Linux so you can have a full, compliant linux system accessible on Windows.
PowerShell aliases some commands to be Linux-like, but they are fairly quirky.
We recommend Git Bash or WSL:
-
Option A: Git Bash (Easier)
- Download Git for Windows from git-scm.com
- During installation, select "Use Git and optional Unix tools from the Command Prompt"
- Open "Git Bash" from Start menu
- This gives you Unix-like commands on Windows
-
Option B: Windows Subsystem for Linux (WSL)
# Run PowerShell as Administrator, then: wsl --install # Restart your computer # Open "Ubuntu" from Start menu -
Option C: PowerShell (Built-in)
- Press
Win + Xand select "PowerShell" - Note: Commands differ from Unix (use
dirinstead ofls, etc.) - Not recommended for the in-class activities.
- Press
Verify Your Setup (Both Platforms)
pwd # Should show your current directory
ls # Should list files (macOS/Linux) or use 'dir' (PowerShell)
which ls # Should show path to ls command (if available)
echo "Hello!" # Should print Hello!
Part 2: Scavenger Hunt
Complete the steps using only the command line!
You can use echo to write to the file, or text editor nano.
Feel free to reference the cheat sheet below and the notes above.
-
Create a folder for the course if you haven't!
-
Create a directory called
treasure_huntin your course projects folder. -
In that directory create a file called
command_line_scavenger_hunt.txtthat contains the following:- Your name / group members
-
Run these lines and record the output into that
.txtfile:
whoami # What's your username?
hostname # What's your computer's name?
pwd # Where do you start?
echo $HOME # What's your home directory path?
-
Inside that directory, create a text file named
clue_1.txtwith the content "The treasure is hidden in plain sight" -
Create a subdirectory called
secret_chamber -
In the
secret_chamberdirectory, create a file calledclue_2.txtwith the content "Look for a hidden file" -
Create a hidden file in the
secret_chamberdirectory called.treasure_map.txtwith the content "Congratulations. You found the treasure" -
When you're done, change to the parent directory of
treasure_huntand run the commandzip -r treasure_hunt.zip treasure_hunt.- Or if you are on Git Bash, you may have to use the command
tar.exe -a -c -f treasure_hunt.zip treasure_hunt
- Or if you are on Git Bash, you may have to use the command
-
Upload
treasure_hunt.zipto gradescope - next time we will introduce git and github and use that platform going forward. -
Optional: For Bragging Rights Create a shell script that does all of the above commands and upload that to Gradescope as well.
Command Line Cheat Sheet
Basic Navigation & Listing
# Navigate directories
cd ~ # Go to home directory
cd /path/to/directory # Go to specific directory
pwd # Show current directory
# List files and directories
ls # List files
ls -la # List all files (including hidden) with details
ls -lh # List with human-readable file sizes
ls -t # List sorted by modification time
Finding Files
# Find files by name
find /home -name "*.pdf" # Find all PDF files in /home
find . -type f -name "*.log" # Find log files in current directory
find /usr -type l # Find symbolic links
# Find files by other criteria
find . -type f -size +1M # Find files larger than 1MB
find . -mtime -7 # Find files modified in last 7 days
find . -maxdepth 3 -type d # Find directories up to 3 levels deep
Counting & Statistics
# Count files
find . -name "*.pdf" | wc -l # Count PDF files
ls -1 | wc -l # Count items in current directory
# File and directory sizes
du -sh ~/Documents # Total size of Documents directory
du -h --max-depth=1 /usr | sort -rh # Size of subdirectories, largest first
ls -lah # List files with sizes
Text Processing & Search
# Search within files
grep -r "error" /var/log # Search for "error" recursively
grep -c "hello" file.txt # Count occurrences of "hello"
grep -n "pattern" file.txt # Show line numbers with matches
# Count lines, words, characters
wc -l file.txt # Count lines
wc -w file.txt # Count words
cat file.txt | grep "the" | wc -l # Count lines containing "the"
System Information
# System stats
df -h # Disk space usage
free -h # Memory usage (Linux)
system_profiler SPHardwareDataType # Hardware info (Mac)
uptime # System uptime
who # Currently logged in users
# Process information
ps aux # List all processes
ps aux | grep chrome # Find processes containing "chrome"
ps aux | wc -l # Count total processes
File Permissions & Properties
# File permissions and details
ls -l filename # Detailed file information
stat filename # Comprehensive file statistics
file filename # Determine file type
# Find files by permissions
find . -type f -readable # Find readable files
find . -type f ! -executable # Find non-executable files
Network & Hardware
# Network information
ip addr show # Show network interfaces (Linux)
ifconfig # Network interfaces (Mac/older Linux)
networksetup -listallhardwareports # Network interfaces (Mac)
cat /proc/cpuinfo # CPU information (Linux)
system_profiler SPHardwareDataType # Hardware info (Mac)
Platform-Specific Tips
Mac/Linux Users:
- Your home directory is
~or$HOME - Hidden files start with a dot (.)
- Use
man commandfor detailed help - Try
which commandto find where a command is located
Windows Users:
- Your home directory is
%USERPROFILE%(Command Prompt) or$env:USERPROFILE(PowerShell) - Hidden files have the hidden attribute (use
dir /ahto see them) - Use
Get-Help commandin PowerShell orhelp commandin Command Prompt for detailed help - Try
where commandto find where a command is located
Universal Tips:
- Use Tab completion to avoid typing long paths
- Most shells support command history (up arrow or Ctrl+R)
- Combine commands with pipes (
|) to chain operations - Search online for "[command name] [your OS]" for specific examples
GitHub Collaboration Challenge
Form teams of three people.
Follow these instructions with your teammates to practice creating a GitHub repository, branching, pull requests (PRs), review, and merging. Work in groups of three—each person will create and review a pull request.
0. Everyone needs a GitHub account
Go ahead and use your personal email address to register - you'll want to take this one with you after you graduate.
1. Create and clone the repository
- Choose one teammate to act as the repository owner.
- They should log in to GitHub, click the “+” menu in the upper‑right and select New repository.
- Give the repository a short, memorable name, optionally add a description, make the visibility public, check “Add a README,” and
- click Create repository.
- Go to Settings/Collaborators and add your teammates as developers with write access.
- Each team member needs a local copy of the repository. On the repo’s main page, click Code, copy the HTTPS URL, open a terminal, navigate to the folder where you want the project, and run:
git clone <repo‑URL>
Cloning creates a full local copy of all files and history.
2. Create your own branch
Branching lets you make changes without affecting the default main branch.
On your machine:
git checkout -b <your‑first‑name>-branch
git push -u origin <your‑first‑name>-branch # creates the branch on GitHub
3. Add a personal file, commit and push
- In your cloned repository (on your topic branch), at the command line (using the shell skills we learned last time):
- Create a directory inside the repo called
our_bios - Create a new text file named after yourself (e.g.,
alex.txt) in that directory - Write a few sentences about yourself (major, hometown, a fun fact) to that file.
-
Stage and commit the file:
git add alex.txt # this only works if you are in the directory where the file is, otherwise you'll have to think about what the path is to the file you're adding relative to your working directory git commit -m "Add personal bio for Alex" -
Push your commit to GitHub:
git push
4. Create a pull request (PR) for your teammates to review
- On GitHub, click Pull requests → New pull request.
- Set the base branch to
mainand the compare branch to your branch. - Provide a clear title (e.g. “Add Alex’s bio”) and a short description of what you added. Creating a pull request lets your collaborators review and discuss your changes before merging them.
- Request reviews from your two teammates.
5. Review your teammates’ pull requests
- Open each of your teammates’ PRs.
- On the Conversation or Files changed tab, leave at least one constructive comment (ask a question or suggest something you’d like them to add). You can comment on a specific line or leave a general comment.
- Submit your review with the Comment option. Pull request reviews can be comments, approvals, or requests for changes; you’re only commenting at this stage.
6. Address feedback by making another commit
-
Read the comments on your PR. Edit your text file locally in response to the feedback.
-
Stage, commit, and push the changes:
git add alex.txt git commit -m "Address feedback" git pushAny new commits you push will automatically update the open pull request.
-
Reply to the reviewer’s comment in the PR, explaining how you addressed their feedback.
7. Approve and merge pull requests
- After each PR author has addressed the comments, revisit the PRs you reviewed.
- Click Review changes → Approve to approve the updated PR.
- Once a PR has at least one approval, a teammate other than the author should merge it.
-In the PR, scroll to the bottom and click Merge pull request, then Confirm merge. - Delete the topic branch when prompted; keeping the branch list tidy is good practice.
Each student should merge one of the other students’ PRs so everyone practices.
8. Capture a snapshot for submission
- One teammate downloads a snapshot of the final repository. On the repo’s main page, click Code → Download ZIP. GitHub generates a snapshot of the current branch or commit.
- Open the Commits page (click the “n commits” link) and take a screenshot showing the commit history.
- Go to Pull requests → Closed, and capture a screenshot showing the three closed PRs and their approval status. You can also use the Activity view to see a detailed history of pushes, merges, and branch changes.
- Upload the ZIP file and screenshots to Gradescope.
Tips
- Use descriptive commit messages and branch names.
- Each commit is a snapshot; keep commits focused on a single change.
- Be polite and constructive in your feedback.
- Delete merged branches to keep your repository clean.
This exercise walks you through the entire GitHub flow—creating a repository, branching, committing, creating a PR, reviewing, addressing feedback, merging, and capturing a snapshot. Completing these steps will help you collaborate effectively on future projects.
Hello Rust Activity
-
Get in groups of 3+ (I only have 16 copies!)
-
Send one person up to get a packet
-
Write your names on the submission sheet (no gradescope issues this time for sure!)
-
Place the lines of code in order in two parts on the page: your shell, and your code file
main.rsto make a reasonable sequence and functional code. -
Wish extra time, add any other commands or lines of rust you might want
-
We'll take the last 5 minutes to share solutions
println!("Good work! Average: {:.1}", average);
cargo run
scores.push(88);
git push -u origin main
let average = total as f64 / scores.len() as f64;
cargo new hello_world
} else if average >= 80.0 {
nano src/main.rs
let total: i32 = scores.iter().sum();
if average >= 90.0 {
touch README.md
cd hello_world
fn main() {
git add src/main.rs
println!("Keep trying! Average: {:.1}", average);
let mut scores = vec![85, 92, 78, 96];
ls -la
echo "This is a grade average calculator" > README.md
} else {
git commit -m "Add calculator functionality"
}}
println!("Excellent! Average: {:.1}", average);
Compiler Error Scavenger Hunt
This activity is designed to teaching you to to not fear compiler errors and to show you that Rust's error messages are actually quite helpful once you learn to read them!
Please do NOT use VSCode yet! Open your files in nano, TextEdit / Notepad or another plain text editor.
Instructions
The code contains a complete guessing game (it's okay if you don't know how it all works yet!)
Working in pairs, see how many different compiler errors you can create.
I'll give you a 2 minute warning to wrap up in gradescope.
Again Please do NOT use VSCode yet! It ruins the fun
Rules:
- Create a new project in your project folder with
cargo new guessing_game - Copy the starter code into
src/main.rs, and add theranddependency to theCargo.tomlfile - Make one change at a time that breaks compilation (try misspelling, removing, reordering)
- Run
cargo checkorcargo buildto see the error - Record the error message - write down in the gradescope assignment what you changed and what kind of error it produced
- Undo your change and try a different way to break it
- Goal: Find at least 8 different error types (I found 14, as a class can we find more?)!
Add to the Cargo.toml file:
Under [dependencies]:
rand = "0.8.5"
Starter Code (src/main.rs)
use std::io; use rand::Rng; use std::cmp::Ordering; fn main() { println!("Guess the number!"); let secret_number = rand::thread_rng().gen_range(1..=100); let mut attempts = 0; loop { println!("Please input your guess:"); let mut guess = String::new(); io::stdin() .read_line(&mut guess) .expect("Failed to read line"); let guess: u32 = match guess.trim().parse() { Ok(num) => num, Err(_) => { println!("Please enter a valid number!"); continue; } }; attempts += 1; println!("You guessed: {}", guess); match guess.cmp(&secret_number) { Ordering::Less => println!("Too small!"), Ordering::Greater => println!("Too big!"), Ordering::Equal => { println!("You win! It took you {} attempts.", attempts); break; } } } let final_message = format!("Thanks for playing! You made {} guesses.", attempts); println!("{}", final_message); }
Debrief Questions:
-
Let's make a list together - how many did we find?
-
Which error was the most confusing?
-
Which error message was the most helpful?
-
Did any errors surprise you?
-
What patterns did you notice in how Rust reports errors?
Hello VSCode and Hello Github Classroom!
Part 1: GitHub Classroom Set-up
Step 1: Accept the Assignment (One Person Per Group)
- Go here: https://classroom.github.com/a/F9QCHrtR
- Sign into GitHub if you aren't signed in, then select your name from the list
- Create or join a team:
- If you're first in your group: Click "Create a new team" and name it (e.g., "team-alice-bob")
- If teammate already started: Find and click on your team name
- Click "Accept this assignment"
- Click on repository URL to open it - it will look something like this:
https://github.com/cdsds210-fall25-b1/activity6-team-alice-bob
Step 2: Clone the Repository (Everyone)
Open a terminal and navigate to where you keep your projects (optional, but recommended for organization).
cd path/to/your/projects/
In the GitHub webpage for your group, click the green "code" button, selcet the autheticaion method you set up (HTTPS, SSH, or CLI (gh)), and copy the link.
Then clone the repo in your terminal. Your clone command will look like one of these:
git clone https://github.com/cdsds210-fall25-b1/your-team-repo-name.git # HTTPS
git clone git@github.com:cdsds210-fall25-b1/your-team-repo-name.git # SSH
gh repo clone cdsds210-fall25-b1/your-team-repo-name # CLI
Troubleshooting:
- If HTTPS asks for password: Use your GitHub username and a personal access token (not your GitHub password)
- If SSH fails: Try following the instructions for setting up HTTPS (pinned on Piazza)
Step 3: Open in VSCode (Everyone)
cd your-team-repo-name
code .
You may see recommendations for a few extensions - go ahead and install them if you want!
Step 4: VSCode Exploration
From within your project, open src/main.rs in the navigation sidebar.
Explore These Features:
- Hover over variables - What type information do you see?
- Type
println!and wait - Notice the autocomplete suggestions - Introduce a typo (like
printl!) - See the red squiggle error - Right-click on
rand- Try "Go to Definition" - Open integrated terminal (
Ctrl+`orView -> Terminal) - Run
cargo runfrom the VSCode terminal
Part 2: Making contributions
Step 1: Make a plan as a team
Take a look at src/main.rs the repo as a group and identify two errors using VSCode hints and/or cargo check (you may need to fix one bug first in order to find the other). Then divide up these tasks among your team:
- Fixing the bugs (could be one person or split among two people)
- Adding some comments into
src/main.rsto explain how the code works - Editing the
README.mdfile to include a short summary of how you found the bugs, anything that was confusing or rewarding about this activity, or any other reflections
Step 2: Make individual branches
Make a branch that includes your name and what you're working on, eg. ryan-semicolon-bug-fix or kia-adding-comments
git checkout -b your-branch-name
Step 3: Fix your bug and/or add comments
Talk to each other if you need help!
Step 4: Commit and push
git add . # or add specific files
git commit -m "fix missing semicolon" # your own descriptive comment here
git push -u origin ryan-semicolon-bug-fix # your own branch name here
Step 5: Create a Pull Request
- Go to your team's GitHub repository in your browser
- Click the yellow "Compare & pull request" button (or go to "Pull requests" → "New pull request")
- Make sure the base is
mainand compare is your branch - Write a title like "Fix semicolon bug"
- Click "Create pull request"
Step 6: Review PRs and Merge
- Look at someone else's pull request (not your own!)
- Click "Files changed" to see their changes
- Leave feedback or request other changes if you want
- When you're ready, go to "Review changes" -> "Approve" -> "Submit review"
- Click "Merge pull request" -> "Confirm merge"
If you encounter "merge conflicts" try following these instructions.
Step 7: Is it working?
Run git checkout main and git pull when you're all done, and cargo run to see if your final code is working!
There's no "submit" button / step in GitHub Classroom - when you're done and your main branch is how you want it, you're done!
Activity 7 - Variables, Mutability, and Types Exploration
Part 1: Hypothesis Time
Working in groups, write down your predictions for each "What If" question below. Don't look anything up - just discuss and make your best guesses!
Binary and Number Representation
- What is 42 in binary?
- What decimal number is
1010 1100in binary? - In 8-bit two's complement, what would -5 look like?
Type Compatibility - Will These Compile?
For each code snippet, predict: ✅ Will compile or ❌ Won't compile (and why?)
-
#![allow(unused)] fn main() { let x: i32 = 42; let y: i16 = 100; let sum = x + y; } -
#![allow(unused)] fn main() { let price = 19.99; let tax_rate: f32 = 0.08; let total = price + (price * tax_rate); } -
#![allow(unused)] fn main() { let age: u8 = 25; let negative_age = -age; }
Shadowing
-
Are these equivalent? If yes, why, if not, what is different at the end?
let mut x = 5; x = 6;let x = 5; let x = 6;
-
Can you shadow with a different type? What will happen with:
#![allow(unused)] fn main() { let x = 5; let x = "hello"; } -
What will this print?
#![allow(unused)] fn main() { let x = 10; { let x = x + 5; println!("Inner: {}", x); } println!("Outer: {}", x); }
Overflow Behavior
- What happens when you overflow? Since
u8max is 255, what will this do?
#![allow(unused)] fn main() { let x:u8 = 250; println!("Outer: {}", x+10); }
Part 2: Test Your Hypotheses (15 minutes)
Now create a new Rust project and test your predictions! For each question, write code to test your hypothesis and record on your paper what you discovered:
- Was your hypothesis correct?
- What did you discover?
- Did anything surprise you?
Testing Strategy:
- Questions 1-3: Write code to convert/print binary representations
- Questions 4-6: Copy the code snippets and see if they compile
- Questions 7-10: Write small test programs to verify your predictions
Lab Notebook
Group members:
Notes
| Q | .................. Hypothesis ................... | .................. Discoveries .................. |
|---|---|---|
| 1 | ||
| 2 | ||
| 3 | ||
| 4 | ||
| 5 | ||
| 6 | ||
| 7 | ||
| 8 | ||
| 9 | ||
| 10 |
Activity 8 - Hand-coding challenge
In this activity, you will write a short program that computes the price of an item at a check-out counter depending on sales tax and whether the customer has a membership card (that would earn them 10% off) and computes the final price.
Part 1 - Hand-coding in groups
Requirements for calculate_final_price:
calculate_final_priceshould increase the price by the tax rate and reduce the price by 10% if there is a membership cardcalculate_final_priceshould print the final price like the example below as well as returning the final numerical value value
Example:
> calculate_final_price(100.00, 0.08, true)
Final Price is $82.80
#![allow(unused)] fn main() { fn calculate_final_price(/* fill in parameters */) -> /* fill in return type */ { // Your implementation here } }
Requirements for main:
- Include a few test cases in
main.rs()following the example, passing in the sticker price, tax rate, and boolean for whether they have a membership flag - Your test cases should explore a range of inputs and "edge cases" that could conceivably break your code so can demonstrate error handling
fn main() { // Example: let total = calculate_final_price(100.00, 0.08, true); }
Things to think about:
- What if your final price has more or less than two decimal places? (hint:
println!("{:.3}", 0.1);prints0.100) - Does it matter in what order the tax and discount are applied?
- What would happen if the sticker price were very low (like 2 cents), or negative?
Part 2 - Swap for feedback
When I announce, you'll swap papers with another group and look at their solution. Take a minute to give them feedback including:
- Any highlights of what they did well
- Any bugs you notice
- Any style feedback
At the end, I will collect papers and pick a couple (anonymized) to display on the screen for discussion.
Activity 9 - Loops, Functions, and Variables Review
Group members:
Part 1: Fill-in-the-blanks
Problem 1
fn find_max(numbers: [i32]) -> _______ { let mut max = numbers[0]; for _______ in _______ { if _______ > max { max = _______; } } _______ } fn main() { let scores = [85, 92, 78, 96, 88]; let highest = find_max(_______); println!("Highest score: {}", highest); }
Problem 2
fn count_even_numbers(limit: u32) -> u32 { let mut count = 0; for i in _______ { if i % 2 _______ { count _______; } } count } fn main() { let result = count_even_numbers(10); println!("Even numbers from 1 to 10: {}", _______); }
Problem 3
#![allow(unused)] fn main() { fn find_pair_sum(target: i32) -> _______ { let numbers = [1, 3, 5, 7, 9, 2, 4, 6]; for (i, &first) in numbers.iter()._______ { for j in _______..numbers.len() { if first + _______ == _______ { return (first, numbers[j]); } } } (0, 0) // Not found } }
Problem 4
#![allow(unused)] fn main() { fn try_to_set_a_high_score() -> u32 { let mut personal_best = 100; let mut lives_left = 3; _______ personal_best <= 210 _______ lives_left > 0 { personal_best _______ 25; // You get a little better every time! lives_left _______; println!("Score: {}, Lives left: {}", _______, _______); } _______ personal_best _______ { println!("High score achieved!"); } _______ { println!("Try again later"); } _______ } }
Part 2: What Does This Print?
Problem 1
fn main() { 'outer: for x in 1..=4 { 'inner: for y in 1..=3 { if x * y == 6 { break 'outer; } if x + y == 5 { continue 'outer; } } println!("Finished inner loop for x = {}", x); } }
Problem 2
#![allow(unused)] fn main() { let mut result = [0; 3]; let data = [10, 20, 30, 40, 50]; for (i, &value) in data[1..4].iter().enumerate() { result[i] = value / 10; } println!("{:?}", result); }
Problem 3
#![allow(unused)] fn main() { let mut x = 0; for i in 1..=3 { x += i; } println!("{}", x); }
Problem 4
#![allow(unused)] fn main() { for i in (0..5).step_by(2) { if i == 2 { continue; } println!("{}", i); } }
Part 3: Quick Quiz
- Which loop type should you use when you don't know how many iterations you need? (Could be more than one)
- Which is a correct function signature for a function
is_positivethat takes an integer and returns whether it's positive?
- What command creates a rust project, including Cargo.lock and src/main.rs?
- What shell command lists all files in the current directory, including hidden files?
- What git command would you use to add all modified files to the staging area?
- What shell command would you use to move to your home directory?
Part 4: Debug the Code
Problem 1 (3 bugs):
#![allow(unused)] fn main() { fn calculate_average(numbers: [f64]) -> f64 { let mut sum = 0; for num in numbers { sum += num; } sum / numbers.len() } }
Bug 1: ________________________________________________
Fix 1: ________________________________________________
Bug 2: ________________________________________________
Fix 2: ________________________________________________
Bug 3: ________________________________________________
Fix 3: ________________________________________________
Problem 2:
#![allow(unused)] fn main() { let arr = [1, 2, 3]; for i in 0..arr.len() { arr[i] = arr[i] * 2; } }
Bug: ________________________________________________
Fix: ________________________________________________
Problem 3 (2 bugs):
#![allow(unused)] fn main() { fn find_first_even(numbers: [u32; 5]) -> u32 { for num in numbers { if num % 2 = 0 { return num; } } return -1; // indicating no even numbers found } }
Bug 1: ________________________________________________
Fix 1: ________________________________________________
Bug 2: ________________________________________________
Fix 2: ________________________________________________
Activity 10 - Make a Calculator with Error Handling
Goal: Build a calculator that uses Result<T, E> for error handling and Option<T> for operations.
Instructions
- Go to https://classroom.github.com/a/PJAfqzH5 to accept the assignment in github classroom. You can work together in small groups on a single repo or work on your own repo even if you are discussing with others - your choice!
- Complete the code in
src/main.rs. You will need to:- Convert string operations like "+" and "/" to an
Operationenum using a functionparse_operationthat returns anOption<Operation>. - Implement a function
calculatethat takes two numbers and anOperation, returning aResult<f64, CalcError>(which handles division by zero by returning an appropriate error). - Implement
safe_calculatorthat both parses and operator and calculates a final value, returningResult<f64, CalcError>.
- Convert string operations like "+" and "/" to an
- Run the tests using
cargo testto check your work - Run the main function to see your code in action
- Make sure to commit and push your changes to your repository!
Tips
- Use
matchstatements for pattern matching on enums - Remember that
matchmust be exhaustive (handle all cases) - For
Option<T>, useSome(value)andNone - For
Result<T, E>, useOk(value)andErr(error) - The
#[derive(Debug, PartialEq)]attributes let you print and compare enum values
Starter code
#[derive(Debug, PartialEq)] enum CalcError { DivisionByZero, InvalidOperation, } #[derive(Debug, PartialEq)] enum Operation { Add, Subtract, Multiply, Divide, } // TODO: Implement these functions fn parse_operation(op: &str) -> Option<Operation> { // Return Some(Operation) for "+", "-", "*", "/" // Return None for anything else todo!() } fn calculate(a: f64, b: f64, op: Operation) -> Result<f64, CalcError> { // Perform the calculation based on the operation // Return Err(CalcError::DivisionByZero) if dividing by zero // Hint: Check if b == 0.0 when op is Operation::Divide todo!() } fn safe_calculator(a: f64, op_str: &str, b: f64) -> Result<f64, CalcError> { // Combine parse_operation and calculate // Return Err(CalcError::InvalidOperation) if operation parsing fails // Hint: Use match on the output of parse_operation(op_str) - handle Some(operation) and None cases todo!() } #[cfg(test)] mod tests { use super::*; #[test] fn test_parse_operation() { assert_eq!(parse_operation("+"), Some(Operation::Add)); assert_eq!(parse_operation("-"), Some(Operation::Subtract)); assert_eq!(parse_operation("*"), Some(Operation::Multiply)); assert_eq!(parse_operation("/"), Some(Operation::Divide)); assert_eq!(parse_operation("x"), None); assert_eq!(parse_operation(""), None); } #[test] fn test_calculate() { assert_eq!(calculate(10.0, 5.0, Operation::Add), Ok(15.0)); assert_eq!(calculate(10.0, 3.0, Operation::Subtract), Ok(7.0)); assert_eq!(calculate(4.0, 5.0, Operation::Multiply), Ok(20.0)); assert_eq!(calculate(15.0, 3.0, Operation::Divide), Ok(5.0)); assert_eq!(calculate(10.0, 0.0, Operation::Divide), Err(CalcError::DivisionByZero)); } #[test] fn test_safe_calculator() { assert_eq!(safe_calculator(10.0, "+", 5.0), Ok(15.0)); assert_eq!(safe_calculator(10.0, "/", 0.0), Err(CalcError::DivisionByZero)); assert_eq!(safe_calculator(10.0, "x", 5.0), Err(CalcError::InvalidOperation)); } } fn main() { // Test the calculator match safe_calculator(20.0, "/", 4.0) { Ok(result) => println!("Result: {}", result), Err(CalcError::DivisionByZero) => println!("Error: Cannot divide by zero!"), Err(CalcError::InvalidOperation) => println!("Error: Invalid operation!"), } // Run tests with: cargo test }
Activity 11 - Error Handling by Hand
Name:
1. Convert panic to Result
#![allow(unused)] fn main() { // Given this function that panics: fn safe_divide(a: i32, b: i32) -> i32 { if b == 0 { panic!("Cannot divide by zero!"); } a / b } // Rewrite it to return a Result instead of panicking: fn safe_divide_result(a: i32, b: i32) -> ______________ { // Your code here } }
2. Error Propagation with match
- Use this helper function to complete
parse_and_double - The helper function handles parsing and returns clear error messages
#![allow(unused)] fn main() { // Helper function (already written for you): fn parse_int(input: &str) -> Result<i32, String> { match input.parse::<i32>() { Ok(num) => Ok(num), Err(_) => Err(format!("'{}' is not a valid number", input)), } } // Complete this function using the helper: fn parse_and_double(input: &str) -> Result<i32, String> { let num = match parse_int(input) { ___________ => ___________, ___________ => ___________, }; let doubled = ___________; _____________ } }
3. Using the ? operator
- Rewrite the parse_and_double function using the
?operator - Use the same helper function from problem 2
#![allow(unused)] fn main() { fn parse_and_double_short(input: &str) -> Result<i32, String> { // Your code here (should be 2-3 lines) } }
Activity 12 - Design your own midterm
No promises, but I do mean it.
I want you all to spend some time thinking about problems/questions that you could imagine being on our first midterm. If I like your questions, I might include them (or some variation) on the exam!
This also helps me understand what you're finding easy/difficult and where we should focus on Wednesday. It can help you identify areas you might want to brush up on as well.
Aim to come up with 2-3 questions per category (or more!). I'm defining these as:
- EASY You know the answer now and expect most students in the class will get it right
- MEDIUM You feel iffy now but bet you will be able to answer it after studying, and it would feel fair to be on exam
- HARD It would be stressful to turn the page to this question, but you bet you could work your way to partial credit
Requirements for each question:
For each question you create, please include:
- The question itself
- The answer/solution
- Why you categorized it as Easy/Medium/Hard
Content Areas to Consider:
Make sure your questions collectively cover the major topics we've studied so far:
- Tools: git, shell, cargo
- Rust fundamentals: Variables & mutability, types, functions, loops, enums & match, error handling
Some formats of problems to consider:
- Definitions
- Multiple choice
- Does this compile / what does it return
- Find and fix the bug
- Fill-in-the-blank in code
- Longer hand-coding problems
- Short answer on concepts (describe how x works...)
Activity 13 - Midterm 1 Practice Problems
Name:
Practice Problem Set A
You will have 10 minutes to complete these problems
Problem A1: Fill in the Blanks
Complete this function that finds the largest and smallest numbers in an array:
fn find_min_and_max(numbers: [i32; 5]) -> __________ { let mut min = _______________ ; let mut max = _______________ ; for num _____________ { if num ____________ min { min = ____________; } if num ____________ max { max = ____________; } } _______________ } fn main() { let scores = [85, 92, 78, 96, 88]; let result = find_min_and_max(scores); println!("Min: {}, Max: {}", ______________); }
Problem A2: Debug the Code
This code has 3 bugs. Find and fix them:
#![allow(unused)] fn main() { fn calculate_grade(points: f32, total: f32) -> Result<char, String> { if total = 0.0 { return Err("Total cannot be zero".to_string()); } let percentage = (points / total) * 100; match percentage { x if x >= 90.0 => Ok('A'), // hint - there's nothing wrong with the x if x >= 80.0 => Ok('B'), // `x if x >= 90.0 ` notation here x if x >= 70.0 => Ok('C'), x if x >= 60.0 => Ok('D'), x if x >= 0.0 => Ok('F'), } } }
-
_____________should be_____________because_____________ -
_____________should be_____________because_____________ -
_____________should be_____________because_____________
Problem A3: Find the Bug
This code has 2 bugs. Find and fix them:
#![allow(unused)] fn main() { fn sum_integers_if_positive(nums: [i32; 3]) -> Option<i32> { let mut total = 0; for num in nums.iter().enumerate() { if num < 0 { return None; } total += num; } Ok(total) } }
-
_____________should be_____________because_____________ -
_____________should be_____________because_____________
Practice Problem Set B: Hand-Coding Problem
Write a function that validates if numbers are in a valid range using an enum.
Then write a function that uses that function to find the average of valid numbers in an array
#[derive(Debug)] enum ValidationResult { Valid, TooSmall, TooBig, } // Complete this function: fn validate_number(num: i32, min: i32, max: i32) -> ValidationResult { // Your code here - return appropriate ValidationResult variant } fn average_of_valid_numbers(arr: [i32 ; 5], min: i32, max: i32) -> Option<f32> { // Use validate_number to find which numbers are valid in the array // and return their average // If there are no valid numbers, return None rather than a value. } fn main() { let small_type = validate_number(1, 2, 3); let avg = average_of_valid_numbers([1,5,3,2,5], 2, 4); println!("{:?}", small_type); // this should print TooSmall println!("{:?}", avg); // this should print Some(2.5) }
Activity 14 - My first stack
Name:
fn main() { let x = 5; let name = String::from("Bob"); // same as "Bob".to_string() print_info(x, &name); } fn print_info(age: i32, username: &str) { // DRAW DIAGRAM FOR WHEN THE CODE REACHES THIS POINT // What does memory look like at this exact point? println!("{} is {} years old", username, age); }
Activity 15 - Acting out ownership
To bring:
- Tape/string
- Blank paper
Act 1: Copy vs Move (6 students)
fn main() { let x = 5; let y = x; let s1 = String::from("hello"); let s2 = s1; println!("{} {}", x, y); // println!("{} {}", s1, s2); }
Act 2: Function calls and returning ownership (4 students)
fn main() { let data = vec![1, 2, 3]; let data = process(data); println!("{:?}", data); // Works! } fn process(mut numbers: Vec<i32>) -> Vec<i32> { numbers.push(4); numbers }
Act 3: Attack of the Clones (8 students)
fn main() { let s1 = String::from("hello"); let s2 = s1.clone(); println!("{} {}", s1, s2); let s3 = s1; let b4 = s2; println!("{} {}", s3, s4); let names = vec![s3, s4]; }
Finale: The Box Office (14 students!!)
fn main() { let ticket_number = 42; let venue = String::from("Stage"); let guest_list = vec![ String::from("Alice"), String::from("Bob") ]; // Box in a Box! let vip_box = Box::new(Box::new(String::from("VIP"))); let show = prepare_show(guest_list, vip_box); println!("Show at {} with ticket {}", venue, ticket_number); println!("Final show: {:?}", show); } fn prepare_show(mut guests: Vec<String>, special: Box<Box<String>>) -> Box<Vec<String>> { guests.push(String::from("Charlie")); guests.push(*special); // Unbox twice! Box::new(guests) }
Activity 16 - Borrowing and References Debugging
Fix the borrowing bugs in each of the following code snippets. Try pasting them in the Rust playground and work on them until they compile and run.
When you have working code, paste the corrected code, with a comment on the line you fixed saying why your fix works.
Warm-up Problems
Problem 1: Use After Move
fn main() { let data = vec![1, 2, 3]; print_data(data); println!("{:?}", data); // Fix this! } fn print_data(v: Vec<i32>) { println!("{:?}", v); }
Hint: The function takes ownership. How can you let it borrow instead?
Problem 2: Reference Confusion
fn main() { let scores = vec![85, 92, 78]; let first = scores[0]; // This works, but... let names = vec![String::from("Alice")]; let first_name = names[0]; // This doesn't! Fix it println!("First score: {}", first); println!("First name: {}", first_name); }
Hint: What's different about i32 vs String? How can you access the String without moving it?
Problem 3: Iterator Ownership
fn main() { let nums = vec![1, 2, 3]; for n in nums { println!("{}", n * 2); } println!("{:?}", nums); // Oops! Fix the loop }
Hint: How can you iterate without consuming the vector?
Problem 4: Multiple Functions Need the Same Data
fn main() { let message = String::from("Hello, Rust!"); let len = get_length(message); let upper = to_uppercase(message); println!("Length: {}, Uppercase: {}", len, upper); } fn get_length(s: String) -> usize { s.len() } fn to_uppercase(s: String) -> String { s.to_uppercase() }
Hint: Both functions try to take ownership. What if they borrowed instead?
Problem 5: Iterator Pattern Matching
fn main() { let pairs = vec![(1, 2), (3, 4), (5, 6)]; for (a, b) in pairs.iter() { let sum = a + b; // Error! Can't add references println!("{} + {} = {}", a, b, sum); } println!("Pairs still available: {:?}", pairs); }
Hint: What type does .iter() give you? The tuple pattern (a, b) doesn't automatically dereference. How can you extract the values from the references?
Challenge Problems
Problem 6: Complex Ownership Chain
fn main() { let data = vec![10, 20, 30, 40, 50]; let result = process(data); println!("Original: {:?}", data); // Want to keep using data! println!("Result: {:?}", result); } fn process(nums: Vec<i32>) -> Vec<i32> { let popped = pop_last(nums); push_7(popped) } fn pop_last(nums: Vec<i32>) -> Vec<i32> { nums.pop(); nums } fn push_7(mut nums: Vec<i32>) -> Vec<i32> { nums.push(7); nums }
Hint: Where can you borrow or clone instead of passing ownership?
Problem 7: Function Returns and Borrowing
fn main() { let data = vec![5, 10, 15, 20]; let largest = find_largest(&data); data.push(25); // Error! Fix this println!("Largest was: {}", largest); println!("Updated data: {:?}", data); } fn find_largest(numbers: &Vec<i32>) -> &i32 { let mut largest = &numbers[0]; for num in numbers.iter() { if num > largest { largest = num; } } largest }
Hint: The function returns a reference into the vector. How long does that borrow last? Would it be safe to modify the vector while that reference exists? (We'll learn the precise rules for this next time.)
Activity 17 - Be the Borrow Checker!
For each code snippet below:
- Circle each borrow
- Draw a box or bracket around each borrow's scope (from creation to last use)
- Label each borrow scope as
&(immutable) or&mut(mutable) - Mark any conflicts where borrows violate the rules
- Decide whether the code will compile or not (and if not, why not)
Borrow Checker Rules:
- Rule 1: You can have EITHER many immutable references OR one mutable reference (not both)
- Rule 2: References must be valid (can't outlive the data they point to)
Problem 1 - let's do it together
fn main() { let mut scores = vec![85, 92, 78]; let reader = &scores; println!("Current scores: {:?}", reader); let writer = &mut scores; writer.push(95); println!("Updated scores: {:?}", writer); }
Problem 2
fn main() { let data = vec![1, 2, 3]; let ref1 = &data; let ref2 = &data; let ref3 = &data; println!("{:?}", ref1); println!("{:?}", ref2); println!("{:?}", ref3); println!("{:?}", data); }
Problem 3
fn main() { let mut numbers = vec![1, 2, 3, 4, 5]; for num in numbers.iter() { println!("{}", num); let num_ref = &mut numbers; num_ref.push(*num * 2); } }
Fun (and useful) fact - the same thing happens when you do numbers.push() without let ...
Problem 4
fn main() { let mut text = String::from("Hello"); let read = &text; println!("{}", read); let write = &mut text; write.push_str(" World"); println!("{} {}", read, write); }
Problem 5
fn main() { let mut data = vec![10, 20, 30]; let sum = calculate_sum(&data); add_bonus(&mut data, 5); println!("Sum: {}, Data: {:?}", sum, data); } fn calculate_sum(numbers: &Vec<i32>) -> i32 { numbers.iter().sum() } fn add_bonus(numbers: &mut Vec<i32>, bonus: i32) { for num in numbers.iter_mut() { *num += bonus; } }
Problem 6
fn main() { let outer; // this creates the variable at this scope and lets you set it to a value later { let inner = vec![1, 2, 3]; outer = &inner; println!("Inside: {:?}", outer); } println!("Outside: {:?}", outer); }
Problem 7
fn main() { let mut values = vec![1, 2, 3]; let modifier1 = &mut values; modifier1.push(4); println!("After first: {:?}", modifier1); let modifier2 = &mut values; modifier2.push(5); println!("After second: {:?}", modifier2); }
Problem 8
fn create_message() -> &String { let msg = String::from("Hello"); return &msg; } fn main() { let message = create_message(); println!("{}", message); }
Problem 9
fn main() { let mut data = vec![1, 2, 3]; let first = &data[0]; data.push(4); println!("First element: {}", first); }
Activity 18 - Poll Questions

You'll need to re-submit once for each question as we go!
Poll Question 1
Which of these will compile?
#![allow(unused)] fn main() { // Option A let mut data = vec![1, 2, 3]; let r1 = &data; let r2 = &data; println!("{:?} {:?}", r1, r2); // Option B let mut data = vec![1, 2, 3]; let r1 = &data; let r2 = &mut data; println!("{:?} {:?}", r1, r2); // Option C let mut data = vec![1, 2, 3]; let r1 = &mut data; let r2 = &mut data; println!("{:?} {:?}", r1, r2); }
A) Only A compiles B) A and B compile C) All three compile D) None compile
Poll Question 2
What happens when you run this code?
#![allow(unused)] fn main() { let emoji = "🦀"; let slice = &emoji[0..2]; println!("{}", slice); }
A) Prints "🦀" B) Prints nothing (empty string) C) Compiler error D) Runtime panic
Poll Question 3: Function Design - Style Preference
Which approach do you prefer for getting the first 3 characters of a string?
#![allow(unused)] fn main() { // Option A: Mutable borrow - modifies in place fn keep_first_three(s: &mut String) { *s = s.chars().take(3).collect(); } // Option B: Immutable borrow - returns new String fn first_three(s: &str) -> String { s.chars().take(3).collect() } // Usage A: let mut text = String::from("Hello World"); keep_first_three(&mut text); println!("{}", text); // "Hel" // Usage B: let text = String::from("Hello World"); let first = first_three(&text); println!("{}", first); // "Hel" }
A) Option A B) Option B C) Depends on context
Poll Question 4
What's the output?
fn main() { let mut data = vec![1, 2, 3, 4, 5]; let slice = &data[1..3]; data.push(6); println!("{:?}", slice); }
A) Prints [2, 3] B) Prints [2, 3, 6] C) Compiler error D) Runtime panic
Poll Question 5: String Type Choice
You're writing a function that finds the first word in text. Which signature is best?
#![allow(unused)] fn main() { // Option A fn first_word(text: String) -> String { ... } // Option B fn first_word(text: &String) -> &str { ... } // Option C fn first_word(text: &str) -> String { ... } // Option D fn first_word(text: &str) -> &str { ... } }
A) Option A B) Option B C) Option C D) Option D
Activity 19 - Explain the Anagram Finder
Below is a complete program for finding anagrams. The code is functional (for once!) - your job is to understand it.
- Take some time to explain in the in-line commments what each line of code is doing.
- In the triple /// doc-string comments before each function, explain what the function does overall and what its role is in the program.
- Consider renaming functions and variables (and if you do, replacing it elsewhere!) to make it clearer what's going on
You can pate this into your IDE/VSCode or Rust playground - whichever's easier.
Regardless of how far you get, paste your edited code into gradescope by the end of class.
use std::collections::HashMap; /// /// fn function_1(word: &str) -> Vec<char> { let mut ls: Vec<char> = Vec::new(); for ch in word.chars() { // if ch.is_alphabetic() { // let lc = ch.to_lowercase().next().unwrap(); // ls.push(lc); } } ls } /// /// fn function_2(word: &str) -> HashMap<char, usize> { let mut cs = HashMap::new(); let ls = function_1(word); for l in ls { // let c = cs.entry(l).or_insert(0); // *c += 1; } cs } /// /// fn function_3(word1: &str, word2: &str) -> bool { // let c1 = function_2(word1); // let c2 = function_2(word2); // c1 == c2 } /// /// fn function_4(word: &str) -> String { let mut ls = function_1(word); // ls.sort(); // let mut result = String::new(); for l in ls.iter() { result.push(*l); } result } /// /// fn function_5(words: Vec<&str>) -> Vec<Vec<String>> { // let mut sm: HashMap<String, Vec<String>> = HashMap::new(); for word in words { // let sig = function_4(word); // sm.entry(sig).or_insert(Vec::new()).push(word.to_string()); } // let mut g: Vec<Vec<String>> = Vec::new(); for (_s, wl) in sm { // if wl.len() > 1 { g.push(wl); } } // g.sort(); g } fn main() { let pairs = vec![ ("listen", "silent"), ("hello", "world"), ("The Morse Code", "Here come dots"), ("rust", "trust"), ("Dormitory", "Dirty room"), ]; for (w1, w2) in pairs { println!("'{}' and '{}': {}", w1, w2, function_3(w1, w2)); } println!(); let words = vec![ "listen", "silent", "enlist", "tea", "eat", "ate", "rust", "stur", "post", "stop", "pots", "tops", "hello", "world", "act", "cat", "tac", ]; let groups = function_5(words); for (i, group) in groups.iter().enumerate() { println!("Group {}: {:?}", i + 1, group); } }
Activity 20: Design Your Own Structs and Methods
Overview
In groups of 5-6, you'll design a struct-based system for a real-world scenario. Focus on:
- What fields belong in your structs
- What enums represent choices in your domain
- What methods you need and what type of
selfparameter each uses - How structs and enums work together
Time:
- 10 minutes: Group design work
- 10 minutes: Group presentations
Groups 1+2: Front of the room, Task A Groups 3+4: In the seats, Task B Groups 5+6: Outside the doors, Task C Groups 7+8: Lobby area, Task D
Instructions
- Add everyone's name to the sheet
- Design your system on paper:
- List the main struct(s) you need with their fields and types
- List any enums that represent choices or states
- Write any
implblocks you need and method signatures (including whether it takesself,&self, or&mut self) - but feel free to leave the inside of each methodunimplemented()
- Be ready to present:
- Choose one person who will come to the front to explain your design
- We'll go by task, so we'll hear two approaches to each problem
Task A: Smart Home Thermostat & Lights
Design a smart home system with thermostats and light bulbs.
Consider:
- A
Thermostatstruct - what fields does it need?- Current temperature? Target temperature? Current mode?
- A
SmartLightstruct - what makes a smart light?- Brightness level? Color? On/off state?
- What enums represent choices?
- Thermostat modes (Heat/Cool/Auto/Off)?
- Light colors or temperature?
Methods to think about:
- How do you read the current temperature? (
&self?) - How do you change the target temperature? (
&mut self?) - How do you turn a light on/off? (
&mut self?) - What about a factory reset that returns the device to defaults? (
self?)
Bonus: How might you store multiple lights in a home?
Task B: Coffee Shop Order System
Design a system for taking and managing coffee shop orders.
Consider:
- An
Orderstruct - what's in an order?- Customer name?
- Items ordered?
- Total price?
- Order status?
- A
Drinkstruct - what defines a drink?- Type (latte, cappuccino, etc.)?
- Size?
- Customizations (extra shot, oat milk, etc.)?
- What enums would help?
- DrinkSize (Small/Medium/Large)?
- OrderStatus (Pending/InProgress/Ready/Completed)?
- MilkType (Whole/Skim/Oat/Almond)?
Methods to think about:
- How do you calculate the total price? (
&self?) - How do you add an item to an order? (
&mut self?) - How do you mark an order as ready? (
&mut self?) - What about completing/closing an order so it can't be modified? (
selfto consume it?)
Bonus: How do you handle customizations? Separate struct? Enum? Vec of options?
Task C: Music Streaming Playlist
Design a music streaming app's playlist system.
Consider:
- A
Playliststruct - what data does a playlist have?- Name, creator?
- List of songs?
- Play count? Duration?
- Public or private?
- A
Songstruct - what identifies a song?- Title, artist, album?
- Duration in seconds?
- Genre?
- What enums fit?
- Genre (Rock/Pop/Jazz/Classical/...)?
- PlaylistVisibility (Public/Private/Unlisted)?
Methods to think about:
- How do you get the total playlist duration? (
&self?) - How do you add/remove songs from a playlist? (
&mut self?) - How do you shuffle the playlist? (
&mut self?) - What about converting a playlist to a "mix" that can't be edited? (
selfto consume?)
Bonus: Should shuffle return a new playlist or modify the existing one?
Task D: RPG Game Character
Design a role-playing game character system.
Consider:
- A
Characterstruct - what defines a character?- Name, level?
- Health points (current and max)?
- Inventory of items?
- Character class?
- An
Itemstruct - what's in the inventory?- Name, description?
- Item type (weapon, armor, potion)?
- Value or power?
- What enums make sense?
- CharacterClass (Warrior/Mage/Rogue/Healer)?
- ItemType (Weapon/Armor/Potion/Quest)?
Methods to think about:
- How do you check if a character is alive? (
&self?) - How do you take damage or heal? (
&mut self?) - How do you level up? (
&mut self?) - What about "retiring" a character and getting their final stats? (
selfto consume?)
Bonus: How does a character "use" an item from inventory?
Presentation Guidelines
When presenting (2 minutes per group):
-
Introduce your scenario (15 seconds)
- "We designed a [system name]"
-
Show your main struct(s) (45 seconds)
- "Our main struct is [Name] with fields: ..."
- "We also have [other structs]"
-
Show your enums (30 seconds)
- "We used enums for [choices]: ..."
-
Highlight interesting method (30 seconds)
- Pick ONE interesting method
- Explain why you chose
&self,&mut self, orself - "We made X take &mut self because it needs to change..."
Discussion Questions (After Presentations)
- Which groups had similar design decisions?
- Did anyone use
self(consuming) methods? When and why? - What made you choose an enum vs adding a field to a struct?
- Did any groups nest structs inside other structs?
- How did you decide what should be a separate struct vs just a field?
Key Concepts
As you work, remember:
-
&self: Use when you just need to READ data- Getting values, calculations, checking status
- The struct is still usable afterward
-
&mut self: Use when you need to CHANGE data- Updating fields, adding to collections, state changes
- The struct is still usable afterward
-
self: Use when you CONSUME the struct- Converting to something else, finalizing, deleting
- The struct is NOT usable afterward
-
Enums: Use for CHOICES (one of several alternatives)
- "This OR that" relationships
- Statuses, modes, types
-
Structs: Use for GROUPING related data
- "This AND that" relationships
- Data that belongs together
Activity 21 - Confidence rating and mini-quiz
Name:
On your the last page of your packets there is a sheet of questions.
You do NOT have to answer them.
Instead, rate each question on how confident you would be if you had to answer it now
- 😊 🤨 ☹️
- 1-5
- 🔴 🌕 🟢
Then pick THREE questions to answer and turn your sheet in.
(The list of questions will be available online after class.)
Self-quiz
You should be able to answer:
- When does Rust move vs copy data?
- Why can't you have
&mut Tand&Tsimultaneously?
- Why is
&strusually better thanStringfor parameters?
- What's the difference between
.iter()and.iter_mut()?
- When should you use a HashMap instead of a Vec?
- What are the three ownership rules and two borrow-checker rules?
- What's the difference between stack and heap memory?
- When would you use
&selfvs&mut selfvsselfin a method?
- What does
.collect()do and why does it need a type annotation?
- What's the difference between a struct and an enum?
- Why can't you index into a String with
text[0]?
- What happens when you call
.clone()on a Vec?
- Why does
.get()on HashMap return anOption?
- What happens if you try to modify a Vec while iterating over it with
.iter()?
- What's the purpose of the
.entry().or_insert()pattern in HashMap?
- What's a tuple struct and when would you use one?
17. **Stack/Heap Diagram**
Draw a stack/heap diagram showing memory after this code executes:
#![allow(unused)] fn main() { let mut scores = vec![85, 92, 78]; let first = scores[0]; let scores_ref = &scores; }
18. **Debugging:**
What's wrong with this code and how would you fix it?
fn process_data(data: Vec<i32>) { println!("Processing: {:?}", data); } fn main() { let numbers = vec![1, 2, 3]; process_data(numbers); println!("Numbers: {:?}", numbers); }
Activity 22 - Generics
Overview
In this activity, you'll practice writing generic functions and structs, working with trait bounds, and understanding how Rust's type system enables flexible, reusable code. All exercises can be completed in the Rust Playground.
Part 1: Fix the Trait Bounds (Warm-up)
Learning goal: Understanding which trait bounds are needed for different operations
Important Note: Some traits need to be imported! Copy this template to start each problem in the Rust Playground
#![allow(unused)] fn main() { // Common trait imports you might need: #![allow(unused_imports)] // to ignore unused import warnings use std::fmt::{Debug, Display}; use std::cmp::{PartialOrd, PartialEq, Eq, Ord}; use std::ops::{Add, Sub, Mul, Div}; // Note: Copy, Clone are automatically imported }
Instructions For each problem copy the snippet into Rust Playground and work on it until it compiles. The compiler errors will be very helpful!
Problem 1.1: Printing with Debug
Fix this function by adding the correct trait bound(s):
// Fix this function so it compiles fn print_twice<T>(value: T) { println!("{:?}", value); } fn main() { print_twice(42); print_twice("hello"); }
Problem 1.2: Comparison
Fix this function by adding the correct trait bound:
// Fix this function so it compiles fn is_greater<T>(a: T, b: T) -> bool { a > b } fn main() { println!("{}", is_greater(5, 3)); println!("{}", is_greater(2.5, 7.8)); }
Problem 1.3: Multiple Uses with Display
Fix this function by adding the correct trait bounds (you'll need multiple!):
// Fix this function so it compiles fn compare_and_print<T>(a: T, b: T) { if a > b { println!("{:?} is greater", a); } else if a == b { println!("They are equal!"); } else { println!("{:?} is greater", b); } } fn main() { compare_and_print(5, 3); compare_and_print(2.5, 7.8); }
Part 2: Build a Generic Container
Learning goal: Creating and implementing methods for generic structs
Implement a generic Pair struct that holds two values of the same type.
#[derive(Debug)] struct Pair<T> { first: T second: T } // 1. Implement a constructor method `new` impl<T> Pair<T> { // fn new(first: T, second: T) -> Pair<T> } // 2. Implement a method `swap` that returns a new Pair with values swapped // You can do this without adding a trait bound! impl<T> Pair<T> { // fn swap(self) -> Pair<T> } // 3. Implement a method `are_equal` that returns true if first == second // (You'll need a trait bound on this impl block!) impl<T: ???> Pair<T> { // fn are_equal(&self) -> bool } // Work until this compiles! fn main() { let pair = Pair::new(5, 10); println!("Original: {:?}", pair); let swapped = pair.swap(); println!("Swapped: {:?}", swapped); println!("Are equal? {}", pair.are_equal()); let equal_pair = Pair::new(7, 7); println!("Are equal? {}", equal_pair.are_equal()); }
Bonus: Add a method max that returns a reference to the larger of the two values. What trait bound do you need?
Part 3: Two Different Types
Learning goal: Working with multiple type parameters
Sometimes you want to store two values of DIFFERENT types. Implement this:
#[derive(Debug)] struct Pair<T, U> { first: T second: U } // Implement methods: impl<T, U> Pair<T, U> { // 1. Constructor fn new(first: T, second: U) -> Pair<T, U> { // Your code here } // 2. Get first value as reference fn get_first(&self) -> &T { // Your code here } // 3. Get second value as reference fn get_second(&self) -> &U { // Your code here } // 4. Swap the values (notice the return type!) fn swap(self) -> Pair<U, T> { // Your code here } } fn main() { let mixed = Pair::new(42, "hello"); println!("First: {}, Second: {}", mixed.get_first(), mixed.get_second()); let swapped = mixed.swap(); println!("Swapped: {:?}", swapped); // Now swapped is Pair<&str, i32> instead of Pair<i32, &str>! }
Part 4: Challenge - Option Revisited
Now that you understand generics, try to implement your own version of Option<T> from scratch (call it Maybe<T>). Implement is_some(), is_none(), unwrap(), and unwrap_or() methods.
Activity 23 - Traits
Overview
In this activity, you'll practice defining and implementing traits. We'll start with one example together, then you'll implement your own trait in the Rust Playground.
Part 1: Live-coding example - Summary Trait
We'll implement a Summary trait that works for different types.
// 1. Define the trait trait Summary { fn summarize(&self) -> String; // How long will this take to consume? fn time_needed(&self) -> u32; // in minutes // Default implementation using time_needed fn commitment_level(&self) -> String { let time = self.time_needed(); if time < 60 { format!("Quick! Just {} minutes", time) } else if time < 180 { format!("Moderate commitment: {:.1} hours", time as f64 / 60.0) } else { format!("Big commitment: {:.1} hours", time as f64 / 60.0) } } } // 2. Define some types struct Book { title: String, author: String, pages: u32, } struct Movie { title: String, director: String, runtime_minutes: u32, } // 3. Implement Summary for Book impl Summary for Book { // TODO } // 4. Implement Summary for Movie impl Summary for Movie { // TODO } // 5. Use the trait in a function fn print_info(item: &impl Summary) { // TODO } fn main() { let book = Book { title: "The Rust Programming Language".to_string(), author: "Steve Klabnik".to_string(), pages: 560, }; let movie = Movie { title: "The Matrix".to_string(), director: "Wachowskis".to_string(), runtime_minutes: 136, }; print_info(&book); println!(); print_info(&movie); }
Part 2: Your Turn - Measurable and Shape2D Traits
Learning goal: Implementing traits and understanding trait extension
You'll implement two related traits: Measurable (for anything with a size) and Shape2D (for 2D shapes, which extends Measurable).
Step 1: Define the structs and traits you'll need
Paste this into Rust Playground:
#![allow(unused)] fn main() { trait Measurable { fn size(&self) -> f64; fn size_category(&self) -> String { // Default implementation if self.size() < 10.0 { "Small".to_string() } else if self.size() < 100.0 { "Medium".to_string() } else { "Large".to_string() } } } // Shape2D extends Measurable - any Shape2D must also implement Measurable! trait Shape2D: Measurable { fn bounding_width(&self) -> f64; // Width of bounding box fn bounding_height(&self) -> f64; // Height of bounding box // Default: area is the same as size fn area(&self) -> f64 { self.size() } fn bounding_area(&self) -> f64 { self.bounding_width() * self.bounding_height() } // This gives a fraction of the space used by the shape if they were to be packed in a grid fn packing_efficiency(&self) -> f64 { self.area() / self.bounding_area() } } #[derive(Debug)] struct Rectangle { width: f64, height: f64, } #[derive(Debug)] struct Circle { radius: f64, } #[derive(Debug)] struct CrayonBox { count: u32, price: f64, barcode: String, } }
Step 2: Implement Measurable for each struct
Add these templates to your rust playground code and complete them - this step is done when the code in main runs successfully!
impl Measurable for Rectangle { fn size(&self) -> f64 { // Return the area // Your code here } } impl Measurable for Circle { fn size(&self) -> f64 { // Return the area (π × radius²) // Hint: use std::f64::consts::PI // Your code here } } impl Measurable for CrayonBox { fn size(&self) -> f64 { // Size is just the count of crayons // But be careful of types! // Your code here } // Override size_category for different thresholds // You don't need to modify this fn size_category(&self) -> String { if self.count <= 8 { "Small box".to_string() } else if self.count <= 24 { "Medium box".to_string() } else { "Large box".to_string() } } } fn main() { let rect = Rectangle { width: 5.0, height: 3.0 }; let circle = Circle { radius: 2.0 }; let crayons = CrayonBox { count: 64, price: 12.99, barcode: "071662078645".to_string(), }; println!("Rectangle:"); println!("Size: {}", rect.size()); println!("{}", rect.size_category()); println!("\nCircle:"); println!("Size: {}", circle.size()); println!("{}", circle.size_category()); println!("\nCrayons:"); println!("Size: {}", crayons.size()); println!("{}", crayons.size_category()); }
Step 4: Implement Shape2D for Rectangle and Circle only
Add this code to your playground, and REPLACE the code in main:
impl Shape2D for Rectangle { fn bounding_width(&self) -> f64 { // Your code here } fn bounding_height(&self) -> f64 { // Your code here } // area() uses the default implementation (calls self.size()) } impl Shape2D for Circle { fn bounding_width(&self) -> f64 { // Width of bounding box // Your code here } fn bounding_height(&self) -> f64 { // Height of bounding box // Your code here } } fn main() { let rect = Rectangle { width: 5.0, height: 3.0 }; let circle = Circle { radius: 2.0 }; println!("Rectangle:"); println!("{}}", rect.packing_efficiency()); println!("\nCircle:"); describe_shape(&circle); println!("{}}", circle.packing_efficiency()); let crayons = CrayonBox { count: 64, price: 12.99, barcode: "071662078645".to_string(), }; // CrayonBox is not Shape2D so we can just just do: println!("\nCrayons:"); println!("Size: {}", crayons.size()); }
Challenge / Extension: Implementing PartialOrd
Make shapes comparable by area! Implement PartialOrd for Rectangle so you can compare which shape is bigger.
use std::cmp::Ordering; // First, you need PartialEq (required for PartialOrd) impl PartialEq for Rectangle { fn eq(&self, other: &Rectangle) -> bool { // Your code here } } // Now implement PartialOrd - compare by area impl PartialOrd for Rectangle { fn partial_cmp(&self, other: &Rectangle) -> Option<Ordering> { // Compare areas // Hint: f64 already implements partial_cmp // So if x and y are f64 values // You could return x.partial_cmp(y) // Your code here } } // Now you can write a function that computes the area of the larger shape fn larger_area<T>(shape1: &T, shape2: &T) -> f64 where T: Shape2D + PartialOrd { // Use > to compare shape1 and shape2, return the area of the larger one // Your code here } fn main() { let rect1 = Rectangle { width: 5.0, height: 3.0 }; // area = 15 let rect2 = Rectangle { width: 4.0, height: 4.0 }; // area = 16 let bigger_area = larger_area(&rect1, &rect2); println!("Bigger rectangle has area: {:.2}", bigger_area); // 16.00 // Test some comparisons println!("rect1 < rect2: {}", rect1 < rect2); // true println!("rect1 == rect2: {}", rect1 == rect2); // false }
Activity 24 - Stack and Heap Diagram Practice
Instructions
For each code snippet below:
- Draw the stack and heap at the moment indicated by the comment
// DRAW HERE - Draw from the bottom up! With the stack on the left, heap on the right
- Label each variable on the with its type and metadata (len, cap)
- Show what's stored on the heap (if anything)
- Draw arrows for references (regular
&and mutable&mut) - For fat pointers (slices), show both the pointer and the metadata (len)
- For multiple stack frames, box each stack frame and label its scope.
- Remember to allocate space for a return values and other variables in a frame before adding the next frame!
Tips
- Start with the stack: Draw all local variables in the current frame
- Add heap data: For Box, String, Vec, draw boxes on the heap
- Draw arrows: References are just pointers - draw arrows from stack to stack or stack to heap
- Fat pointers: Remember slices store ptr + len
- Multiple frames: Stack them vertically, with newer frames at the top
- Trace execution: Follow the code line by line to see how values change
Common Mistakes to Avoid
- Drawing references as pointing directly to heap (they usually point to stack variables!)
- Forgetting that slices are fat pointers (ptr + length)
- Not showing the metadata (capacity, length) for String and Vec
- Forgetting that values can change during execution (trace carefully!)
- Forgetting to allocate space for a return value / all variables in a stack frame before adding a new frame
Problem 1
Concepts: Primitives on stack, Box, String, Vec on heap
fn main() { let x = 42; let y = Box::new(100); let s = String::from("hello"); let v = vec![1, 2, 3]; // DRAW HERE }
Problem 2
Concepts: Immutable references, mutable references
fn main() { let mut x = 10; let y = 20; let r1 = &y; let r2 = &mut x; *r2 = 15; // DRAW HERE }
Problem 3: Your turn
Concepts: References to Box, String, and Vec
fn main() { let mut numbers = vec![10, 20, 30]; let name = String::from("Alice"); let boxed = Box::new(42); let r1 = &numbers; let r2 = &mut numbers; let r3 = &name; let r4 = &boxed; r2.push(40); // DRAW HERE }
Problem 4:
Concepts: Slices as fat pointers with ptr + length
fn main() { let data = vec![5, 10, 15, 20, 25]; let slice = &data[1..4]; // DRAW HERE }
Problem 5:
Concepts: Multiple stack frames, passing references across frames
fn process(x: &mut i32, y: &i32) { *x = x + y; // DRAW HERE } fn main() { let mut a = 10; let b = 5; process(&mut a, &b); }
Problem 6:
Concepts: Multiple frames, heap data, references, slices
fn analyze(numbers: &Vec<i32>, window: &[i32]) -> i32 { let first = window[0]; let sum_ref = &first; // DRAW HERE first + numbers.len() as i32 } fn main() { let mut data = vec![100, 200, 300, 400]; let slice = &data[1..3]; let result = analyze(&data, slice); }
Problem 7: Mutable references across frames
Concepts: Mutable references, multiple frames, heap mutations
fn append_data(list: &mut Vec<i32>, value: i32) { list.push(value); let last = &list[list.len() - 1]; // DRAW HERE } fn main() { let mut numbers = vec![10, 20]; append_data(&mut numbers, 30); }
Activity - Let's talk glitches
~ 6 min
On gradescope:
- What kinds of bugs led to this behavior?
- How would rust have prevented them?
Just for fun:
(1:43-2:25, 5:05 -> (skip ahead around 10 min about a minute) -> 11:30)
~ 6 min
Time for questions / or we can take it easy and start the next one...
Other great videos to watch to learn more about memory via glitches in classic games:
-
Includes discussion of integer overflow and signed/unsigned ints, buffer overflow, etc.
Activity L26: Ask and Answer
Phase 1: Question Writing
- Tear off the last page of your notes from today
- Pick a codename (favorite Pokémon, secret agent name, whatever) - remember it!
Write one or two of of:
- A concept you don't fully understand ("I'm confused about...")
- A study strategy question ("What's the best way to review...")
- A practice test question
- Anything else you'd like to ask your peers ahead of the midterm
Phase 2: Round Robin Answering
- Pass papers around a few times
- Read the question, write a helpful response (2-3 min)
- Repeat 4-5 times (I'll let you know when)
You can answer questions, explain concepts, give tips / encouragement, draw diagrams, wish each other luck
Phase 3: Return & Review
- Submit on gradescope what codename you chose for yourself
- Return the papers at the end of class
- I'll scan and post all papers - you can see the responses you got and also all others
Activity 27 - Module Organization Puzzle
Group members:
Your Challenge:
You have a pile of code snippets that need to be organized into 4 files:
main.rs- The main programperson.rs- Person struct and methodsstorage.rs- Functions for managing a collection of peoplestats.rs- Functions for computing statistics
Steps:
-
Match signatures to bodies - Each uppercase letter [A] has a corresponding body with a lowercase letter. Find the matches!
-
Sort the complete snippets into files (
mainis already done!) In lieu of tape/glue you can write the letter pairs (eg [A][m]) on the correct paper to record your solution. -
Mark what's public - write
pubon things that need to be accessed from other files. -
Write
useandmodstatements- At the top of
main.rs, write theuseandmodstatements needed to connectmainto the other modules - Some modules may need to import from other modules too!
- At the top of
SIGNATURES (cut these out):
┌─────────────────────────────────────────┐
│ [A] │
│ fn list_names(people: &Vec
┌─────────────────────────────────────────┐ │ [B] │ │ impl Person { │ │ fn get_score(&self) -> f64 { │ └─────────────────────────────────────────┘
┌─────────────────────────────────────────┐ │ [C] │ │ fn validate_age(age: i32) -> bool { │ └─────────────────────────────────────────┘
┌─────────────────────────────────────────┐
│ [D] │
│ fn highest_score(people: &Vec
┌─────────────────────────────────────────┐ │ [E] │ │ impl Person { │ │ fn new(name: String, age: i32, │ │ score: f64) -> Person { │ └─────────────────────────────────────────┘
┌─────────────────────────────────────────┐
│ [F] │
│ fn count_people(people: &Vec
┌─────────────────────────────────────────┐ │ [G] │ │ const MIN_PASSING_SCORE: f64 = 60.0; │ └─────────────────────────────────────────┘
┌─────────────────────────────────────────┐ │ [H] │ │ struct Person { │ │ name: String, │ │ age: i32, │ │ score: f64, │ └─────────────────────────────────────────┘
┌─────────────────────────────────────────┐
│ [I] │
│ fn add_person(people: &mut Vec
┌─────────────────────────────────────────┐ │ [J] │ │ fn compute_average(sum: f64, │ │ count: usize) │ │ -> f64 { │ └─────────────────────────────────────────┘
┌─────────────────────────────────────────┐ │ [K] │ │ impl Person { │ │ fn get_age(&self) -> i32 { │ └─────────────────────────────────────────┘
┌─────────────────────────────────────────┐
│ [L] │
│ fn average_score(people: &Vec
┌─────────────────────────────────────────┐ │ [M] │ │ fn format_person(p: &Person) -> String {│ └─────────────────────────────────────────┘
┌─────────────────────────────────────────┐ │ [N] │ │ impl Person { │ │ fn get_name(&self) -> &str { │ └─────────────────────────────────────────┘
┌─────────────────────────────────────────┐
│ [O] │
│ fn count_passing(people: &Vec
BODIES (cut these out, they're scrambled!):
┌─────────────────────────────────────────┐ │ [a] │ │ } │ └─────────────────────────────────────────┘
┌─────────────────────────────────────────┐ │ [b] │ │ self.age │ │ } │ │ } │ └─────────────────────────────────────────┘
┌─────────────────────────────────────────┐ │ [c] │ │ if validate_age(age) { │ │ Person { name, age, score } │ │ } else { │ │ panic!("Invalid age"); │ │ } │ │ } │ │ } │ └─────────────────────────────────────────┘
┌─────────────────────────────────────────┐ │ [d] │ │ people.iter() │ │ .filter(|p| p.get_score() │ │ >= MIN_PASSING_SCORE)│ │ .count() │ │ } │ └─────────────────────────────────────────┘
┌─────────────────────────────────────────┐ │ [e] │ │ &self.name │ │ } │ │ } │ └─────────────────────────────────────────┘
┌─────────────────────────────────────────┐ │ [f] │ │ sum / count as f64 │ │ } │ └─────────────────────────────────────────┘
┌─────────────────────────────────────────┐ │ [g] │ │ people.iter() │ │ .map(|p| p.get_name() │ │ .to_string()) │ │ .collect() │ │ } │ └─────────────────────────────────────────┘
┌─────────────────────────────────────────┐ │ [h] │ │ people.len() │ │ } │ └─────────────────────────────────────────┘
┌─────────────────────────────────────────┐ │ [i] │ │ let sum: f64 = people.iter() │ │ .map(|p| p.get_score()) │ │ .sum(); │ │ compute_average(sum, │ │ people.len()) │ │ } │ └─────────────────────────────────────────┘
┌─────────────────────────────────────────┐ │ [j] │ │ people.iter() │ │ .map(|p| p.get_score()) │ │ .max_by(|a, b| │ │ a.partial_cmp(b) │ │ .unwrap()) │ │ .unwrap() │ │ } │ └─────────────────────────────────────────┘
┌─────────────────────────────────────────┐ │ [k] │ │ age > 0 && age < 150 │ │ } │ └─────────────────────────────────────────┘
┌─────────────────────────────────────────┐ │ [l] │ │ self.score │ │ } │ │ } │ └─────────────────────────────────────────┘
┌─────────────────────────────────────────┐ │ [m] │ │ people.push(person); │ │ } │ └─────────────────────────────────────────┘
┌─────────────────────────────────────────┐ │ [n] │ └─────────────────────────────────────────┘
┌─────────────────────────────────────────┐ │ [o] │ │ format!("{} (age {}, score: {:.1})",│ │ p.get_name(), │ │ p.get_age(), │ │ p.get_score()) │ │ } │ └─────────────────────────────────────────┘
main.rs
use and mod statements here:
fn main(){
let mut people = Vec::new();
let alice = Person::new("Alice".to_string(), 25, 92.5);
let bob = Person::new("Bob".to_string(), 30, 87.0);
add_person(&mut people, alice);
add_person(&mut people, bob);
println!("Count: {}", count_people(&people));
println!("Names: {:?}", list_names(&people));
println!("Average: {:.1}", average_score(&people));
println!("Highest: {:.1}", highest_score(&people));
println!("Passing: {}", count_passing(&people));
}
person.rs
storage.rs
stats.rs
Activity 28: Write Tests for Your Code
Goal
Practice writing unit tests for Rust code using the #[test] attribute and assert macros.
Setup Steps
1. Create a new Cargo project:
cargo new contact_tests
cd contact_tests
2. Create the module files:
Your project should have this structure:
contact_tests/
├── Cargo.toml
└── src/
├── main.rs (already exists - replace with code below)
├── person.rs (create this file)
├── storage.rs (create this file)
└── stats.rs (create this file)
3. Copy the code below into each file
Use the base code provided in the next section.
4. Verify it compiles:
cargo run
You should see output with counts, names, averages, etc.
Your Task
Add test modules to person.rs, storage.rs, and stats.rs (NOT main.rs).
What to test:
- Normal cases that should work
- Edge cases (empty inputs, boundary values, single items)
- Invalid inputs (use
#[should_panic]for functions that panic) - Custom error messages to explain test failures
How to run tests:
cargo test
Challenge yourself:
- Write 3-4 tests per module
- Add custom error messages to at least 2 tests
- Try breaking the code to see tests fail (then fix it!)
- Choose two tests you're proud of to submit on Gradescope with explanations
Base code
person.rs:
#![allow(unused)] fn main() { pub struct Person { // [H][a] - pub - used by main name: String, // private - only accessed through methods age: i32, // private score: f64, // private } fn validate_age(age: i32) -> bool { age > 0 && age < 150 } impl Person { pub fn new(name: String, age: i32, score: f64) -> Person { if validate_age(age) { Person { name, age, score } } else { panic!("Invalid age"); } } pub fn get_age(&self) -> i32 { self.age } pub fn get_name(&self) -> &str { &self.name } pub fn get_score(&self) -> f64 { self.score } } }
storage.rs
#![allow(unused)] fn main() { use crate::person::Person; // needs Person struct! pub fn add_person(people: &mut Vec<Person>, person: Person) { people.push(person); } pub fn count_people(people: &Vec<Person>) -> usize { people.len() } pub fn list_names(people: &Vec<Person>) -> Vec<String> { people.iter() .map(|p| p.get_name().to_string()) .collect() } pub fn format_person(p: &Person) -> String { format!("{} (age {}, score: {:.1})", p.get_name(), p.get_age(), p.get_score()) } }
stats.rs
#![allow(unused)] fn main() { use crate::person::Person; // needs Person struct! const MIN_PASSING_SCORE: f64 = 60.0; pub fn average_score(people: &Vec<Person>) -> f64 { let sum: f64 = people.iter() .map(|p| p.get_score()) .sum(); compute_average(sum, people.len()) } fn compute_average(sum: f64, count: usize) -> f64 { sum / count as f64 } pub fn highest_score(people: &Vec<Person>) -> f64 { people.iter() .map(|p| p.get_score()) .max_by(|a, b| a.partial_cmp(b).unwrap()) .unwrap() } pub fn count_passing(people: &Vec<Person>) -> usize { people.iter() .filter(|p| p.get_score() >= MIN_PASSING_SCORE) .count() } }
main.rs
mod person; mod storage; mod stats; use person::Person; use storage::{add_person, count_people, list_names}; use stats::{average_score, highest_score, count_passing}; fn main() { let mut people = Vec::new(); let alice = Person::new("Alice".to_string(), 25, 92.5); let bob = Person::new("Bob".to_string(), 30, 87.0); add_person(&mut people, alice); add_person(&mut people, bob); println!("Count: {}", count_people(&people)); println!("Names: {:?}", list_names(&people)); println!("Average: {:.1}", average_score(&people)); println!("Highest: {:.1}", highest_score(&people)); println!("Passing: {}", count_passing(&people)); }
Activity 29: From Loops to Iterators
Goal: Rewrite loop-based code using iterators and closures.
Setup: Open Rust Playground, keep the main(){...} part on the outside, and start with this data:
#![allow(unused)] fn main() { let numbers = vec![1, 2, 3, 4, 5, 6, 7, 8, 9, 10]; }
For each problem, think about:
- Do you need
*numor&numor justnumin your closures? - When do you need
.copied()or.cloned()? - What's the type of the iterator at each step?
To wrap up, submit the problem number and solution to the last problem you were able to complete by the end of class.
Problem 1:
Given this loop:
#![allow(unused)] fn main() { let mut result = Vec::new(); for num in &numbers { result.push(num + 5); } println!("result: {:?}", result); }
Rewrite using .map() and .collect()
Problem 2:
Given this loop:
#![allow(unused)] fn main() { let mut result = Vec::new(); for num in &numbers { if num % 3 == 0 { result.push(*num); } } println!("result: {:?}", result); }
Rewrite using .filter() and .collect()
Problem 3:
Given this loop:
#![allow(unused)] fn main() { let mut result = Vec::new(); for num in &numbers { if *num > 5 { result.push(num * 2); } } println!("result: {:?}", result); }
Rewrite using .filter(), .map(), and .collect()
Problem 4:
Given this loop:
#![allow(unused)] fn main() { let mut result = Vec::new(); for num in &numbers { let squared = num * num; if squared > 20 { result.push(squared); } } println!("result: {:?}", result); }
Rewrite using .map(), .filter(), and .collect()
Problem 5:
Given this loop:
#![allow(unused)] fn main() { let mut result = Vec::new(); for num in &numbers { if num % 2 == 0 { // Keep evens let tripled = num * 3; if tripled > 10 { // Keep if > 10 result.push(tripled); } } } println!("result: {:?}", result); }
Rewrite using .map(), .filter(), and .collect()
Problem 6:
Given this loop:
#![allow(unused)] fn main() { let mut count = 0; for num in &numbers { if num % 2 == 0 && *num > 4 { count += 1; } } println!("count: {}", count); }
Rewrite using .filter() and .count()
Problem 7:
Given this loop:
#![allow(unused)] fn main() { let mut sum = 0; for num in &numbers { if *num < 8 { sum += num * 2; } } println!("sum: {}", sum); }
Rewrite using .filter(), .map(), and .sum()
Challenge Problem:
Given this loop:
#![allow(unused)] fn main() { let mut result = Vec::new(); let mut running_sum = 0; for num in &numbers { running_sum += num; result.push(running_sum); } println!("result: {:?}", result); }
Rewrite using .fold() with a multi-line closure. Think about:
- What should the initial accumulator value be? (Hint: you need to track both the running sum AND the result vector, can use a tuple to hold both)
- The closure needs to update both parts of the tuple and return it
- Use
{ }syntax for a multi-line closure
Activity 30 - Midterm Retest
Today we used the activity time as a re-test opportunity for stack-heap and hand-coding problems from the second midterm.
Activity 31: Big O Complexity Analysis
Instructions
For each problem below:
- Determine the time complexity (Big O notation)
- Determine the space complexity (Big O notation)
- Justify your answer briefly (1-2 sentences)
- Answer the follow-up question about optimization or efficiency
Problem 1: Array Sum
#![allow(unused)] fn main() { fn sum_array(arr: &[i32]) -> i32 { let mut total = 0; for &num in arr { total += num; } total } }
Time complexity: ________________
Space complexity: ________________
Can this be made more efficient? Or is this optimal?
________________________________
Problem 2: Finding First Duplicate
#![allow(unused)] fn main() { fn find_first_duplicate(arr: &[i32]) -> Option<i32> { for i in 0..arr.len() { for j in (i+1)..arr.len() { if arr[i] == arr[j] { return Some(arr[i]); } } } None } }
Time complexity: ________________
Space complexity: ________________
Can this be made more efficient? Or is this optimal?
________________________________
Problem 3: Checking Sorted Array
#![allow(unused)] fn main() { fn is_sorted(arr: &[i32]) -> bool { for i in 0..(arr.len() - 1) { if arr[i] > arr[i + 1] { return false; } } true } }
Time complexity: ________________
Space complexity: ________________
Can this be made more efficient? Or is this optimal?
________________________________
Problem 4: Tricky Loop
#![allow(unused)] fn main() { fn mystery(n: usize) -> usize { let mut count = 0; let mut i = 1; while i < n { count += 1; i *= 2; // note * not + } count } }
Time complexity: ________________
Space complexity: ________________
Can this be made more efficient? Or is this optimal?
________________________________
Problem 5: Multiple Passes
#![allow(unused)] fn main() { fn count_above_average(arr: &[i32]) -> usize { // First pass: calculate average let mut sum = 0; for &num in arr { sum += num; } let avg = sum / arr.len() as i32; // Second pass: count above average let mut count = 0; for &num in arr { if num > avg { count += 1; } } count } }
Time complexity: ________________
Space complexity: ________________
Can this be made more efficient? Or is this optimal?
________________________________
Problem 6: HashMap Lookup
#![allow(unused)] fn main() { use std::collections::HashMap; fn count_frequencies(arr: &[i32]) -> HashMap<i32, usize> { let mut freq = HashMap::new(); for &num in arr { *freq.entry(num).or_insert(0) += 1; } freq } }
Time complexity: ________________
Space complexity: ________________
Can this be made more efficient? Or is this optimal?
________________________________
Problem 7: Matrix Operations
#![allow(unused)] fn main() { fn matrix_multiply(a: &Vec<Vec<i32>>, b: &Vec<Vec<i32>>) -> Vec<Vec<i32>> { let n = a.len(); let m = b[0].len(); let p = a[0].len(); let mut result = vec![vec![0; m]; n]; for i in 0..n { for j in 0..m { for k in 0..p { result[i][j] += a[i][k] * b[k][j]; } } } result } }
Time complexity: ________________
Space complexity: ________________
Can this be made more efficient? Or is this optimal?
________________________________
Bonus Challenge: Space-Time Tradeoff
Consider these two approaches to check if an array has duplicates:
Version A:
#![allow(unused)] fn main() { fn has_duplicates_v1(arr: &[i32]) -> bool { for i in 0..arr.len() { for j in (i+1)..arr.len() { if arr[i] == arr[j] { return true; } } } false } }
Version B:
#![allow(unused)] fn main() { use std::collections::HashSet; fn has_duplicates_v2(arr: &[i32]) -> bool { let mut seen = HashSet::new(); for &val in arr { if seen.contains(&val) { return true; } seen.insert(val); } false } }
Version A:
- Time: _______ Space: _______
Version B:
- Time: _______ Space: _______
-
When might you prefer Version A?
-
When might you prefer Version B?
Activity 32: Sorting Race
Setup
- Separate one deck into 4 suits
- Use Ace-10 from each suit (10 cards per algorithm)
- Pre-shuffle each suit to the same order (important!)
- Example starting order: 7-3-9-1-5-8-2-10-4-6
Board Setup: Create results table:
ROUND 1: O(n²) Showdown (n=10)
Starting order: 7-3-9-1-5-8-2-10-4-6
| Algorithm | Time | Swaps/Ops | Place |
|------------|------|-----------|-------|
| Bubble | | | |
| Insertion | | | |
| Selection | | | |
Round 1: The O(n^n) Showdown
- Call 12 Volunteers (2 sorters, 1 judge, 1 counter) for each alg
- Brief algorithm reminders:
- Bubble: Compare adjacent pairs, swap if wrong order, repeat
- Insertion: Build sorted portion by inserting each card
- Selection: Find minimum, move to front, repeat
- Judges count swaps/comparisons, verify correctness
- Quick show of hands to predict the winner + record
- Race starts / recording times and counts
Round 2: O(n log n)? Challenge
- Add to board:
ROUND 2: Champion Challenge (n=13)
Starting order: [all 13 cards shuffled]
| Algorithm | Time | Operations | Winner? |
|--------------|------|------------|---------|
| [R1 winner] | | | |
| Merge Sort | | | |
| Wild Card | | | |
- Keep Round 1 champion team! Add 8 new volunteers
- Reminder for Merge Sort:
- Merge Sort: Split pile in half, sort each half (smaller), then merge by comparing front cards
- Tip: "Split until you have piles of 1-2 cards, then combine"
- Ask wild card team for their intentions
- Vote on predictions
- Race and record results
Discussion
- Do these results match computational complexity?
- Were some algorithms harder/easier for people than for a computer?
- Would this change how you might sort cards in the future / what is your preference?
Activity 33: Printer Queue Simulator
Goal: Implement a printer job queue using VecDeque with methods to manage print jobs. (You can use Rust Playground - just copy the template code.)
Part 1: Setup
use std::collections::VecDeque; struct PrintJob { id: u32, pages: u32, } struct PrinterQueue { jobs: VecDeque<PrintJob>, } impl PrinterQueue { fn new() -> Self { // TODO: Create a new empty PrinterQueue } fn add_job(&mut self, id: u32, pages: u32) { // TODO: Add a normal job to the back of the queue } fn add_urgent_job(&mut self, id: u32, pages: u32) { // TODO: Add an urgent job to the front of the queue } fn total_pages(&self) -> u32 { // TODO: Calculate and return the total pages of all jobs in the queue } fn print_next(&mut self) { // TODO: Remove the next job from the queue and print: // "Processing job [id]: [pages] pages" // If the queue is empty, print: "No jobs in queue" } fn print_all(&mut self) { // TODO: Process and print all remaining jobs until the queue is empty } } fn main() { let mut printer = PrinterQueue::new(); // Add some regular jobs printer.add_job(1, 5); printer.add_job(2, 10); printer.add_job(3, 3); println!("Total pages in queue: {}", printer.total_pages()); // Process one job printer.print_next(); // Add an urgent job (should go to front) printer.add_urgent_job(99, 2); // Process all remaining jobs printer.print_all(); }
Expected Output
Total pages in queue: 18
Processing job 1: 5 pages
Processing job 99: 2 pages
Processing job 2: 10 pages
Processing job 3: 3 pages
Part 2: Extensions (if time permits)
Once you have the basic functionality working, try adding:
-
fn queue_size(&self) -> usize- Returns the number of jobs in the queue -
fn peek_next(&self) -> Option<&PrintJob>- Look at the next job without removing it -
fn cancel_job(&mut self, id: u32) -> bool- Remove a specific job by ID, return true if found
Discussion Questions
- Why is
VecDequebetter thanVecfor this problem? - What would happen if we used
Vecand had many urgent jobs? - In what scenarios would
add_urgent_jobbe useful in real systems? - What's the time complexity of
total_pages()? How could we make it O(1)?
Activity 33: Autograder Presentation
Guest talk from Joey Russoniello!
Activity 35 - Binary Heap and BST practice
Problem 1: Heap validation
Tree 1: Tree 2: Tree 3:
42 50 30
/ \ / \ / \
30 25 30 35 25 20
/ \ / / \ \ /
10 20 15 25 40 20 15
Tree 4: Tree 5:
100 60
/ \ / \
80 90 50 55
/ \ / \
50 85 40 45
Questions:
- Which are valid max-heaps?
- For invalid ones, identify the heap property violation
- What is the array representation of Tree 1?
Problem 2: Tracing heap operations
For each task, draw a representation of the process used and the final heap.
Starting max-heap:
42
/ \
35 25
/ \ /
30 20 15
Tasks:
- Insert 40: Show the bubble-up process.
- Extract-max: Show the bubble-down process
- Insert 50: Show the bubble-up process.
- What is the time complexity of each operation?
Problem 3: BST validation
Tree 1: Tree 2: Tree 3:
10 8 15
/ \ / \ / \
5 15 4 10 10 20
/ \ / / \ \ / \ \
1 7 12 1 5 14 5 12 25
/ \
3 6
Tree 4: Tree 5:
20 50
/ \ / \
10 30 25 75
/ \ \ / \ \
5 15 25 10 30 80
/ \
5 40
Questions:
- Which are valid BSTs?
- For invalid ones, identify the violation
- How would you fix them?
Problem 4: Tracing BST operations
In the space below, draw modified trees representing how each task would be completed, and note the time-complexity of that task.
Starting BST:
8
/ \
3 10
/ \ \
1 6 14
/ \ /
4 7 13
Tasks:
- Trace: Search for 4 (show path)
- Trace: Search for 11 (show path, realize not found)
- Trace: Insert 5 (show where it goes, draw resulting tree)
- Trace: Delete 6 (two children - find successor, show result)
- Trace: Delete 10 (one child - show result)
Problem 5: Comparing BST and Binary Heap
-
Is it possible for a tree to satisfy both BST and heap properties? If yes, what constraints must it have? If no, why not?
-
For each problem, decide whether a BST or a Binary Heap would be better, and explain why:
a. Finding the median of a stream of numbers (maintain as numbers arrive) b. Finding the 10 largest values in a dataset of 1 million numbers c. Maintaining a sorted list where you frequently check if a value exists d. Processing tasks by priority where you only care about the highest priority task e. Implementing autocomplete where you need to find all words with a given prefix
- Fill in this table:
| Operation | BST (balanced) | Binary Heap |
|---|---|---|
| Find minimum | ? | ? |
| Find maximum | ? | ? |
| Search for value x | ? | ? |
| Insert value x | ? | ? |
| Delete value x | ? | ? |
| Get all elements sorted | ? | ? |
Activity 36: Implement BFS
Format: Rust playground, submit on gradescope
Task: Complete the BFS implementation to find shortest paths in a graph
Part 1: Understanding the Setup
The graph is represented as an adjacency list:
graph[i]contains a vector of all neighbors of vertexi- Example:
graph[0] = vec![1, 2]means vertex 0 connects to vertices 1 and 2
Data structures used:
queue: VecDeque- BFS explores vertices level by level (FIFO)visited: HashSet- Track which vertices we've already seenparent: HashMap- Track how we reached each vertex (for path reconstruction)
Part 2: Complete the Implementation
use std::collections::{VecDeque, HashSet, HashMap}; fn bfs_shortest_path( graph: &Vec<Vec<usize>>, start: usize, end: usize ) -> Option<Vec<usize>> { // Initialize data structures for BFS let mut queue = VecDeque::new(); let mut visited = HashSet::new(); let mut parent: HashMap<usize, usize> = HashMap::new(); // Start BFS from the start vertex // TODO: Add start to queue // TODO: Add start to visited // BFS main loop: explore vertices level by level while !queue.is_empty() { // TODO: let vertex = the next value coming from the queue if vertex == end { // Found the destination! Now reconstruct the path // The path goes: start -> ... -> end // We need to follow parent pointers backward from end to start // TODO: Create an empty vector called 'path' // TODO: Create a variable 'current' and set it to 'end' // TODO: Write a loop that continues while 'current' is in the parent map // Inside the loop: // 1. Push 'current' to the path vector // 2. Update 'current' to be the parent of current // TODO: Push 'start' to the path (it won't be in the parent map) // TODO: Reverse the path (we built it backward!) // Hint: use path.reverse() // TODO: Return Some(path) } // If we're not done yet - explore all neighbors of current vertex for &neighbor in &graph[vertex] { //TODO: if visited contains &neighbor, skip (continue) //TODO: add neighbor to visited //TODO: add the neighbor-vertex pair to the parent hashmap //TODO: add neighbor to the queue } } None // No path exists from start to end } fn main() { // Example graph structure: // 0 --- 1 --- 4 // | | // 2 --- 3 --- 5 // | // 6 let graph = vec![ vec![1, 2], // 0 connects to 1, 2 vec![0, 3, 4], // 1 connects to 0, 3, 4 vec![0, 3], // 2 connects to 0, 3 vec![1, 2, 5, 6], // 3 connects to 1, 2, 5, 6 vec![1], // 4 connects to 1 vec![3], // 5 connects to 3 vec![3], // 6 connects to 3 ]; println!("=== BFS Shortest Path Tests ===\n"); // Test 1: Simple path if let Some(path) = bfs_shortest_path(&graph, 0, 4) { println!("Path from 0 to 4: {:?}", path); println!("Expected: [0, 1, 4]"); println!("Length: {}\n", path.len()); } // Test 2: Longer path if let Some(path) = bfs_shortest_path(&graph, 0, 6) { println!("Path from 0 to 6: {:?}", path); println!("Expected: [0, 1, 3, 6] or [0, 2, 3, 6]"); println!("Length: {}\n", path.len()); } // Test 3: Path to adjacent vertex if let Some(path) = bfs_shortest_path(&graph, 3, 5) { println!("Path from 3 to 5: {:?}", path); println!("Expected: [3, 5]"); println!("Length: {}\n", path.len()); } // Test 4: Start equals end if let Some(path) = bfs_shortest_path(&graph, 2, 2) { println!("Path from 2 to 2: {:?}", path); println!("Expected: [2]"); println!("Length: {}\n", path.len()); } // Test 5: Disconnected graph (no path exists) let disconnected = vec![ vec![1], // 0 connects to 1 vec![0], // 1 connects to 0 vec![3], // 2 connects to 3 (separate component) vec![2], // 3 connects to 2 ]; match bfs_shortest_path(&disconnected, 0, 3) { Some(path) => println!("Path from 0 to 3: {:?} (unexpected!)", path), None => println!("No path from 0 to 3 (correct - graph is disconnected)"), } }
Expected Output
=== BFS Shortest Path Tests ===
Path from 0 to 4: [0, 1, 4]
Expected: [0, 1, 4]
Length: 3
Path from 0 to 6: [0, 1, 3, 6]
Expected: [0, 1, 3, 6] or [0, 2, 3, 6]
Length: 4
Path from 3 to 5: [3, 5]
Expected: [3, 5]
Length: 2
Path from 2 to 2: [2]
Expected: [2]
Length: 1
No path from 0 to 3 (correct - graph is disconnected)
Questions for Reflection
- Why does BFS find the shortest path?
- What would happen if we used a stack (DFS) instead of a queue?
- What is the time complexity of BFS? (Think about V vertices and E edges)
- Why do we need the
visitedset? What would happen without it?
Activity 37: Topological Sort and MST
Problem 1A: Topological Sort
Given this DAG (course prerequisites):
CS101 → CS201 → CS301
↓ ↓ ↓
CS150 → CS250 → CS350
↓
CS160
Tasks:
- Trace DFS-based topological sort starting from CS101
- Show the finish order of vertices
- Write the topological ordering (reversed finish order)
- Verify: does your ordering respect all dependencies?
Problem 1B: Minimum Spanning Tree
Given this weighted graph:
A --5-- B --7-- C
| \ | / |
4 6 3 /9 2
| \ |/ |
D --8-- E --4-- F
Choose ONE algorithm to trace:
Option 1: Kruskal's Algorithm
- List all edges sorted by weight
- Mark which edges you add/skip
- Draw the final MST and calculate total weight
Option 2: Prim's Algorithm (start from A)
- Show MST growth step by step
- At each step, show which edge you're adding and why
- Draw the final MST and calculate total weight
Part 2: Create a Challenge
Partner up! Each person should:
-
Design a challenge graph for your partner of your choice:
- Topological sort: Create a DAG with 5-7 vertices
- MST: Create a weighted graph with 5-6 vertices and 7-9 edges
-
Design guidelines:
- Make it interesting but solvable in 3-4 minutes
- For topological sort: ensure it's actually a DAG (no cycles!)
- For MST: include some close edge weights to make decisions non-trivial
- Label your nodes/edges meaningfully! (courses, tasks, roads, etc)
-
Write down your own solution on a separate piece of paper
Part 3: Swap and Solve
- Exchange challenge graphs with your partner
- Solve your partner's problem:
- For topological sort: find a valid ordering
- For MST: trace Kruskal's OR Prim's to find the MST
- Show your work - your partner will check it!
Part 4: Check and Discuss
- Swap back and check each other's solutions using your answer key
- Discuss:
- Did they find a correct solution?
- If topological sort: are there other valid orderings?
- If MST: did you both get the same total weight?
- What made the problem easy or tricky?
Discussion Questions to Submit on Gradescope
- What made a good challenge graph? What made it too easy or too hard?
- Which MST algorithm (Kruskal's or Prim's) felt easier to trace by hand? Why?
Blank page here!
Activity 38: Confidence quiz
Instructions: For each question below, rate your confidence level on answering it:
- ✅ Confident - "I can do this!"
- ⚠️ Uncertain - "I'd need to think about it"
- ❌ Need Review - "I should study this more"
Or the happy face scale or whatever scale you want :-)
You don't need to actually answer the questions - just assess your confidence. Use this to identify areas to focus on before the exam
Fill-ins
1.1 To use both == and < comparisons on a custom struct, implement the _____ and _____ traits.
1.2 The ? operator propagates errors and can only be used in functions that return _____ or _____.
1.3 An array of i32 is stored in _____, while a String allocates memory on the _____.
1.4 To process tasks in the order they arrive, use a _____.
1.5 Data structures: BFS uses a _____ while DFS uses a _____ or recursion.
1.6 To maintain a collection where you frequently need the maximum element, use a _____.
1.7 The key property of a min-heap is that each parent node is _____ than its children.
1.8 A graph with V vertices and E edges represented as an adjacency list uses _____ space.
1.9 Quick sort's worst-case time complexity is _____, which occurs when _____.
1.10 To check if a graph contains a cycle, you can use _____ with a visited set.
1.11 Command to see the commit history: _____
1.12 Command to create a new branch called feature-x: _____
1.13 Command to see what changes you've made but haven't staged: _____
1.14 To iterate over both indices and values of a vector, use the _____ method.
1.15 A Vec<T> owns its data, while a _____ is a borrowed view of a sequence.
1.16 When a function parameter is &mut self, it can _____ the struct, but when it's &self, it can only _____.
1.17 An adjacency matrix uses O(___) space, which is wasteful for _____ graphs.
1.18 To find if there's a path between two nodes in a graph, use _____ or _____.
Code Tracing
2.1 What does this print?
#![allow(unused)] fn main() { use std::collections::BTreeMap; let mut map = BTreeMap::new(); map.insert(3, "three"); map.insert(1, "one"); map.insert(2, "two"); for (k, v) in &map { println!("{}", k); } }
2.2 What is the time complexity?
#![allow(unused)] fn main() { fn find_pair_sum(arr: &[i32], target: i32) -> bool { for &num in arr { for &other in arr { if num + other == target { return true; } } } false } }
2.3 What kind of error does this produce?
fn main() { let data = vec![1, 2, 3]; let first = &data[0]; let more = data; println!("{}", first); }
2.4 What does this print?
#![allow(unused)] fn main() { let mut v = vec![5, 3, 8, 1]; v.sort(); v.pop(); println!("{}", v.len()); }
Hand-Coding Problems
4.1 Write a function count_occurrences(vec: &Vec<i32>, target: i32) -> usize that counts how many times target appears in the vector.
4.2 Write a function using .filter() and .collect() that takes Vec<String> and returns a new Vec<String> containing only strings with length > 5.
4.3 Write two tests for a function fn median(nums: Vec<i32>) -> f64 that tests a normal case and an edge case (eg an empty vector).
Algorithm Tracing
DFS Traversal
Given this graph:
0: [1, 3]
1: [0, 2]
2: [1, 3, 4]
3: [0, 2]
4: [2]
a) Draw the graph
b) Starting from node 0, what is the DFS traversal order (assuming you visit neighbors in numerical order)?
c) After processing node 2, what is the stack contents?
Topological Sort
Given this DAG:
A: [B, C]
B: [D]
C: [D]
D: []
What is a valid topological ordering of these vertices?
Shortest Path
Given this weighted graph:
3 2
A ----- B ----- D
| |
4| 1|
| |
C ----- E
2
Edge weights: A-B: 3, B-D: 2, A-C: 4, B-E: 1, C-E: 2
Starting from A, what is the shortest path to D using Dijkstra's algorithm? Do any values get updated twice?
Max Heap
Start with an empty max-heap. Insert: 8, 3, 10, 1, 6
After all insertions, what is the array representation of the heap?
Stack-Heap Diagram
Draw a stack-heap diagram at the labeled point
fn process_data(data: &mut Vec<i32>) -> i32 { data.push(5); let s = &data[1..3]; let x = s[0]; // DRAW STACK-HEAP HERE return s.len(); } fn main() { let mut nums = vec![1, 2, 3, 4]; let result = process_data(&mut nums); }
Activity L39: Ask and Answer II
Phase 1: Question Writing
- Tear off the last page of your notes from today
- Pick a codename (favorite Pokémon, secret agent name, whatever) - remember it!
Write one or two of of:
- A concept you don't fully understand ("I'm confused about...")
- A study strategy question ("What's the best way to review...")
- A practice test question
- Anything else you'd like to ask your peers ahead of the midterm
Phase 2: Round Robin Answering
- Pass papers around a few times
- Read the question, write a helpful response
- When you're done, raise you paper up and find someone to swap with
You can answer questions, explain concepts, give tips / encouragement, draw diagrams, wish each other luck
Phase 3: Return & Review
- Submit on gradescope what codename you chose for yourself
- Return the papers at the end of class
- I'll scan and post all papers - you can see the responses you got and also all others