Hello Shell!
About This Module
This module introduces you to the command-line interface and essential shell commands that form the foundation of systems programming and software development. You'll learn to navigate the file system, manipulate files, and use the terminal effectively for Rust development.
Prework Readings
Review this module.
Pre-lecture Reflections
Before class, consider these questions:
- What advantages might a command-line interface offer over graphical interfaces? What types of tasks seem well-suited for command-line automation?
- How does the terminal relate to the development workflow you've seen in other programming courses?
Learning Objectives
By the end of this module, you should be able to:
- Create, copy, move, and delete files and directories at the command line
- Understand file permissions and ownership concepts
- Use pipes and redirection for basic text processing
- Set up an organized directory structure for programming projects
- Feel comfortable working in the terminal environment
Why the Command Line Matters
For Programming and Data Science:
# Quick file operations
ls *.rs                    # Find all Rust files
grep "TODO" src/*.rs       # Search for TODO comments across files
wc -l data/*.csv          # Count lines in all CSV files
Advantages over GUI:
- Speed: Much faster for repetitive tasks
- Precision: Exact control over file operations
- Automation: Commands can be scripted and repeated
- Remote work: Essential for server management
- Development workflow: Many programming tools use command-line interfaces
File Systems
File System Structure Essentials
A lot of DS and AI infrastructure runs on Linux/Unix type filesystems.
Root Directory (/):
The slash character represents the root of the entire file system.
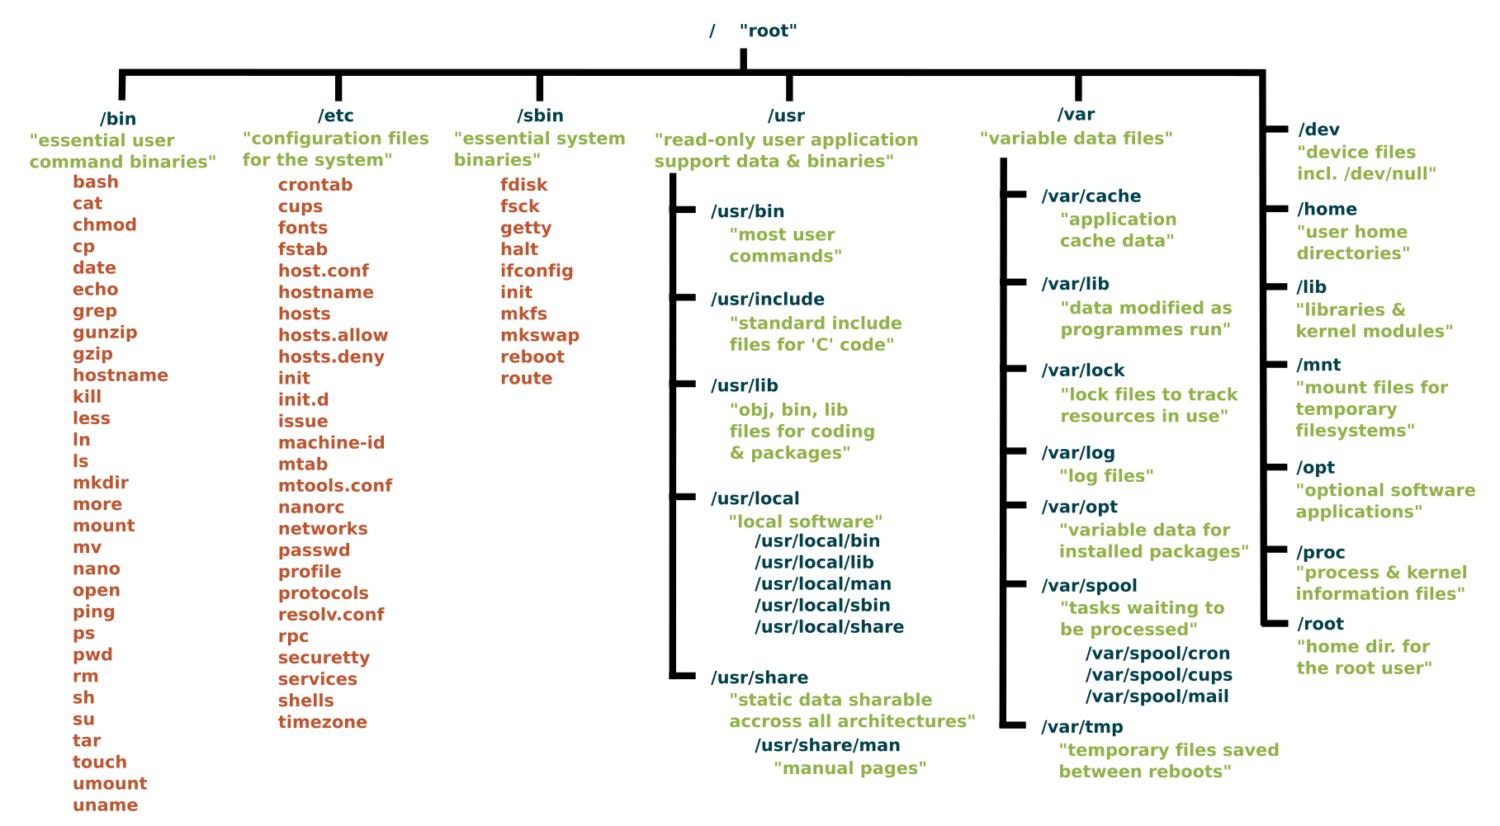
Directory Conventions
/: The slash character by itself is the root of the filesystem/bin: A place containing programs that you can run/boot: A place containing the kernel and other pieces that allow your computer to start/dev: A place containing special files representing all your devices/etc: A place with lots of configuration information (i.e. login and password data)/home: All user's home directories/lib: A place for all system libraries/mnt: A place to mount external file systems/opt: A place to install user software/proc: Lots of information about your computer and what is running on it/sbin: Similar to bin but for the superuser/usr: Honestly a mishmash of things and rather overlapping with other directories/tmp: A place for temporary files that will be wiped out on a reboot/var: A place where many programs write files to maintain state
Key Directories You'll Use:
/                          # Root of entire system
├── home/                  # User home directories
│   └── username/          # Your personal space
├── usr/                   # User programs and libraries
│   ├── bin/              # User programs (like cargo, rustc)
│   └── local/            # Locally installed software
└── tmp/                  # Temporary files
Navigation Shortcuts:
~= Your home directory.= Current directory..= Parent directory/= Root directory
To explore further
You can read more about the Unix filesystem at https://en.wikipedia.org/wiki/Unix_filesystem.
The Linux shell
It is an environment for finding files, executing programs, manipulating (create, edit, delete) files and easily stitching multiple commands together to do something more complex.
Windows and MacOS has command shells, but Windows is not fully compatible, however MacOS command shell is.
Windows Subystem for Linux is fully compatible.
In Class Activity Part 1: Access/Install Terminal Shell
Directions for MacOS Users and Windows Users.
macOS Users:
Your Mac already has a terminal! Here's how to access it:
-
Open Terminal:
- Press
Cmd + Spaceto open Spotlight - Type "Terminal" and press Enter
- Or: Applications → Utilities → Terminal
- Press
-
Check Your Shell:
echo $SHELL # Modern Macs use zsh, older ones use bash -
Optional: Install Better Tools:
Install Homebrew (package manager for macOS)
/bin/bash -c "$(curl -fsSL https://raw.githubusercontent.com/Homebrew/install/HEAD/install.sh)"
Install useful tools
brew install tree # Visual directory structure
brew install ripgrep # Fast text search
Windows Users:
Windows has several terminal options. For this exercise we recommend Option 1, Git bash.
When you have more time, you might want to explore Windows Subsystem for Linux so you can have a full, compliant linux system accessible on Windows.
PowerShell aliases some commands to be Linux-like, but they are fairly quirky.
We recommend Git Bash or WSL:
-
Option A: Git Bash (Easier)
- Download Git for Windows from git-scm.com
- During installation, select "Use Git and optional Unix tools from the Command Prompt"
- Open "Git Bash" from Start menu
- This gives you Unix-like commands on Windows
-
Option B: Windows Subsystem for Linux (WSL)
# Run PowerShell as Administrator, then: wsl --install # Restart your computer # Open "Ubuntu" from Start menu -
Option C: PowerShell (Built-in)
- Press
Win + Xand select "PowerShell" - Note: Commands differ from Unix (use
dirinstead ofls, etc.) - Not recommended for the in-class activities.
- Press
Verify Your Setup (Both Platforms)
pwd              # Should show your current directory
ls               # Should list files (macOS/Linux) or use 'dir' (PowerShell)
which ls         # Should show path to ls command (if available)
echo "Hello!"    # Should print Hello!
Essential Commands for Daily Use
Navigation and Exploration:
pwd                        # Show current directory path
ls                        # List files in current directory
ls -al                    # List files with details and hidden files
cd directory_name         # Change to directory
cd ..                     # Go up one directory
cd ~                      # Go to home directory
Creating and Organizing:
mkdir project_name        # Create directory
mkdir -p path/to/dir      # Create nested directories
touch filename.txt        # Create empty file
cp file.txt backup.txt    # Copy file
mv old_name new_name      # Rename/move file
rm filename               # Delete file
rm -r directory_name      # Delete directory and contents
rm -rf directory_name     # Delete dir and contents without confirmation
Viewing File Contents:
cat filename.txt          # Display entire file
head filename.txt         # Show first 10 lines
tail filename.txt         # Show last 10 lines
less filename.txt         # View file page by page (press q to quit)
File Permissions Made Simple
Understanding ls -l Output:
-rw-r--r-- 1 user group 1024 Jan 15 10:30 filename.txt
drwxr-xr-x 2 user group 4096 Jan 15 10:25 dirname
Permission Breakdown:
- First character:
-(file) ord(directory) - Next 9 characters in groups of 3:
- Owner permissions (rwx): read, write, execute
- Group permissions (r-x): read, no write, execute
- Others permissions (r--): read only
We will see these kinds of permissions again in Rust programming!
Common Permission Patterns:
644orrw-r--r--: Files you can edit, others can read755orrwxr-xr-x: Programs you can run, others can read/run600orrw-------: Private files only you can access
Pipes and Redirection Basics
Saving Output to Files:
ls > file_list.txt        # Save directory listing to file
echo "Hello World" > notes.txt  # Overwrite file contents
echo "It is me" >> notes.text   # Append to file content
Combining Commands with Pipes:
ls | grep ".txt"          # List only .txt files
cat file.txt | head -5    # Show first 5 lines of file
ls -l | wc -l            # Count number of files in directory
Practical Examples:
# Find large files
ls -la | sort -k5 -nr | head -10

# Count total lines in all text files
cat *.txt | wc -l

# Search for pattern and save results
grep "error" log.txt > errors.txt
Setting Up for Programming
Creating Project Structure:
# Create organized development directory
# The '-p' means make intermediate directories as required
mkdir -p ~/development/rust_projects
mkdir -p ~/development/data_science
mkdir -p ~/development/tools

# Navigate to project area
cd ~/development/rust_projects

# Create specific project
mkdir my_first_rust_project
cd my_first_rust_project
Customizing Your Shell Profile (Optional)
Understanding Shell Configuration Files:
Your shell reads a configuration file when it starts up. This is where you can add aliases, modify your PATH, and customize your environment.
Common Configuration Files:
- macOS (zsh):
~/.zshrc - macOS (bash):
~/.bash_profileor~/.bashrc - Linux (bash):
~/.bashrc - Windows Git Bash:
~/.bash_profile
Finding Your Configuration File:
It's in your Home directory.
# Check which shell you're using (MacOS/Linus)
echo $SHELL

# macOS with zsh
echo $HOME/.zshrc

# macOS/Linux with bash
echo $HOME/.bash_profile
echo $HOME/.bashrc
Adding Useful Aliases:
# Edit your shell configuration file (choose the right one for your system)
nano ~/.zshrc        # macOS zsh
nano ~/.bash_profile # macOS bash or Git Bash
nano ~/.bashrc       # Linux bash

# Add these helpful aliases:
alias ll='ls -la'
alias ..='cd ..'
alias ...='cd ../..'
alias projects='cd ~/development'
alias rust-projects='cd ~/development/rust_projects'
alias grep='grep --color=auto'
alias tree='tree -C'

# Custom functions
# This will make a directory specified as the argument and change into it
mkcd() {
    mkdir -p "$1" && cd "$1"
}
Modifying Your PATH:
# Add to your shell configuration file
export PATH="$HOME/bin:$PATH"
export PATH="$HOME/.cargo/bin:$PATH"    # For Rust tools (we'll add this later)

# For development tools
export PATH="/usr/local/bin:$PATH"
Applying Changes:
# Method 1: Reload your shell configuration
source ~/.zshrc        # For zsh
source ~/.bash_profile # For bash

# Method 2: Start a new terminal session
# Method 3: Run the command directly
exec $SHELL
Useful Environment Variables:
# Add to your shell configuration file
export EDITOR=nano           # Set default text editor
export HISTSIZE=10000       # Remember more commands
export HISTFILESIZE=20000   # Store more history

# Color support for ls
export CLICOLOR=1           # macOS
export LS_COLORS='di=34:ln=35:so=32:pi=33:ex=31:bd=34:cd=34:su=0:sg=0:tw=34:ow=34' # Linux
Shell Configuration with Git Branch Name
A useful shell configuration is modify the shell command prompt to show your current working directory and your git branch name if you are in a git project.
See DS549 Shell Configuraiton for instructions.
Shell scripts
A way to write simple programs using the linux commands and some control flow elements. Good for small things. Never write anything complicated using shell.
Shell Script File
Shell script files typically use the extension *.sh, e.g. script.sh.
Shell script files start with a shebang line, #!/bin/bash.
#!/bin/bash

echo "Hello world!"
To execute shell script you can use the command:
source script.sh
Hint: You can use the
nanotext editor to edit simple files like this.
In-Class Activity: Shell Challenge
Prerequisite: You should have completed Part I above to have access to a Linux or MacOS style shell.
Part 2: Scavenger Hunt
Complete the steps using only the command line!
You can use echo to write to the file, or text editor nano.
Feel free to reference the cheat sheet below and the notes above.
-
Create a directory called
treasure_huntin your course projects folder. -
In that directory create a file called
command_line_scavenger_hunt.txtthat contains the following:- Your name / group members
-
Run these lines and record the output into that
.txtfile:
whoami                    # What's your username?
hostname                  # What's your computer's name?
pwd                      # Where do you start?
echo $HOME               # What's your home directory path?
-
Inside that directory, create a text file named
clue_1.txtwith the content "The treasure is hidden in plain sight" -
Create a subdirectory called
secret_chamber -
In the
secret_chamberdirectory, create a file calledclue_2.txtwith the content "Look for a hidden file" -
Create a hidden file in the
secret_chamberdirectory called.treasure_map.txtwith the content "Congratulations. You found the treasure" -
When you're done, change to the parent directory of
treasure_huntand run the commandzip -r treasure_hunt.zip treasure_hunt.- Or if you are on Git Bash, you may have to use the command
tar.exe -a -c -f treasure_hunt.zip treasure_hunt
- Or if you are on Git Bash, you may have to use the command
-
Upload
treasure_hunt.zipto gradescope - next time we will introduce git and github and use that platform going forward. -
Optional: For Bragging Rights Create a shell script that does all of the above commands and upload that to Gradescope as well.
Command Line Cheat Sheet
Basic Navigation & Listing
Mac/Linux (Bash/Zsh):
# Navigate directories
cd ~                    # Go to home directory
cd /path/to/directory   # Go to specific directory
pwd                     # Show current directory

# List files and directories
ls                      # List files
ls -la                  # List all files (including hidden) with details
ls -lh                  # List with human-readable file sizes
ls -t                   # List sorted by modification time
Windows (PowerShell/Command Prompt):
# Navigate directories
cd ~                    # Go to home directory (PowerShell)
cd %USERPROFILE%        # Go to home directory (Command Prompt)
cd C:\path\to\directory # Go to specific directory
pwd                     # Show current directory (PowerShell)
cd                      # Show current directory (Command Prompt)

# List files and directories
ls                      # List files (PowerShell)
dir                     # List files (Command Prompt)
dir /a                  # List all files including hidden
Get-ChildItem -Force    # List all files including hidden (PowerShell)
Finding Files
Mac/Linux:
# Find files by name
find /home -name "*.pdf"           # Find all PDF files in /home
find . -type f -name "*.log"       # Find log files in current directory
find /usr -type l                  # Find symbolic links

# Find files by other criteria
find . -type f -size +1M           # Find files larger than 1MB
find . -mtime -7                   # Find files modified in last 7 days
find . -maxdepth 3 -type d         # Find directories up to 3 levels deep
Windows:
# PowerShell - Find files by name
Get-ChildItem -Path C:\Users -Filter "*.pdf" -Recurse
Get-ChildItem -Path . -Filter "*.log" -Recurse
dir *.pdf /s                       # Command Prompt - recursive search

# Find files by other criteria
Get-ChildItem -Recurse | Where-Object {$_.Length -gt 1MB}  # Files > 1MB
Get-ChildItem -Recurse | Where-Object {$_.LastWriteTime -gt (Get-Date).AddDays(-7)}  # Last 7 days
Counting & Statistics
Mac/Linux:
# Count files
find . -name "*.pdf" | wc -l       # Count PDF files
ls -1 | wc -l                      # Count items in current directory

# File and directory sizes
du -sh ~/Documents                 # Total size of Documents directory
du -h --max-depth=1 /usr | sort -rh  # Size of subdirectories, largest first
ls -lah                            # List files with sizes
Windows:
# Count files (PowerShell)
(Get-ChildItem -Filter "*.pdf" -Recurse).Count
(Get-ChildItem).Count              # Count items in current directory

# File and directory sizes
Get-ChildItem -Recurse | Measure-Object -Property Length -Sum  # Total size
dir | sort length -desc            # Sort by size (Command Prompt)
Text Processing & Search
Mac/Linux:
# Search within files
grep -r "error" /var/log           # Search for "error" recursively
grep -c "hello" file.txt           # Count occurrences of "hello"
grep -n "pattern" file.txt         # Show line numbers with matches

# Count lines, words, characters
wc -l file.txt                     # Count lines
wc -w file.txt                     # Count words
cat file.txt | grep "the" | wc -l  # Count lines containing "the"
Windows:
# Search within files (PowerShell)
Select-String -Path "C:\logs\*" -Pattern "error" -Recurse
(Select-String -Path "file.txt" -Pattern "hello").Count
Get-Content file.txt | Select-String -Pattern "the" | Measure-Object

# Command Prompt
findstr /s "error" C:\logs\*       # Search for "error" recursively
find /c "the" file.txt             # Count occurrences of "the"
System Information
Mac/Linux:
# System stats
df -h                              # Disk space usage
free -h                            # Memory usage (Linux)
system_profiler SPHardwareDataType # Hardware info (Mac)
uptime                             # System uptime
who                                # Currently logged in users

# Process information
ps aux                             # List all processes
ps aux | grep chrome               # Find processes containing "chrome"
ps aux | wc -l                     # Count total processes
Windows:
# System stats (PowerShell)
Get-WmiObject -Class Win32_LogicalDisk | Select-Object Size,FreeSpace
Get-WmiObject -Class Win32_ComputerSystem | Select-Object TotalPhysicalMemory
(Get-Date) - (Get-CimInstance Win32_OperatingSystem).LastBootUpTime  # Uptime
Get-LocalUser                      # User accounts

# Process information
Get-Process                        # List all processes
Get-Process | Where-Object {$_.Name -like "*chrome*"}  # Find chrome processes
(Get-Process).Count                # Count total processes

# Command Prompt alternatives
wmic logicaldisk get size,freespace  # Disk space
tasklist                           # List processes
tasklist | find "chrome"           # Find chrome processes
File Permissions & Properties
Mac/Linux:
# File permissions and details
ls -l filename                     # Detailed file information
stat filename                     # Comprehensive file statistics
file filename                     # Determine file type

# Find files by permissions
find . -type f -readable           # Find readable files
find . -type f ! -executable       # Find non-executable files
Windows:
# File details (PowerShell)
Get-ItemProperty filename          # Detailed file information
Get-Acl filename                   # File permissions
dir filename                       # Basic file info (Command Prompt)

# File attributes
Get-ChildItem | Where-Object {$_.Attributes -match "ReadOnly"}  # Read-only files
Network & Hardware
Mac/Linux:
# Network information
ip addr show                       # Show network interfaces (Linux)
ifconfig                          # Network interfaces (Mac/older Linux)
networksetup -listallhardwareports # Network interfaces (Mac)
cat /proc/cpuinfo                 # CPU information (Linux)
system_profiler SPHardwareDataType # Hardware info (Mac)
Windows:
# Network information (PowerShell)
Get-NetAdapter                     # Network interfaces
ipconfig                          # IP configuration (Command Prompt)
Get-WmiObject Win32_Processor      # CPU information
Get-ComputerInfo                   # Comprehensive system info
Platform-Specific Tips
Mac/Linux Users:
- Your home directory is
~or$HOME - Hidden files start with a dot (.)
- Use
man commandfor detailed help - Try
which commandto find where a command is located
Windows Users:
- Your home directory is
%USERPROFILE%(Command Prompt) or$env:USERPROFILE(PowerShell) - Hidden files have the hidden attribute (use
dir /ahto see them) - Use
Get-Help commandin PowerShell orhelp commandin Command Prompt for detailed help - Try
where commandto find where a command is located
Universal Tips:
- Use Tab completion to avoid typing long paths
- Most shells support command history (up arrow or Ctrl+R)
- Combine commands with pipes (
|) to chain operations - Search online for "[command name] [your OS]" for specific examples