Hello Git!
About This Module
This module introduces version control concepts and Git fundamentals for individual development workflow. You'll learn to track changes, create repositories, and use GitHub for backup and sharing. This foundation prepares you for collaborative programming and professional development practices.
Prework
Read through this module.
If you're on Windows, install git from
https://git-scm.com/downloads.
You probably already did this to use git-bash for the Shell class activity.
MacOS comes pre-installed with git.
From your Home or projects directory in a terminal or cmd, run the command:
git clone https://github.com/cdsds210/simple-repo.git
If it is the first time, it may ask you to login or authenticate.
Ultimately, you want to cache your GitHub credentials locally on your computer. This page gives instructions.
Optionally you can browse through these Git references:
- Git Handbook - Getting Started - Core concepts overview
- Pro Git Chapter 1: Getting Started - Version control basics
- GitHub Hello World Guide - GitHub workflow
- Review: Git Commands Cheat Sheet
Pre-lecture Reflections
Before class, consider these questions:
- Why is version control essential for any programming project?
- How does Git differ from simply making backup copies of files?
- What problems arise when multiple people work on the same code without version control?
- How might Git help you track your learning progress in this course?
- What's the difference between Git (the tool) and GitHub (the service)?
Learning Objectives
By the end of this module, you should be able to:
- Understand why version control is critical for programming
- Configure Git for first-time use
- Create repositories and make meaningful commits
- Connect local repositories to GitHub
- Use the basic Git workflow for individual projects
- Recover from common Git mistakes
You may want to follow along with the git commands in your own environment during the lecture.
Why Version Control Matters
The Problem Without Git:
my_project.rs
my_project_backup.rs
my_project_final.rs
my_project_final_REALLY_FINAL.rs
my_project_broken_trying_to_fix.rs
my_project_working_maybe.rs
The Solution With Git:
git log --oneline
a1b2c3d Fix input validation bug
e4f5g6h Add error handling for file operations
h7i8j9k Implement basic calculator functions
k1l2m3n Initial project setup
Key Benefits:
- Never lose work: Complete history of all changes
- Fearless experimentation: Try new ideas without breaking working code
- Clear progress tracking: See exactly what changed and when
- Professional workflow: Essential skill for any programming job
- Backup and sharing: Store code safely in the cloud
Core Git Concepts
Repository (Repo): A folder tracked by Git, containing your project and its complete history.
Commit: A snapshot of your project at a specific moment, with a message explaining what changed.
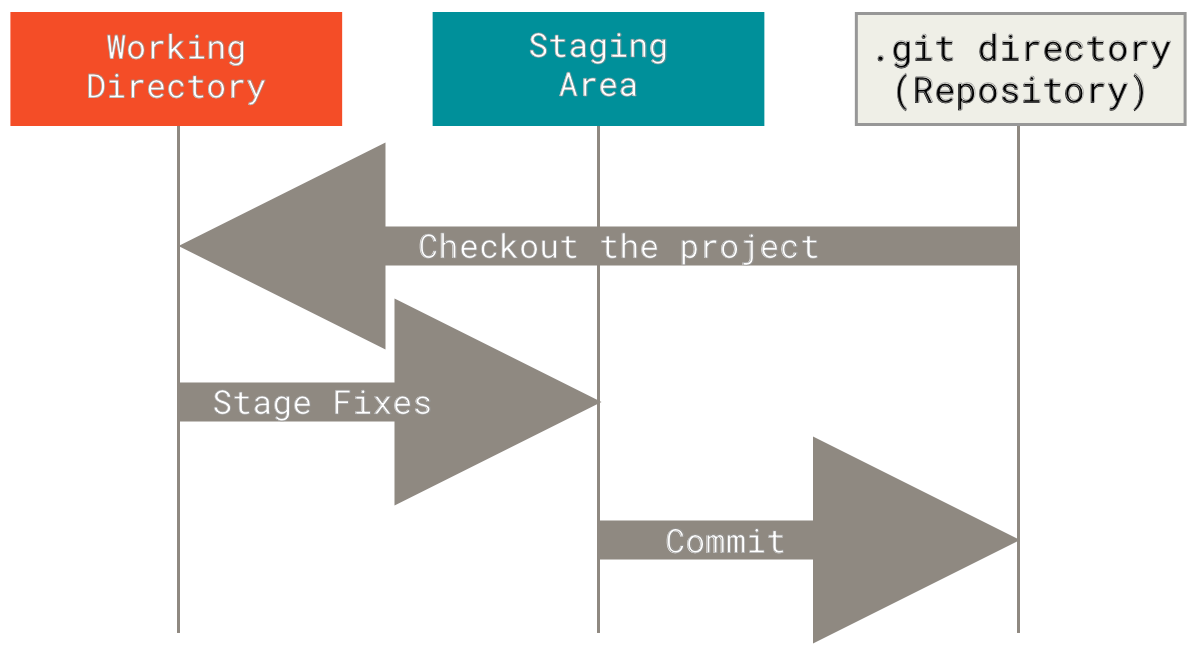
The Three States:
- Working Directory: Files you're currently editing
- Staging Area: Changes prepared for next commit
- Repository: Committed snapshots stored permanently
The Basic Workflow:
Edit files → Stage changes → Commit snapshot
     (add)      (commit)
Push: Uploads your local commits to a remote repository (like GitHub). Takes your local changes and shares them with others.
Local commits → Push → Remote repository
Pull: Downloads commits from a remote repository and merges them into your current branch. Gets the latest changes from others.
Remote repository → Pull → Local repository (updated)
Merge: Combines changes from different branches. Takes commits from one branch and integrates them into another branch.
Feature branch + Main branch → Merge → Combined history
Pull Request (PR): A request to merge your changes into another branch, typically used for code review. You "request" that someone "pull" your changes into the main codebase.
Your branch → Pull Request → Review → Merge into main branch
Git Branching
Lightweight Branching:
Git's key strength is efficient branching and merging:
- Main branch: Usually called
main(ormasterin older repos) - Feature branches: Created for new features or bug fixes

Branching Benefits:
- Isolate experimental work
- Enable parallel development
- Facilitate code review process
- Support different release versions
Essential Git Commands
Here are some more of those useful shell commands!
One-Time Setup
# Configure your identity (use your real name and email)
git config --global user.name "Your Full Name"
git config --global user.email "your.email@example.com"
If you don't want to publish your email in all your commits on GitHub, then highly recommended to get a "no-reply" email address from GitHub. Here are directions.
# Set default branch name
git config --global init.defaultBranch main
Note: The community has moved away from
masteras the default branch name, but it may still be default in some installations.
# Verify configuration
git config --list
Starting a New Project
# Create project directory
mkdir my_rust_project
cd my_rust_project

# Initialize Git repository
git init

# Check status
git status
Daily Git Workflow (without GithHub)
# Create a descriptive branch name for the change you want to make
git checkout -b topic_branch

# Check what's changed
git status                    # See current state
git diff                      # See specific changes

# make edits to, for example filename.rs

# Stage changes for commit
git add filename.rs          # Add specific file
git add .                    # Add all changes in current directory

# Create commit with a comment
git commit -m "Add calculator function"

# View history
git log                      # Full commit history
git log --oneline           # Compact view

# View branches
git branch

# Switch back to main
git checkout main

# Merge topic branch back into main
git merge topic_branch

# Delete the topic branch when finished
git branch -d topic_branch
Writing Good Commit Messages
The Golden Rule: Your commit message should complete this sentence: "If applied, this commit will [your message here]"
Good Examples:
git commit -m "Add input validation for calculator"
git commit -m "Fix division by zero error"
git commit -m "Refactor string parsing for clarity"
git commit -m "Add tests for edge cases"
Bad Examples:
git commit -m "stuff"           # Too vague
git commit -m "fixed it"        # What did you fix?
git commit -m "more changes"    # Not helpful
git commit -m "asdfjkl"        # Meaningless
Commit Message Guidelines:
- Start with a verb: Add, Fix, Update, Remove, Refactor
- Be specific: What exactly did you change?
- Keep it under 50 characters for the first line
- Use present tense: "Add function" not "Added function"
Working with GitHub
Why GitHub?
- Remote backup: Your code is safe in the cloud
- Easy sharing: Share projects with instructors and peers
- Portfolio building: Showcase your work to employers
- Collaboration: Essential for team projects
Connecting to GitHub:
# Create repository on GitHub first (via web interface)
# Then connect your local repository:

git remote add origin https://github.com/yourusername/repository-name.git
git branch -M main
git push -u origin main
Note: The above instructions are provided to you by GitHub when you create an empty repository.
Git Remote Server (GitHub) Related Command
# Check remote connection
git remote -v

# Clone existing repository
git clone https://github.com/username/repository.git
cd repository

# Pull any changes from GitHub
git pull

# Push your commits to GitHub
git push
Daily GitHub Workflow
# Create a descriptive branch name for the change you want to make
git checkout -b topic_branch

# Check what's changed
git status                    # See current state
git diff                      # See specific changes

# make edits to, for example filename.rs

# Stage changes for commit
git add filename.rs          # Add specific file
git add .                    # Add all changes in current directory

# Create commit with a comment
git commit -m "Add calculator function"

# View history
git log                      # Full commit history
git log --oneline           # Compact view

# View branches
git branch

# Run local validation tests on changes

# Push to GitHub
git push origin topic_branch

# Create a Pull Request on GitHub

# Repeat above to make any changes from PR review comments

# When done, merge PR to main on GitHub

git checkout main

git pull

# Delete the topic branch when finished
git branch -d topic_branch
Git for Homework
Recommended Workflow:
# Start new assignment
cd ~/ds210/assignments
mkdir assignment_01
cd assignment_01
git init

# Make initial commit
touch README.md
echo "# Assignment 1" > README.md
git add README.md
git commit -m "Initial project setup for Assignment 1"

# Work and commit frequently
# ... write some code ...
git add src/main.rs
git commit -m "Implement basic data structure"

# ... write more code ...
git add src/main.rs
git commit -m "Add error handling"

# ... add tests ...
git add tests/
git commit -m "Add comprehensive tests"

# Final commit before submission
git add .
git commit -m "Final submission version"
Best Practices for This Course:
- Commit early and often: We expect to see a minimum of 3-5 commits per assignment
- One logical change per commit: Each commit should make sense on its own
- Meaningful progression: Your commit history should tell the story of your solution
- Clean final version: Make sure your final commit has working, clean code
Common Git Scenarios
"I made a mistake in my last commit message"
git commit --amend -m "Corrected commit message"
"I forgot to add a file to my last commit"
git add forgotten_file.rs
git commit --amend --no-edit
"I want to undo changes I haven't committed yet"
git checkout -- filename.rs    # Undo changes to specific file
git reset --hard HEAD          # Undo ALL uncommitted changes (CAREFUL!)
"I want to see what changed in a specific commit"
git show commit_hash           # Show specific commit
git log --patch               # Show all commits with changes
Understanding .gitignore
What NOT to Track: Some files should never be committed to Git:
# Rust build artifacts
/target/
Cargo.lock    # Ignore for libraries, not applications

# IDE files
.vscode/settings.json
.idea/
*.swp

# OS files
.DS_Store
Thumbs.db

# Personal notes
notes.txt
TODO.md
Creating .gitignore:
# Create .gitignore file
touch .gitignore
# Edit with your preferred editor to add patterns above

# Commit the .gitignore file
git add .gitignore
git commit -m "Add .gitignore for Rust project"
Resources for learning more and practicing
- A gamified tutorial for the basics: https://ohmygit.org/
- Interactive online Git tutorial that goes a bit deper: https://learngitbranching.js.org/
- A downloadable app with tutorials and challenges: https://github.com/jlord/git-it-electron
- Another good tutorial (examples in ruby): https://gitimmersion.com/
- Pro Git book (free online): https://git-scm.com/book/en/v2
GitHub Collaboration Challenge
Form teams of three people.
Follow these instructions with your teammates to practice creating a GitHub repository, branching, pull requests (PRs), review, and merging. Work in groups of three—each person will create and review a pull request.
1. Create and clone the repository (≈3 min)
- Choose one teammate to act as the repository lead.
- They should log in to GitHub, click the “+” menu in the upper‑right and select New repository.
- Call the repository "github-class-challenge", optionally add a description, make the visibility public, check “Add a README,” and
- click Create repository.
- Go to Settings/Collaborators and add your teammates as developers with write access.
- Each team member needs a local copy of the repository. On the repo’s main page, click Code, copy the HTTPS URL, open a terminal, navigate to the folder where you want the project, and run:
git clone <repo‑URL>
Cloning creates a full local copy of all files and history.
2. Create your own topic branch (≈2 min)
A topic branch lets you make changes without affecting the default main branch. GitHub recommends using a topic branch when making a pull request.
On your local machine:
git checkout -b <your‑first‑name>-topic
git push -u origin <your‑first‑name>-topic  # creates the branch on GitHub
Pick a branch name based on your first name (for example alex-topic).
3. Add a personal file, commit and push (≈5 min)
-
In your cloned repository (on your topic branch), create a new text file named after yourself—e.g.,
alex.txt. Write a few sentences about yourself (major, hometown, a fun fact). -
Stage and commit the file:
git add alex.txt
git commit -m "Add personal bio"
Good commit messages explain what changed.
-
Push your commit to GitHub:
git push
4. Create a pull request (PR) for your teammates to review (≈3 min)
- On GitHub, click Pull requests → New pull request.
- Set the base branch to
mainand the compare branch to your topic branch. - Provide a clear title (e.g. “Add Alex’s bio”) and a short description of what you added. Creating a pull request lets your collaborators review and discuss your changes before merging them.
- Request reviews from your two teammates.
5. Review your teammates’ pull requests (≈4 min)
- Open each of your teammates’ PRs.
- On the Conversation or Files changed tab, leave at least one constructive comment (ask a question or suggest something you’d like them to add). You can comment on a specific line or leave a general comment.
- Submit your review with the Comment option. Pull request reviews can be comments, approvals, or requests for changes; you’re only commenting at this stage.
6. Address feedback by making another commit (≈3 min)
-
Read the comments on your PR. Edit your text file locally in response to the feedback.
-
Stage, commit, and push the changes:
git add alex.txt
git commit -m "Address feedback"
git push
Any new commits you push will automatically update the open pull request.
-
Reply to the reviewer’s comment in the PR, explaining how you addressed their feedback.
7. Approve and merge pull requests (≈3 min)
- After each PR author has addressed the comments, revisit the PRs you reviewed.
- Click Review changes → Approve to approve the updated PR.
- Once a PR has at least one approval, a teammate other than the author should merge it.
-In the PR, scroll to the bottom and click Merge pull request, then Confirm merge. - Delete the topic branch when prompted; keeping the branch list tidy is good practice.
Each student should merge one of the other students’ PRs so everyone practices.
8. Capture a snapshot for submission (≈3 min)
- One teammate downloads a snapshot of the final repository. On the repo’s main page, click Code → Download ZIP. GitHub generates a snapshot of the current branch or commit.
- Open the Commits page (click the “n commits” link) and take a screenshot showing the commit history.
- Go to Pull requests → Closed, and capture a screenshot showing the three closed PRs and their approval status. You can also use the Activity view to see a detailed history of pushes, merges, and branch changes.
- Upload the ZIP file and screenshots to Gradescope.
Tips
- Use descriptive commit messages and branch names.
- Each commit is a snapshot; keep commits focused on a single change.
- Be polite and constructive in your feedback.
- Delete merged branches to keep your repository clean.
This exercise walks you through the entire GitHub flow—creating a repository, branching, committing, creating a PR, reviewing, addressing feedback, merging, and capturing a snapshot. Completing these steps will help you collaborate effectively on future projects.